DIY Well Pump Repair — Everything You Need To Know

We may receive a commission on purchases made from links.
If your home is one of the more than 43 million in the United States that has a water well, you are pretty much guaranteed to have to address well pump problems at some point. A well pump, like a sump pump, spends its service life submerged in water that may contain sediment, and it works hard, so it would be unrealistic not to expect maintenance issues to arise.
Most of the problems that directly affect a water well pump, such as a broken seal, a worn out impeller, or a stuck foot valve, are beyond a homeowner's ability to repair. They involve pulling the pump out of the ground, and this calls for special equipment and expertise that only a pro has. Minor issues that affect the pump operation and the water supply can occur elsewhere in the plumbing, however, and homeowners can diagnose and repair many of those without calling a plumber. Some of these repairs are very easy.
It's a good idea to familiarize yourself with your well pump water system because you can't fix what you don't understand. Systems differ, but most have more or less the same components. The time you spend doing this won't go to waste, even if the repair at hand turns out to be simple. You'll have more than one opportunity to use it in the future.
Anatomy of a Deep Well Pump System
Anatomy of a Deep Well Pump System
The well on most properties isn't the kind in which you throw coins and make a wish; it's a 4-inch-diameter or larger hole bored in the ground to the depth of the water table, which can be hundreds of feet. When installing a new well, well pump pros drop a plastic casing into the hole along with a submersible pump, which is cylindrical and fits inside the casing at the bottom. The electrical wires that supply power run down through the casing to the pump.
A fitting at the top of the casing connects the casing to the plumbing pipes and separates the parts of the system that need to be fixed by well pump repair services (below the fitting) from those that you can DIY, which are above it. The pipes run to a holding tank, from there to a pressure tank, and finally into the home's water supply network of pipes. In some systems, the holding tank is the pressure tank, and it's pressurized by the well pump. In others, the tanks are separate, and an additional jet pump pressurizes the pressure tank.
A troubleshooting strategy for well pump repair should include these considerations:
- If either pump fails, the house won't get any water, and since each is controlled by a switch, they are the first things to check when troubleshooting low water pressure.
- In a system that employs a separate holding tank, a float inside the tank tells the well pump when to come on; this is another potential culprit.
- Some systems employ a controller with a large capacitor to provide the extra power the well pump needs to switch on, and that capacitor can fail.
- The pressure tank itself may have a ruptured bladder, which makes it unable to develop water pressure.
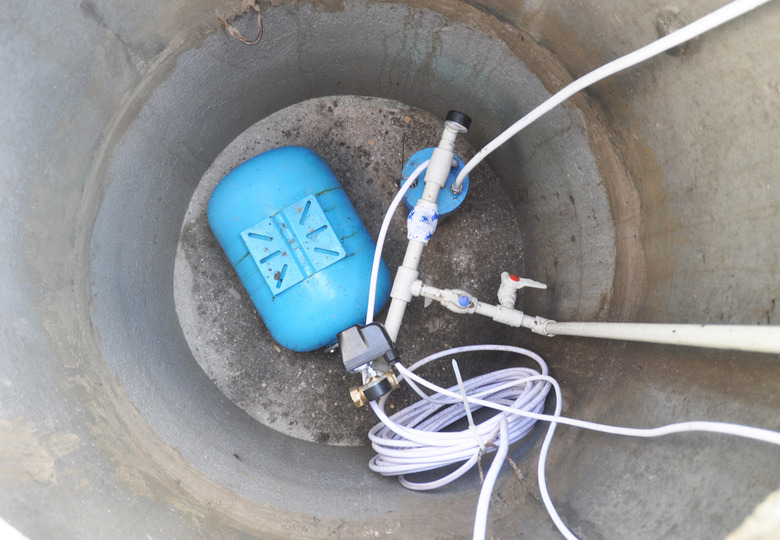 Lex20/iStock/GettyImages
Start With the Pressure Switch
Start With the Pressure Switch
The pressure switch is usually located near the pressure tank, although in systems with external jet pumps, it's usually mounted on the jet pump. It senses the pressure inside the pressure tank and switches on the pressure pump when the water pressure falls below the cut-in value (usually 30 psi). It switches off the pump when the cut-out pressure is reached (usually 50 psi).
If the switch isn't working, the power to it may be off. Check the wall switch (if there is one) and the circuit breaker. You can also check for power by removing the switch cover and testing the terminal voltage with a noncontact voltage tester. You should read 240 volts. When doing this, be careful not to touch the switch terminals with your fingers (or any tool other than the voltage tester) or you'll get a dangerous shock.
If the switch is getting power, the terminals may be pitted or corroded, and there may not be good electrical contact. To check this, sharply tap the pipe just below the switch with a screwdriver handle. If the pump starts running, you need to clean the terminals or replace the switch.
Check the Float Operation
Check the Float Operation
In systems that have both a holding tank and a pressure tank, the holding tank has a float that signals the pump to come on when the water in the tank drops below a preset level. This could be a ballcock float valve much like the one in a toilet tank, or it could be an electrical pressure switch. You should be able to see it when you look through the opening in the top of the tank.
If the water level in the tank is low, it may be because the float is stuck in the closed or off position. If it's a mechanical float valve, try moving it up and down to loosen the valve mechanism and open it. If it's an electrical switch, try tapping it a few times to see if the pump responds and starts filling the tank. If the pump runs when you do either of these tests, replace the ballcock float or the float switch because it will probably get stuck again.
Replace the Controller Capacitor
Replace the Controller Capacitor
Not every water well pump system has a controller, and if yours does, it's usually housed in a rectangular metal box mounted to a wall near your pressure tank. When you unscrew and remove the cover, you'll find a large, cylindrical capacitor inside whose purpose is to supply the extra jolt the pump motor needs to start working. This start capacitor can and does go bad, and when it does, you need to replace it.
You can test the capacitor, but the test isn't always inclusive, and the best way to eliminate it as a possible cause of your well problems is to replace it. Take the entire cover, capacitor and all, to a pump supply outlet and purchase an identical new one. It should cost somewhere from $75 to $125. Note: Capacitors store electricity and can deliver a shock if they are mishandled. For safety, leave the capacitor attached to the cover and do not tamper with it.
The fact that you don't have a controller mounted on the wall doesn't necessarily mean your system doesn't have one. It could be mounted inside the pressure tank. If so and you suspect it to be the problem, you'll need a well pump repair specialist to fix it.
Test the Pressure Tank
Test the Pressure Tank
One of the possible causes of low water pressure is a rupture in the bladder that separates air from water inside the pressure tank. This is known as waterlogging, and it prevents the tank from building pressure. One indication of waterlogging is that the pressure pump runs constantly.
The tank has an air valve, known as a Schrader valve, on the top that's similar to the air valve on an automobile tire. Depress the valve pin with your finger, and if water spurts out, the tank is waterlogged. This means you need a new tank, but you may be able to build pressure in it at least temporarily by pumping air through the valve with a compressor or bicycle pump. This may result in air bubbles coming from your faucets, which is just more proof that the bladder is ruptured, and the tank needs to be replaced.