What Is A Window Cornice? (And How To Make One)
We may receive a commission on purchases made from links.
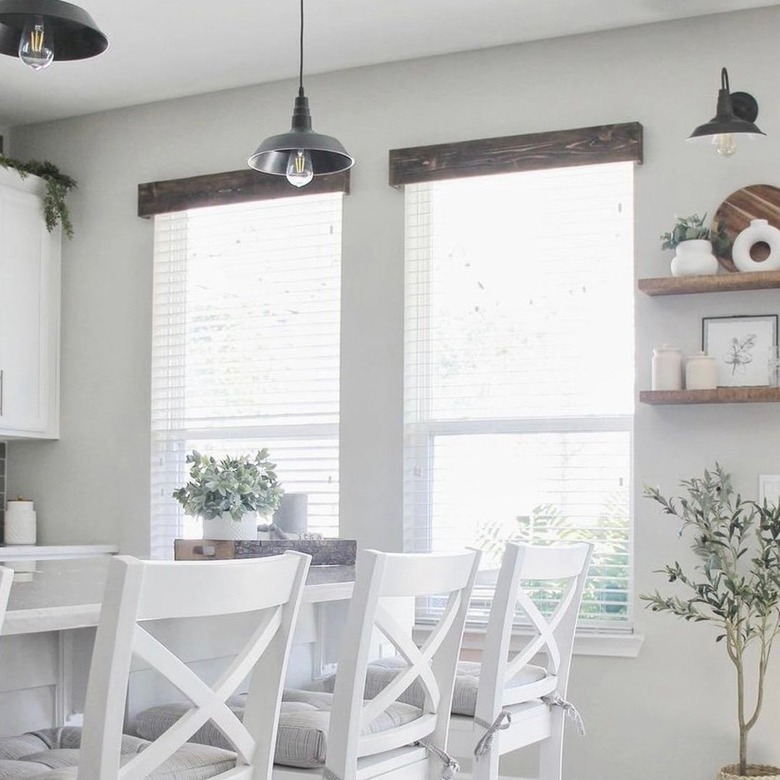
A window cornice can be to a window treatment what a cherry is to a sundae. Cornices serve the practical purpose of covering rods, rings, and other unsightly hardware, but the eye is drawn to them because they enhance the look of windows that could otherwise go unnoticed. Even the most luxurious window-dressing fabrics can seem ordinary without the crowning touch of one of these replicated ancient Greek architectural features.
Tip
An architectural window cornice is an unupholstered, design element normally made from wood that sits at the top of a window frame — primarily to hide window shade and draper hardware. Fabric window valances and padded, fabric-covered pelmets are often somewhat inaccurately referred to as "cornices."
Dealing With Cornice Confusion
Dealing With Cornice Confusion
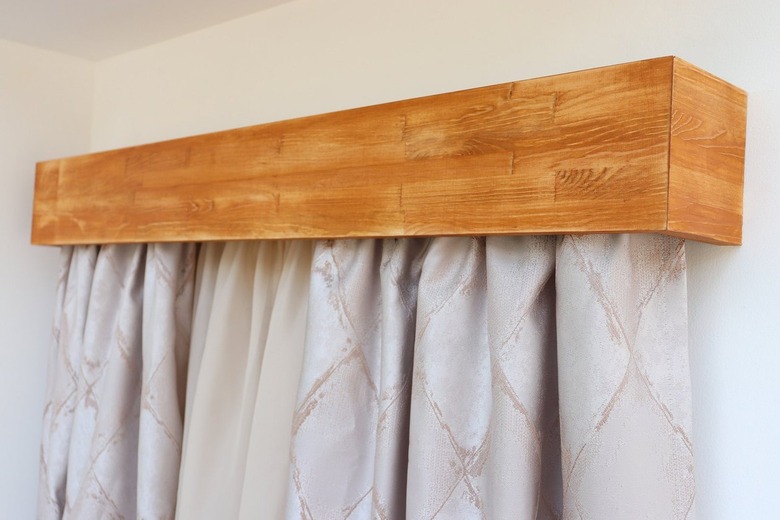
It's easy to be confused by terminology when exploring different window treatments, especially when it comes to the word "cornice." Strictly speaking, a window cornice is a hard topping architectural element made from wood that is stained or painted. Its basic foundation is a three-sided box with an open bottom (and no back piece) and an enclosing top piece that creates what can be used as a display shelf.
Although it can be left unadorned, a true cornice — or what is termed an "architectural cornice" — includes a profiled crown molding projecting from the top of the wall. Crown molding is the horizontal trim often seen where the wall meets the ceiling, and it's also used at the top of classical door and window trim assemblies.
In addition to the crown molding at the top, cornices often include some combination of trim and projections decreasing in size moving toward the bottom. In ancient Greece, cornices made up the top band of the classical Greek architectural entablature, projecting to protect the walls below and serving as magnificently ornamental crowning features. Modern interior decor cornices provide a stylish way to hide window shade or drapery hardware and create a sense of uniformity in a room whose windows vary in size and height.
The confusion is caused by what has become the widely accepted and customary practice within the window-covering industry of applying the word "cornice" to a window-topping feature that for centuries was referred to as a "pelmet." Pelmets are also often made from wood, but they're fabric-covered, frequently padded, and lack the projecting crown molding found in architectural cornices. They most commonly look like three-sided, fabric-covered rectangles wrapping around the window-dressing hardware.
A cornice is also not a valance, which are short panels of fabric that can hang either alone at the top of a window or over a set of curtains or drapery panels for the purpose of decoratively covering the hardware.
Keep Style Continuity in Mind
Keep Style Continuity in Mind
If you're planning to add cornices to your windows, think of continuity, keeping in mind that the style and finish you use for your cornice should work with the interior design of your home. Any existing trim in your house, such as crown molding at the top of a wall or cornices that are already in place above door frames or other windows, should be matched if possible. If there are no preexisting trims in your home that need to be matched or complemented, you're free to choose from endless combinations and designs. Just remember to take the overall style of your interior into consideration.
Planning a DIY Cornice Project
Planning a DIY Cornice Project
There are endless variations when it comes to cornice design. If you can afford to hire a skilled craftsman or if you have skills yourself, you can have the most elaborate ornamentation you can dream up. If, however, you want an architectural detail that doesn't cost much but still looks great, definitely start rounding up your own tools because it's a breeze to put together a basic DIY crown-molding cornice.
The decision to use paint or stain on your cornice can guide the type of wood you use. For a painted cornice, most softwoods will work, including aspen, poplar, basswood, and pine. For a stained or natural-wood cornice, cherry, maple, mahogany, oak, or any other attractive hardwood is best. Just keep in mind that you may need to do a special order to get something other than what is commonly stocked by the home improvement stores.
In addition to the basic cornice box frame and lid, you'll be adding a crown molding to the top with ogee trim just below, running around the edge of the lid piece. At the bottom of the box, you'll add cap trim.
Putting it all together involves taking initial measurements that allow for clearance of the curtains and hardware you're covering, cutting all pieces (the crown molding requires compound miter cuts), assembling the frame and trim pieces with glue and nails, finishing the wood for paint or stain, and mounting the cornice.
If you've never performed miter cuts, especially compound miter cuts, you may want to practice a bit before you get going. These cuts are easily done with a miter saw, but if you're using a simple miter box, be sure to make some practice runs with wood scraps.
Things Needed
-
Stain and finishing product or paint and primer
-
Spray paint for heavily detailed trim
How To Make a Cornice
How To Make a Cornice
1. Measure
for the Cornice
Because the cornice frame box needs to clear the curtains, rod, and finials, it's important to measure all around these elements before beginning the construction of your cornice.
- Measure
the curtains and curtain rod for width, including the finials. Measure the depth of
the top of the curtains, pushing them
open as far as possible so you'll be measuring them when they're bunched up, not
closed and spread out. - Add
1 1/2 inch to each interior measurement to guarantee cornice box clearance.
2. Assemble the Frame
Tip
Don't forget to don protective safety eyeglasses before beginning your work.
- Using a miter box and saw, miter both ends of your front piece at 45 degrees, checking for good joint fit by using mitered scraps. For
each of your two side pieces, do one 45-degree miter cut first followed by a 90-degree cut on the opposite
end that will be next to the wall after mounting. - Join the pieces with wood glue and 1 1/2-inch brads. Use
six evenly spaced brads at each corner — three on each side. - Cut your top piece to fit flush with the top edges of the front and side pieces. Glue the top to the frame and then secure with 1 1/2-inch brads.
- Let the glue dry overnight.
3. Apply Trim Elements
Cut the crown molding to fit along the top of the cornice box using compound miter cuts. If you aren't using a miter saw, cut with the molding upside down and backward on your saw table/miter box setup. Cut ogee (or other) molding to fit under the crown molding if desired. Cut cap molding to run along the bottom edges of the box. Attach the moldings with glue and brads.
4. Do the Finishing Work
Fill all nail holes and gaps in your miters with wood filler. Let the filler dry and then sand all filled spots. If you plan to paint your cornice, first apply a primer and then paint. If you plan to leave the wood natural or apply a stain for color, add the stain first and then apply a clear protective finish, such as polyurethane, following the manufacturer's directions.
5. Mount the Cornice
Mount a cornice with screws into a wall-mounted 1x2. If you've made your cornice out of a heavy hardwood, you may want to have someone help hold it in place while you level and mark a line.
- Lift the cornice into place at the top of your window, making
sure it's centered and at a height that covers your drapery rod and hardware. Use your level to position the cornice and then reach inside the cornice and draw a line across the bottom edge of the lid. - Cut a 1x2 to fit between the drapery rod brackets. Place it
against the wall so your level line runs along the top of the 1x2. The top edge of the 1x2 should be level with the top of each drapery bracket. - Mount the 1x2 with 2 1/2-inch
screws driven into wall studs or the window header for structural backing. If there is no backing at any screw location, install a drywall anchor for the screw. - Position the cornice on top of the 1x2 so it is centered over the drapery rod. Drill 1/8-inch pilot holes through the cornice lid and into the 1x2. Fasten the cornice with 2-inch screws driven through the lid and into the 1x2.
References
- This Old House: How To Build a Window Cornice
- Vogue Window Fashion: Telling the Difference Between Pelmets and Cornices
- William Woods Interior Design: Window Treatments Through the Ages
- High Country Drapery Designs: What Are Window Cornices? Here's Everything You Need to Know
- Britannica: Cornice
- YouTube: Mitchell Dillman – How-to Make Compound Miter Cuts: Home-Shop Tips