How To Remove And Replace Swamp Cooler Pads
We may receive a commission on purchases made from links.
If you have a swamp cooler (instead of an air conditioner) mounted on the roof, the side of your house, or in a window, it's because you live in a dry climate where evaporative cooling is effective. But to keep that cool, humid airflow coming, however, you need to give your swamp cooler regular maintenance, and that includes changing the cooling pads periodically.
The frequency with which you have to change swamp cooler pads depends on two things: the mineral content of the water supply and the general air quality. A homeowner who lives in a rural setting with clean air generally needs to change cooling pads every three to five years, but one who lives in a congested setting where the air quality index is regularly over 100 should change them more often, perhaps once a year. If you're in a wildfire area, smoke can raise the index to 300 or more, and if you don't want to keep breathing that smoke, you should change the pads as soon as the fire is out, and the smoke abates.
Changing swamp cooler pads is an undemanding DIY home improvement job, but it involves some disassembly, and since every swamp cooler model is a little different, you should have your owner's manual handy. You also need to get the right replacement pads, and you may not be able to identify your pads until you do some basic disassembly so you can get a look at them. And, of course, always remember to turn off the power before you remove any part of the cooler housing.
Choosing New Swamp Cooler Pads
Choosing New Swamp Cooler Pads
Some swamp cooler manufacturers design their coolers to accept pads that they sell, so if you have a Bonaire Durango or a MasterCool unit, you should look for Bonaire Durango or MasterCool pads. These are rigid and can be bulky — sometimes having a width of 8 inches — and pads that thick won't fit in coolers that aren't designed for them. These rigid-media, honeycomb pads also come in narrower widths that will fit in most coolers, and although they do last longer than other pads, they are more expensive.
Most coolers will accept nonrigid pads made from aspen or synthetic fibers. Aspen fiber pads are generally considered to be the best, but they are more prone to blockage by the buildup of mineral deposits and mildew contamination, so they have to be changed more often than rigid pads or pads with synthetic fibers, especially if you have hard water.
When you use rigid pads, you have to measure the cavity and buy a pad that fits exactly; with flexible pads, you have more leeway with sizing. Flexible pads often come in rolls, and as long as you purchase a roll with the right width, you can cut pads to length with a utility knife. If that sounds like too much work, there's nothing stopping you from measuring the cavity (or the old pad) with a tape measure and buying new pads that fit exactly.
 Wayfair
Things Needed
How to Change Swamp Cooler Pads
1. Turn Off the Power
You don't want the blower to start running while you have the pads off, or it will circulate warm and possibly dirty air throughout the house, plus you could get a shock. The easiest way to shut off power is to turn off the circuit breaker in the service panel (breaker box) that controls the cooler, but depending on how the cooling system is wired, you may find cords inside the housing that you can unplug. Be sure to unplug the water pump as well as the cooler motor.
2. Turn Off the Water or Prop Up the Float
To prevent the float from automatically refilling the pan while you're working, turn off the water or prop up the float with a piece of wood.
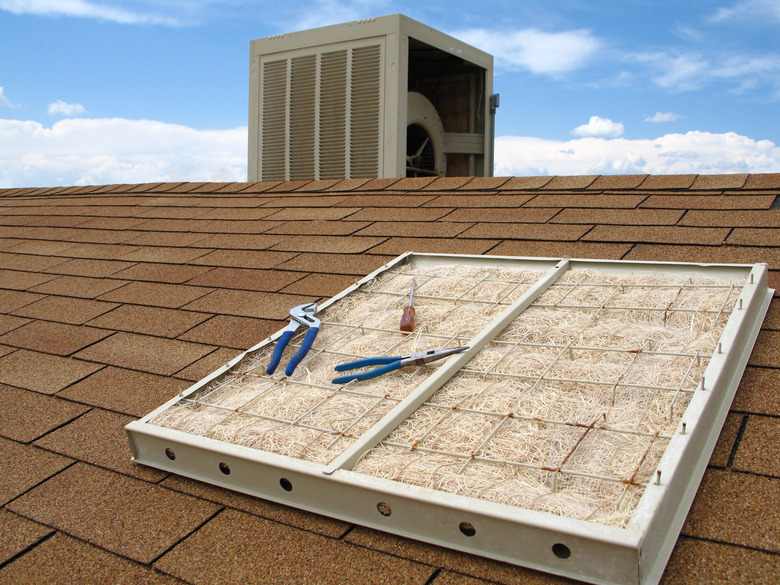
3. Remove the Housing Panels and Cooling Pads
Start by removing the front panel. You may need to use a screwdriver to remove the screws holding the front panel, but many units have turnkeys that you can loosen with your fingers. Lift off the panel and set it aside. After removing the front panel, remove the other panels (if there are any) the same way.
Depending on the model, the cooling pad you need to replace may be attached to the back of the housing panel with a metal grid and retaining bar. This is true for models with flexible pads but not for models with thick, rigid pads. A rigid pad lives in the housing, and to get it out, you also have to remove the top of the housing using a screwdriver if necessary. Once you've removed the top, you can lift out the pad.
4. Separate the Pads From the Panels
If your unit uses flexible aspen or synthetic pads, they will be secured to the back of the panels with a metal grid. Remove the grid by unscrewing the tie bar holding it in place and lifting it off. You can then lift the old pads straight off the panels. While the pads are off, it's a good idea to clean the louvers on the panel with a garden hose to promote good evaporation and a ready supply of cool air indoors.
5. Install the New Pads
Measure the dimensions of the old pads with a tape measure and prepare new ones with the same dimensions. If you bought the pad material in rolls, cut each replacement pad to length with a utility knife. If you're replacing rigid pads, it's best to purchase new ones with exactly the same dimensions as the old ones. You can cut rigid pads, but it's a messy job.
With flexible pads, set each new pad in place on the panel and reinstall the grid and tie bar. Reinstall the panels into the housing and secure them with the provided fasteners. If you're installing a rigid pad, drop it into place in the front of the housing and reinstall the top panel. Leave off the front panel until you've tested the system.
6. Turn on the Power and the Water
Restore power to the cooler by turning on the circuit breaker or plugging in the fan and water pump as applicable. Turn the water back on and/or remove anything from the drain pan you used to prop up the float. Watch the water fill the drain pan and make sure the float switches it off. Turn on the water pump and blower and make sure everything is working the way it should. Then, reinstall the front panel.
Cleaning Is Part of Cooler Maintenance
Cleaning Is Part of Cooler Maintenance
Removing the panels and cooler pads from your swamp cooler gives you an opportunity to clean the drain pan, which is just as important as replacing the pads. The water in the pan frequently becomes discolored by rust and mold, and you don't want that water circulating through your brand-new pads.
To clean the pan, open the drain plug, let out all the water, and scrub down the pan with soap and water. If you see rust or corrosion on the pan, scrape off loose material with a wire brush and patch any holes with epoxy putty. If the pan is extremely moldy, wash it with a 10 percent bleach solution. Also clean the tubing that distributes water through the pads. Fill the pan with a 50-50 vinegar solution, turn on the water pump, and let it circulate the solution for several minutes. It's a good idea to deodorize after you do this.
Before you replace the pads, check the tension on the fan belt and clean the blower blades with soap and water. These simple maintenance tasks may save you an expensive visit from an HVAC technician.