How To Clean A Dryer Vent
We may receive a commission on purchases made from links.
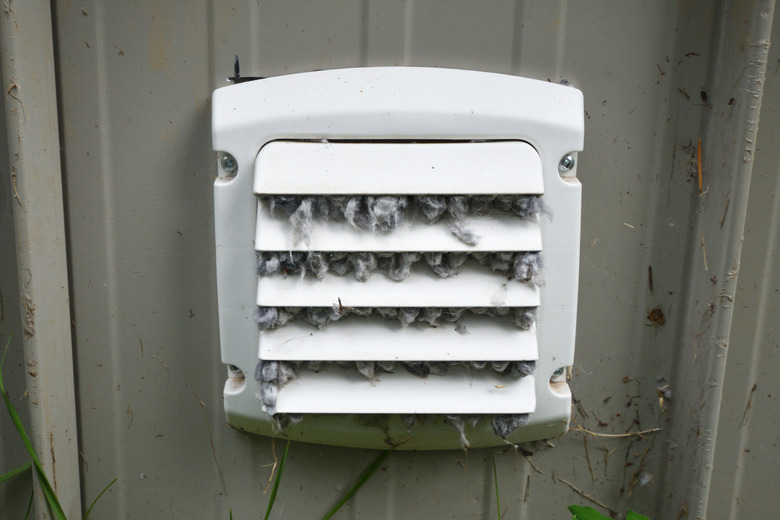
Even if you clean your lint trap religiously between dryer loads, some of the lint your dryer produces will inevitably end up in your dryer vent. Given the extreme flammability of lint buildup, this leads to big problems. Between 2010 and 2014, fire departments in the United States responded to an average of 15,970 house fires a year involving washers and dryers. Of those, 92 percent were due to clothes dryers, according to the National Fire Protection Association. These stats make it clear why you need to periodically clean your dryer vents. Luckily, this is an easy DIY home improvement project you can tackle in less than hour or so.
When to Clean the Dryer Vent
When to Clean the Dryer Vent
Cleaning your dryer vent is a fairly simple task that you should perform at least once a year. If you have a large family or do lots of laundry, however, you may want to do it two or three times a year to prevent dryer fires (and to keep your dryer running more efficiently). No matter how often you perform this task, it's a good idea to keep an eye on your dryer between planned cleanings.
Your dryer will usually let you know when you have a problem. If you find that your drying times are getting lengthier, it is time to clean your dryer vent. The same is true if you notice the outside of your dryer getting hotter than usual when it's running.
If you see these signs of trouble in the laundry room, don't hesitate — you could very well be preventing a fire hazard. You can purchase a vent cleaning kit from your local hardware store to make your task super easy, so there's no good reason to procrastinate. These kits are simple and consist of a wire brush on a long pole that you can run through the vent. Often, kit brushes will attach to a drill for even speedier cleaning.
Things Needed
-
Drill (optional)
-
90-degree aluminum elbow (optional)
-
Semirigid dryer duct (optional)
How to Clean a Dryer Vent
1. Prepare the Dryer
Theoretically, you won't be dealing with electrical wires or gas piping while cleaning your dryer. Still, it's better to play it safe and cut both electrical power and gas delivery to the appliance while you're working on getting a clean dryer vent.. Once you've done that, you'll need to get the dryer ready to move.
- Pull out the dryer about a foot away from the wall. This will make it easier to find and reach the power cord and gas line. Don't move the dryer too far; until you unhook the dryer vent or gas line, you're limited on how far you can go.
- Find and unplug the dryer's power cord — if you have an electric dryer, the power cord for which you're looking is a large one designed to fit a 240-volt outlet. A gas dryer will have a regular plug in a normal 120-volt outlet.
- Turn off the gas to your dryer if applicable. Do this by turning the shutoff valve on the gas line behind the dryer. If installed properly, the shutoff lever will sit perpendicular to the gas line when it is off.
- Remove the vent pipe from the back of the dryer. This pipe is often made of flexible tubing and is usually secured with a hose clamp. Simply turn the screw on the clamp to loosen the clamp and free the vent. If you have an electric dryer, you can now move it as far away from the wall as you like so you can easily work behind it. If you have a gas dryer, carefully pull out the dryer as far as you can without stressing the gas line.
- Remove the other end of the flexible dryer hose from the wall vent. Like the dryer end, this end of the hose will be held in place with a clamp. You'll either need to unscrew the clamp to loosen it or push together the two metal tabs on the clamp depending on the style you have.
2. Vacuum the Dryer and Dryer Vent
Now you're ready to start the actual cleaning process, which is really the easiest part of the job. If you have a short path from your dryer to the outside, you may even be able to clear away all the lint by vacuuming out both ends.
- Clear away the lint from the vent outlet on the back of the dryer. If possible, reach into the vent with your hand and scoop out as much lint as you can. Then, use the hose attachment on your vacuum to remove any lint you missed.
- Turn your attention to the flexible dryer hose next, scooping and vacuuming the lint from it.
- Repeat the hand removal and vacuuming process on the vent pipe that leads to the outside wall. When you've removed as much lint as you can from the inside, take your vacuum outside, remove the dryer vent cover and vacuum out the vent again.
 JodiJacobson/iStock/GettyImages
3. Use Your Dryer Vent Cleaning Kit
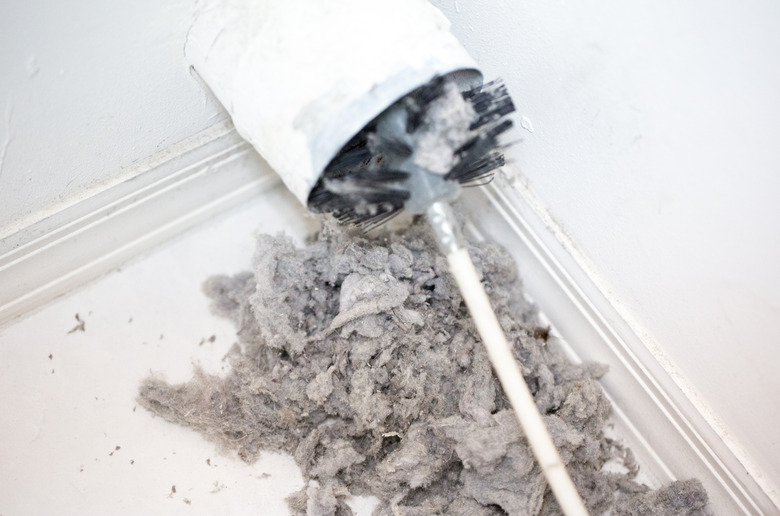
Long or clogged dryer vents require an additional cleaning step. This is where your dryer lint brush kit shines. Although simple, a kit consisting of long, flexible wire brushes is the perfect tool for the job. You can attach the wire brush in your kit to a drill, but this isn't strictly necessary. It's possible to feed the brush into the vent by hand, twisting and turning it as you go to remove lint.
Some kits contain a plastic vacuum adapter. This attachment is placed on the end of your dryer vent and includes two openings: one for the cleaning brush and another for a vacuum cleaner hose. If desired, you can attach your vacuum to the adapter and vacuum away any lint as it comes out of the dryer vent with the cleaning brush.
- Grab the vent brush from your cleaning kit and feed it into the dryer duct, leaving a few inches out.
- Set your drill clutch to the middle setting and attach the end of your cleaning brush to it. Adjust your drill so that it spins clockwise.
- Turn on the drill and let it run as you push the vent cleaning brush in and out of the dryer vent. Pull the brush in and out manually as you clean; do not reverse the drill to remove the brush. Keep working until the brush slides in and out easily and you don't feel it hitting any clogs.
- Remove the drill and add another length of rod to your vent cleaning brush. Screw the rod sections together tightly and then wrap the joint in electrical tape as a precaution. You don't want the rods coming apart inside your dryer vent.
- Attach the new piece of rod to your drill and repeat the cleaning process until you have cleaned the entire length of your vent.
4. Clear Away the Rest of the Lint
Dryer lint gets everywhere, and it can really pile up behind your dryer. Now that you've run the vacuum and a brush in and out of your dryer vent, you likely have a pretty big mess on the floor beneath it. Now is the perfect time to remove all of this flammable lint and dust. After all, you want to start with a clean slate after you clear your vent, and you don't want the dryer to suck any of this lint into your newly cleaned vent.
- Remove any lint that's hanging on the back of the dryer with your vacuum cleaner or a small brush.
- Repeat the process on the wall behind your dryer, removing all the lint that's hanging there.
- Sweep or vacuum the floor behind the dryer, picking up any lint that remains before you put the dryer back in place.
5. Move the Dryer Back Into Position
When the cleaning is done, it's time to hook up your dryer. Before you do, however, take a moment to consider an upgrade. Although commonly used, flexible dryer vent tubing made from foil or vinyl is much less desirable than aluminum venting. If possible, replace the flexible part of your dryer vent with a fire-resistant, 90-degree aluminum elbow or a semirigid dryer vent duct. Make sure your new duct is UL-approved for fire safety.
- Reattach the flexible transition tubing to the outside vent.
- Push the dryer back into place, getting it close to the wall but leaving yourself enough room to reach behind it.
- Reconnect the vent to the dryer, once again securing it with the hose clamp you removed earlier. Plug in the dryer.
- Open the shutoff valve on the gas line as applicable.
- Slide the dryer the rest of the way until it's back in the desired position for use.
- Reinstall the exterior vent cover outside.