How To Start A Lawn Sprinkler System In Spring

We may receive a commission on purchases made from links.
Every spring, I save over $100 by turning on my sprinkler system myself. In this article, I'll teach you how to turn on sprinkler system so you can do the same.
Turning on your sprinklers in spring is a lot easier than blowing out sprinkler systems in winter. In spring, you're essentially just turning the water on and running the sprinklers to blow out all the air. In winter you have to use compressed air to blow out all of the water from the system, and this requires a mighty big compressor and some special knowhow (personally, I don't think it's worth the trouble to do it yourself).
Here's how to turn on sprinkler systems in spring. Not all systems have the same parts and configurations, but the basic procedure is the same. The step-by-step instructions below walk you through the process and can serve as a checklist so you don't miss anything. Also be sure to check out the video below, which shows how easy this is and includes some tips for success.
Things Needed
-
Flat screwdriver
-
Flashlight
-
Pliers
-
Notepad and pen (optional)
How to Turn On a Sprinkler System
1. Make Sure the System is Off
Locate the system controller, or timer, and make sure it is set to the OFF position. It should still be turned off from when it was winterized, but it's good to double-check now to confirm.
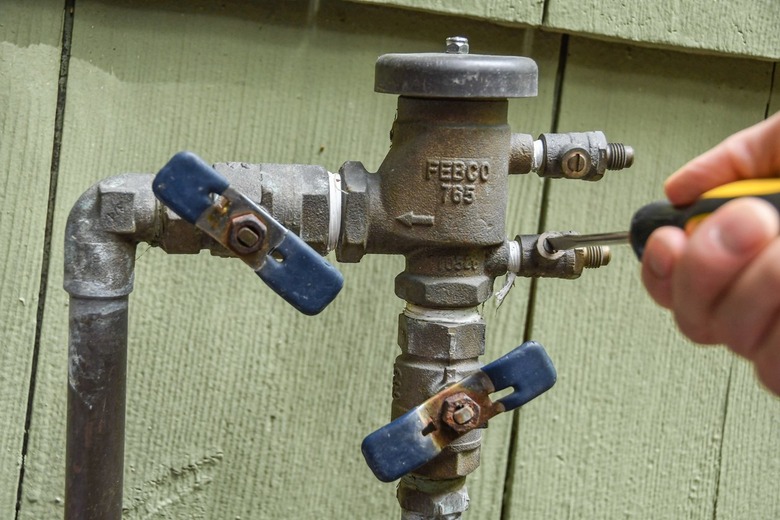
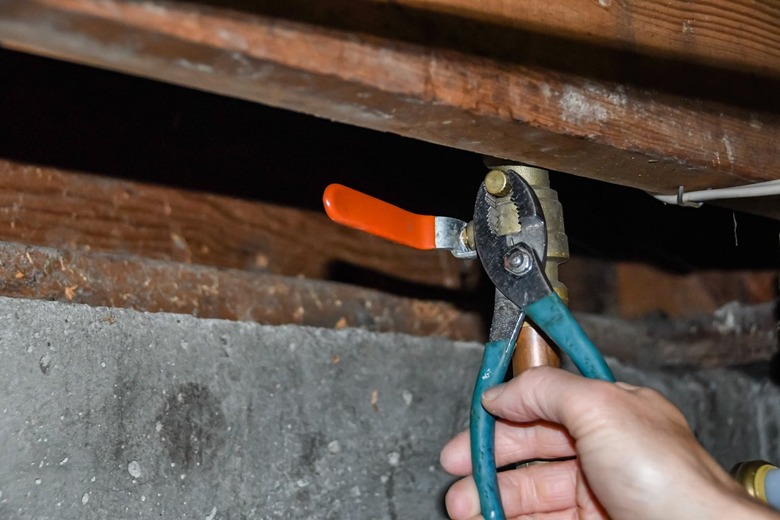
2. Close the Backflow Preventer Test Valves
 Leigh Schmidt for Hunker
Locate the sprinkler system backflow preventer. This is usually just outside an exterior house wall and close to the main system shutoff valve. Use a small flat screwdriver to turn the two test valves so their slots, which are similar to valve handles, are perpendicular to the pipe — the direction of the flow of water.
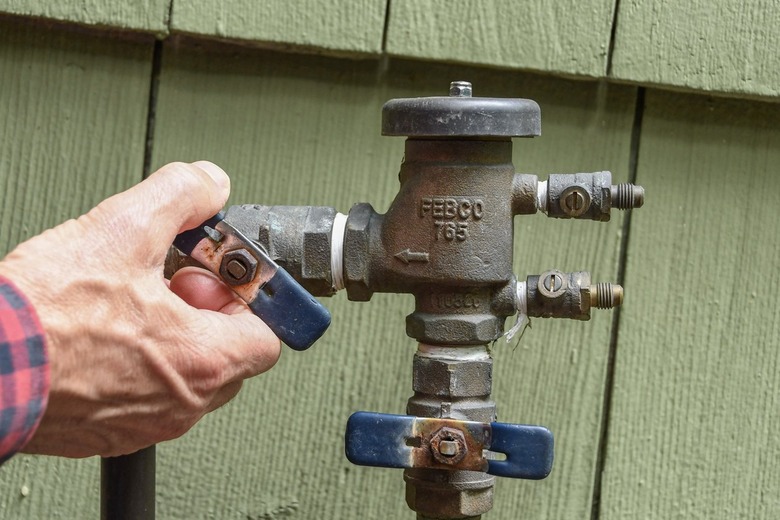
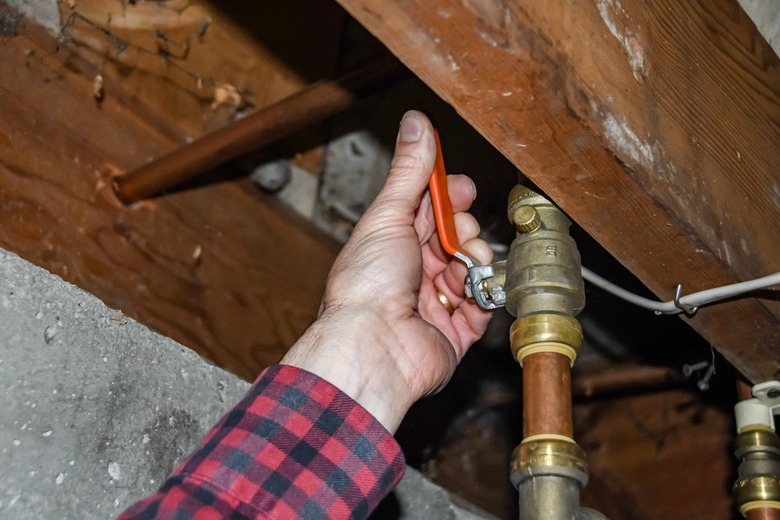
3. Close the Backflow Preventer Flow Valves
 Leigh Schmidt for Hunker
Close the two flow valves on the backflow preventer by turning each valve handle so it is perpendicular to the pipe, or the direction of water flow. The lower valve controls water coming into the vacuum breaker; the upper valve control water flow out of the vacuum breaker. You may have to turn the handle back and forth just a bit to loosen it up after the winter.
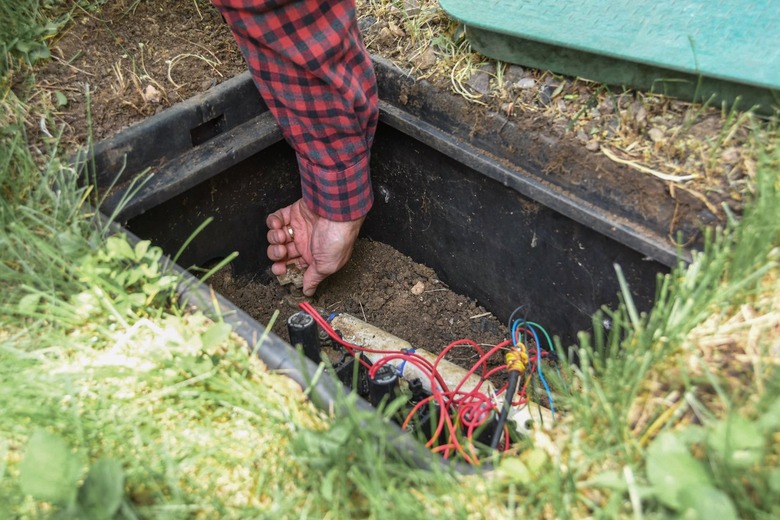
4. Close the Drain Valves
 Leigh Schmidt for Hunker
Open each sprinkler valve box (the in-ground boxes with the green plastic lids, in most systems) and look for a drain valve at one end of the valve manifold (the pipe with the valves attached). Make sure the drain valve is closed by turning it clockwise until it is closed — snug but not too tight.
5. Locate and Check the Main Valve
 Leigh Schmidt for Hunker
Find the sprinkler system shut off valve, or main supply valve. It may be located in a basement, crawlspace, or garage. If you live in a warm climate, it might be outdoors. Some sprinkler systems have their main valve inside an in-ground box or meter well; these may have hand-operated valves or they may call for a valve key.
Inspect the valve body to look for a bleeder cap, a small metal cap that threads onto a nipple on the valve body. If there is one, it was likely loosened or removed during winterizing to make sure all water was drained from the system. Tighten the bleeder cap gently with pliers to make sure it is snug; be careful not to overtighten it or you can damage the gasket inside the cap.
6. Turn On the Water
 Leigh Schmidt for Hunker
Turn on the water to the system by slowly opening the main shutoff valve. It's important to do this slowly so you don't blast the pipes and valves with a sudden rush of water and air pressure, which is hard on the parts. You'll hear a rush of water at first, then the pipes will be quiet, indicating that the pipes are full.
With a ball valve like the one shown here, open the valve by moving the handle until it is parallel to the pipe; it takes just a quarter-turn. If the valve has a round or cross-shaped handle, turn the handle counterclockwise until it stops.
Tip
If you can hear water running in the pipe after the valve is fully open, there might be a sprinkler valve open somewhere, or there could be a leak in the system.
7. Open the Backflow Preventer Flow Valves
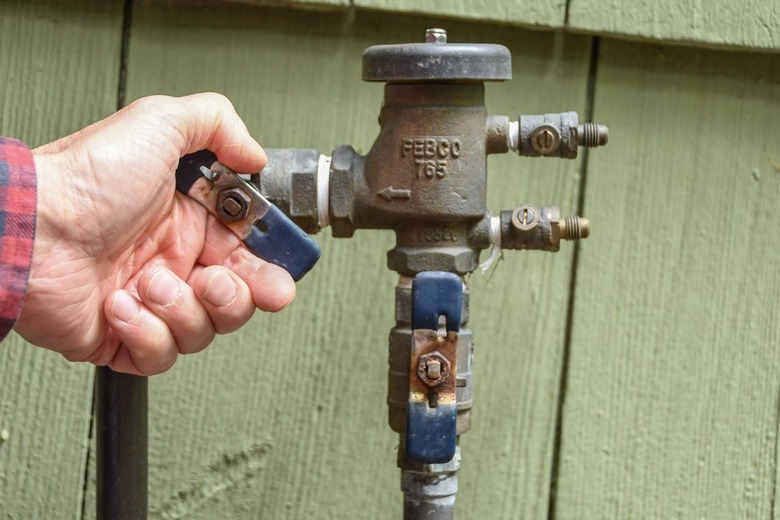 Leigh Schmidt for Hunker
Return to the backflow preventer and open the two flow valves — as with the main shut off valve, open these slowly to prevent a shock to the system. Turn the valve handles so they are parallel with the pipe. Open the lower valve (before the vacuum breaker) first, then open the upper valve (after the vacuum breaker).
Do not open the test valves — the ones you turned off with the screwdriver. These will stay closed until the system is blown out before winter.
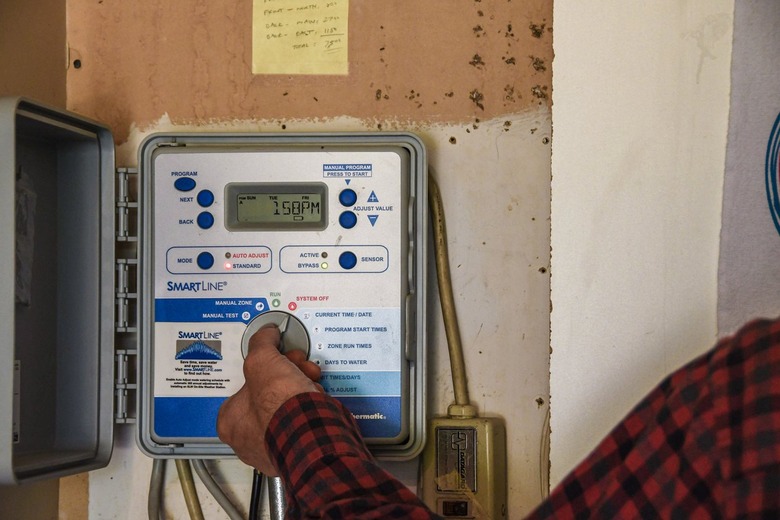
8. Set the Controller for Manual Test
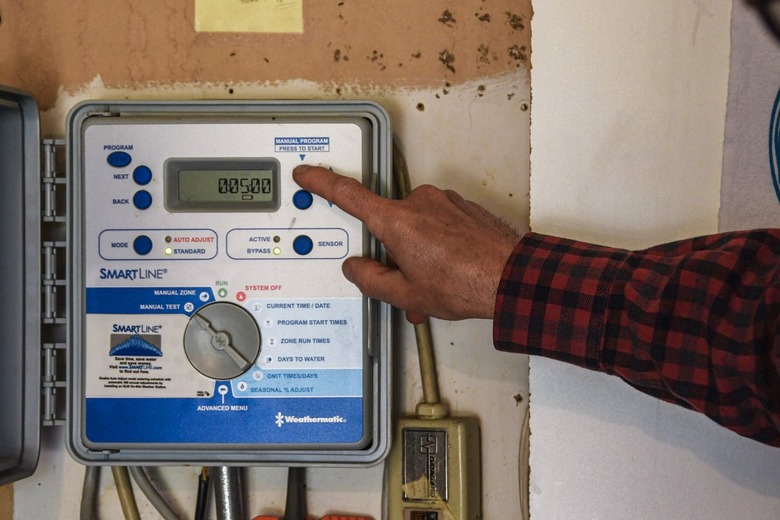 Leigh Schmidt for Hunker
Set the system controller to run a manual test of all the sprinkler zones. If your controller has a "manual test" function, you can set it to cycle through all the zones automatically; otherwise, set it to test each zone individually. You need to run each zone for a few minutes, typically three to five, to let all of air come out and make sure the heads are flowing properly. Set the controller to "run" to start the test cycle or zone.
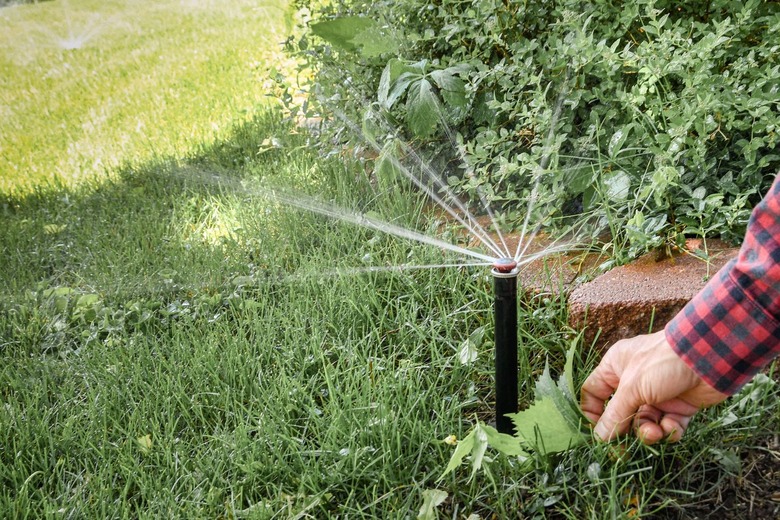
9. Check the Sprinklers
 Leigh Schmidt for Hunker
Inspect the sprinklers of each zone during the manual test. The sprinkler heads will do nothing at first, then they'll gurgle for a bit, then they'll loudly spit water and air, and finally they'll spray smoothly with water only.
Watch the spray of each head to make sure the spray strength and pattern are correct. If any sprinkler pattern or arc is off and needs adjusting, you can adjust it now or make note of the problem and fix it later.
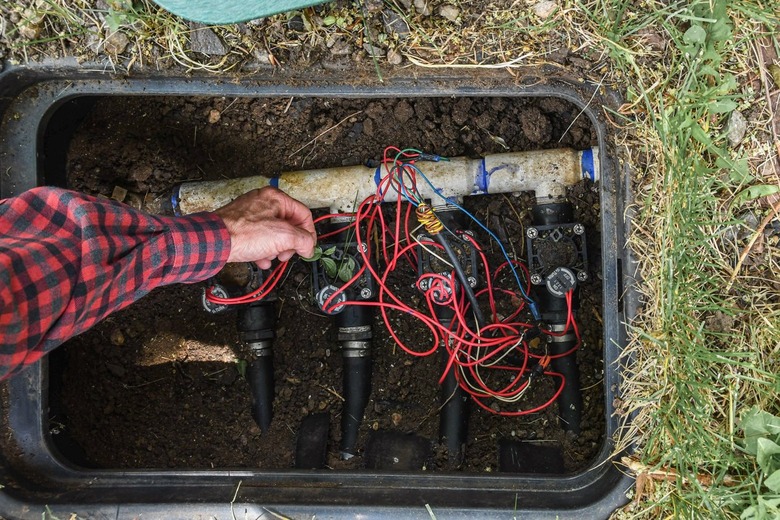
10. Check the Valves
 Leigh Schmidt for Hunker
Inspect the valves in each ground box to make sure that there are no leaks and the valves are free of dirt and debris. Also do a quick final check of the backflow preventer and the sprinkler system shut off valve to make sure all is well.
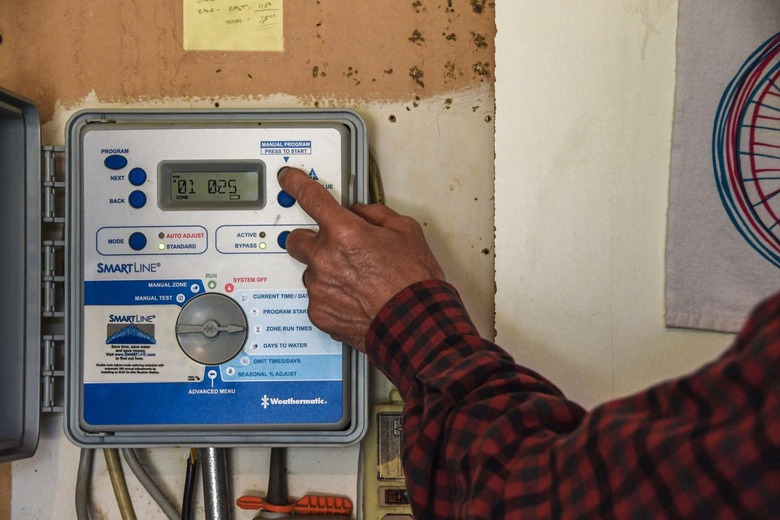
11. Set the Sprinkler Schedule
 Leigh Schmidt for Hunker
Set the desired watering schedule on the control panel, then turn the dial to "run" to activate the system schedule. The controller most likely has saved your schedule from the last watering season, but it's a good idea review the zone run times to make sure it's optimized for the current season.
Tip
When first starting the timer, you can set up the watering times for when you can observe the sprinklers running, such as in the morning or early evening, so you can watch for problems. After a couple of cycles, you can set it for whatever time is most convenient and water-saving.
When to Call a Professional
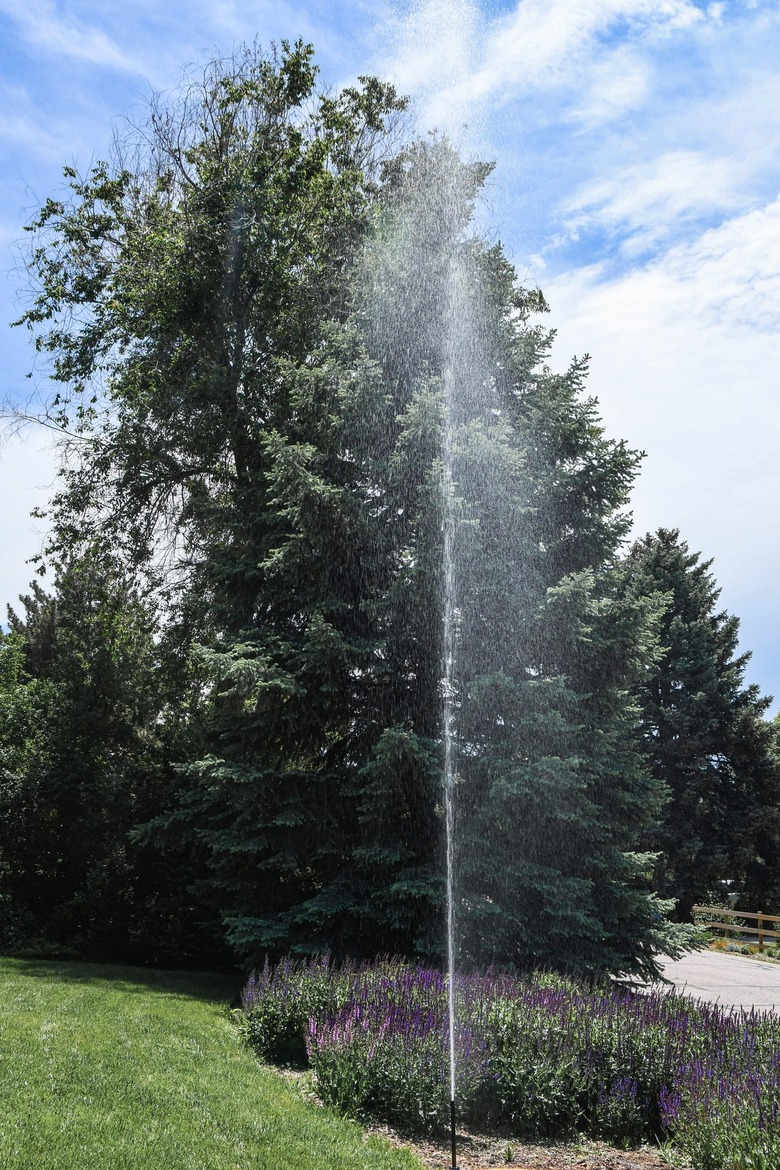
When to Call a Professional
Thar she blows! Most sprinkler start-ups go off without a hitch, but it's also a common time for minor problems to arise. Here we see a sprinkler head that's missing a nozzle, creating a pretty impressive geyser in my front yard. This problem is actually an easy fix — just needs a new nozzle that screws in place — but some issues are more complex and may need a professional's expertise:
- Low pressure or heads failing to come up in specific zones, often caused by underground pipe leaks or tree or shrub roots squeezing the pipe
- Electrical problems related to damaged wiring
- Faulty controller or controller motherboard
- Problems with pumps, for systems that have them
- Poor water pressure or inadequate coverage
- Help to find buried sprinkler heads
Also, unless you're equipped with a large shop air compressor or, preferably, a continuous duty professional-grade compressor, it's best to call a pro for blowing out sprinkler systems in the fall. A pro will ensure there's no water left in the system, which can wreak havoc on various sprinkler system parts if it freezes over the winter, making for an especially interesting start-up spring.
Sprinkler System FAQs
How Long to Run Sprinklers?
Well designed sprinkler systems usually save water compared to manual watering, but unless you're fine-tuning your watering for each season, it's easy waste a lot of water or, conversely, to under-water your lawn. Lawns are made up of grass plants, and as with all plants, the people who know how to grow them best are sources in your local climate. The nearest university extension service, your water utility provider, and local gardening and landscaping pros all are good sources for learning how much to water you lawn — and when.
How Do I Know If My Sprinkler Valve is Open?
An in ground lawn sprinkler system has two main types of valves: shutoff valves and irrigation valves. There's a main sprinkler shut off valve that turns the water supply on an off for the entire system.The backflow preventer (vacuum breaker) also has two shut off valves. All three of these valves are open when the valve handle is parallel to the pipe, or the direction of water flow (with a round or cross-shaped handle, the valve is open when the handle is turned all the way counterclockwise, just like a hose bib faucet).
Irrigation valves, or zone valves, are the ones inside the in-ground valve boxes; there's a valve for each zone. These are normally opened and closed automatically by the controller, but you can also open them manually to troubleshoot problems. To open a zone valve, grasp the top of the valve (usually a cylinder with wires attached to it) and turn it counterclockwise, typically about a half-turn. When it's open you'll hear water flow, and the sprinklers will run on that zone. Turn the valve clockwise to close the valve.
How Do I Manually Turn On My Sprinkler System?
You can turn on any zone in your sprinkler system manually by using the "manual zone" or "manual test" function on the sprinkler system's controller, or timer. Turn the controller dial to the desired manual function, then select the zone you want to run (if using the manual zone function), enter the amount of time you want the zone to run, and set the dial to "start." The manual zone function runs one zone at a time; a manual test runs through each zone automatically for the amount of time entered.