How To Grow Rutabagas
We may receive a commission on purchases made from links.
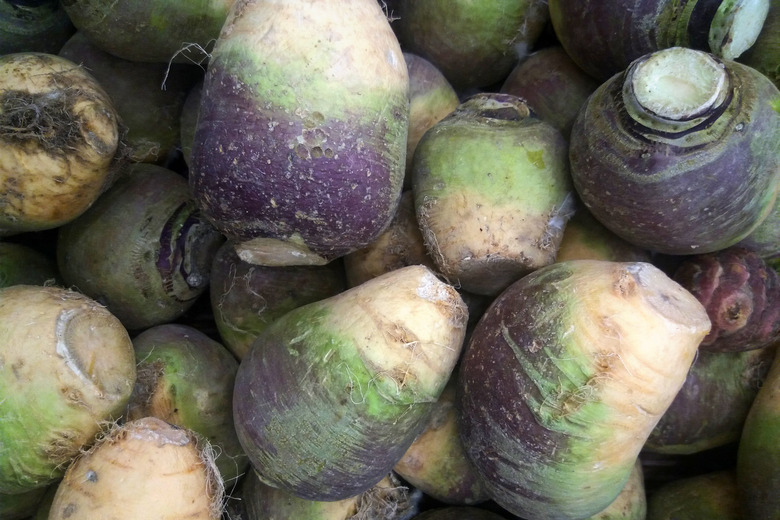
Although no one is quite sure exactly when or how, at some point in history, turnips (Brassica rapa [Rapifera Group]) and cabbages (Brassica oleracea [Capitata Group]) got together and created the rutabaga (Brassica napus [Napobrassica Group]). This yellow-fleshed root vegetable certainly grows like a turnip, but it is not white like a turnip, and it tastes much sweeter. You can further improve the sweet flavor of rutabaga by leaving it in the ground until after a frost or two. It will not survive a hard freeze, but this cool-season vegetable can survive frosts with ease.
Best Uses for Rutabaga
Best Uses for Rutabaga
Rutabaga is not a flashy plant, but it is a tasty one. It adds no pizzazz to a vegetable garden, but it brings plenty to the kitchen. The sweet and strong tang of rutabaga works well when the vegetable is fried, roasted, sauteed or mashed.
Some home cooks mix in rutabaga with their mashed potatoes for a more flavorful dish. In fact, if you can do it with a potato, you can likely do it with a rutabaga too. Diabetics often enjoy rutabagas as a potato substitute since they have a lower glycemic index and are less likely to raise blood-sugar levels.
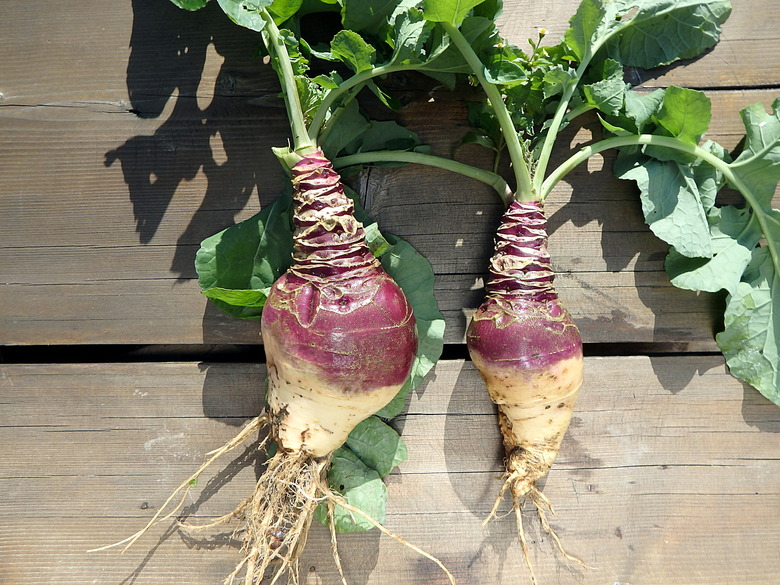
Most gardeners are after the roots of the rutabaga plant, but the greens are edible too. You can trim them from the plant and add them to a salad or serve them as cooked greens. However you eat them, rutabagas are highly nutritious. They contain large amounts of potassium, magnesium, calcium, iron, vitamin C and zinc. They are also a good source of protein, with each root providing 8 percent of your daily protein needs.
Starting Rutabaga From Seed
Starting Rutabaga From Seed
- Before planting, work some compost into the soil, and use only half as much fertilizer as the product label suggests. (Too much nitrogen interferes with the plant's bulb production, so take a less-is-more approach to fertilizer.)
- Use half the recommended amount now and then apply the
other half a few weeks later after thinning the plants. - Sow rutabaga seeds 1/2 inch deep and space
the seeds 2 inches apart. - Water them gently after planting.
- Expect your seedlings to appear four to seven days after planting.
- Thin your rutabaga seedlings so
they are at least 8 inches apart. Crowded plants grow skinny roots and
make for a disappointing harvest. - After thinning, sprinkle some borax powder around the plants and water it in, if a soil test indicates a boron deficiency. Rutabagas need boron, and they
do not perform well when the soil is deficient, particularly sandy soils.
Rutabagas sometime object to being transplanted, but you may have no choice but to start your seeds inside and transplant the seedlings later. This cool-weather crop takes 90 to 120 days to mature, and they need to be harvested before the first killing frost. This may put your planting time smack in the middle of summer.
If the temperatures exceed 80 degrees Fahrenheit at planting time, start seeds indoors rather than outside so they don't bolt (go to seed). When you are starting seeds inside, push your expected harvest date back two weeks. Transplanted rutabagas take time to recover.
When moving your seedlings outside, dig up the root carefully and snip off the long, thread-like root hanging from the bottom of the plant. Plant the seedlings, sprinkle some borax around them and then water them. Mulch around your seedlings to keep weeds down and to hold water in the soil. Your tender transplants will need growing conditions that are as close to perfect as you can provide.
In What Zone Do Rutabagas Grow?
In What Zone Do Rutabagas Grow?
Technically a biennial (a plant with a two-year life cycle), rutabagas grow as annual plants throughout USDA hardiness zone 3 to 9. Most get planted in the summer to provide a fall crop, but they do not like temperatures above 85 degrees. If you live in the South, you can plant in spring (around March) or late summer (around August) for a fall harvest. Your plants are safe until the first hard frost.
When they are exposed to high temperatures during maturity, rutabagas develop a bitter and woody root, so plan plantings accordingly.
When Should You Plant Rutabaga?
When Should You Plant
Rutabaga?
Rutabaga is a cool-season plant, and like other cool-season vegetables, many gardeners say they taste better after one or two frosts. As a general rule, you should plant rutabagas about 90 days before the first anticipated fall frost. If you live in an area where the ground does not freeze, you can grow rutabaga as a winter crop.
Some gardeners who live in warmer regions like to plant a rutabaga crop early in the spring. These gardeners plant as soon as the ground is workable and aim to harvest their rutabagas before the warmth of summer kicks in. This method can and does sometimes work, but it takes only one early warm spell to negatively alter the rutabagas' taste. Proceed with caution if you are hoping for an early spring crop.
Soil, Sunlight and Water Recommendations for Rutabaga
Soil, Sunlight and Water
Recommendations for Rutabaga
Rutabagas need full sun and loamy soil to grow best. Dense soils are difficult for rutabaga roots to push through and may result in smaller vegetables at harvest time. Mixing in some organic matter, such as compost or peat moss, will help loosen compacted soil and will make it easier for rutabagas to thrive.
The ideal soil for rutabagas is a neutral to slightly acidic 5.5 to 7.0 pH range. If your soil is too acidic, mix in some lime to pull up the pH a bit.
Rutabagas do not tolerate dry soil well, so make sure your plants get about 1 1/2 inches per week. Too little water will change the rutabaga's flavor, so keep the soil evenly moist at all times. A drip irrigation system is an excellent way to do this. You do not want to drown your plants, but the general rule of thumb for rutabagas says if you are in doubt, water them.
How to Winterize Rutabaga
How to Winterize Rutabaga
A rutabaga plant will produce one bulb during its lifetime and then go to seed. It is impossible to stop this natural process, so you won't be harvesting the same rutabagas year after year. You can, however, leave them in the ground over the winter if you live in a warm climate, and dig up a few as you need them.
Storing rutabagas in the ground over the winter only works if the ground does not freeze. To prevent freezing, cover your rutabagas with a thick layer of mulch or straw. Make the covering 10 to 12 inches thick so that it provides adequate insulation. Don't just mulch over and around your plants. For maximum protection, make your row of mulch 18 inches wide.
How to Harvest Rutabaga
How to Harvest Rutabaga
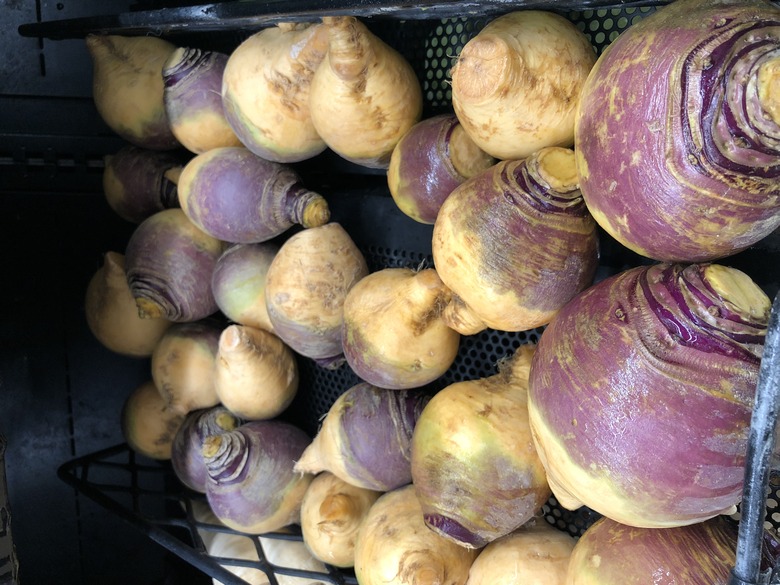
Rutabagas are ready for harvest 90 to 120 days after planting. It is acceptable and even recommended to let them experience a frost or two, but you will want to get them out of the ground before it freezes. Your rutabagas are ready for harvest when the bulbs are 2 to 3 inches wide, but some gardeners prefer to wait until they are 5 or 6 inches wide.
To harvest, carefully dig up the rutabaga and lift it from underneath. Cut away the leaves and fibrous roots on the bottom of the plant. Wash your rutabagas and eat them now or store them in a box of damp sand. Store the box in a cool, dry place, and your rutabagas will keep for up to four months.
Common Pests for Rutabaga
Common Pests for Rutabaga
Rutabaga leaves grow a coating of tiny hairs that repel many insects, but a tenacious few may still visit your plants. These include aphids, cabbage loopers, root maggots and flea beetles. Installing row covers or sprinkling a little diatomaceous earth around the plants will usually solve any problems.
Aphids are easy to remove with a spray of water, and you can deter root maggots by sprinkling wood ash around your plants. Avoid planting other members of the Brassicaceae family near your rutabagas, like cabbage and kale, as these plants attract many pests that might otherwise leave your rutabagas alone.
Common Diseases for Rutabaga
Common Diseases for Rutabaga
Most gardeners grow rutabagas without problems, but clubroot and root knot can both affect the plants. Fortunately, you can avoid both easily by rotating your crops. As long as you do not plant rutabagas in the same area again and again, or plant them in areas where you grew other plants in the Brassicaceae family for the past several years, your plants should stay free of both diseases. Proper soil drainage and proper pH level also help to avoid these issues.
If you do have a diseased plant in your garden, remove and destroy it immediately so the problem doesn't spread.