Building Yard Or Garden Steps: What You Need To Know
We may receive a commission on purchases made from links.
A sloped area in your garden can be an incredible asset, allowing you to plant on multiple levels for a richer and more interesting effect. You may need to add some garden steps, however, to make weeding, feeding and pruning plants on a hill easier. Steps also make it easier to get around in the lawn in general and can help you guide visitors through your outdoor space, funneling them toward a bench, gazebo or picnic table. The key to great garden steps is to take some time planning them before you break ground on the project.
Garden Step Missteps
Garden Step Missteps
Garden steps are a great way to flex your creative muscles. The laws of physics (and maybe your budget) are the only limiting factors to your garden step design. Even so, there are a few design choices you may wish to avoid. One is gravel.
Gravel walkways do look charming in a garden, and homeowners sometimes supplement them with gravel steps. In this arrangement, a wooden step frame is built and then filled with a dirt base followed by gravel. This admittedly looks nice and offers good traction in the garden stairs. Unfortunately, gravel tends to get everywhere and will find its way into your carefully mulched and weeded flower beds. As the gravel gets kicked out of the step or lifted up in shoe treads, it eventually drops lower than the wooden step frame, creating a tripping hazard that's best avoided.
It's also smart to avoid areas with only one step. Depending on the slope of your garden, you may not need a long set of steps. Instead, you may need only three or five steps to navigate a small slope. This arrangement is fine, but never install just one step. As Gardens Illustrated points out, a single step is much less noticeable than even a small set of steps and could cause someone to trip.
When planning garden steps, remember that walking outside is not the same as walking inside. Even professional contractors and landscapers make the mistake of using standard indoor stair dimensions on outdoor garden steps. Outdoor steps require shorter risers and deeper treads to feel comfortable. Whatever size your steps, make sure each is the same. Even a slight variation in riser height or tread depth can break your stride and cause you to stumble.
 Elenathewise/iStock/GettyImages
Garden Step Materials
Garden Step Materials
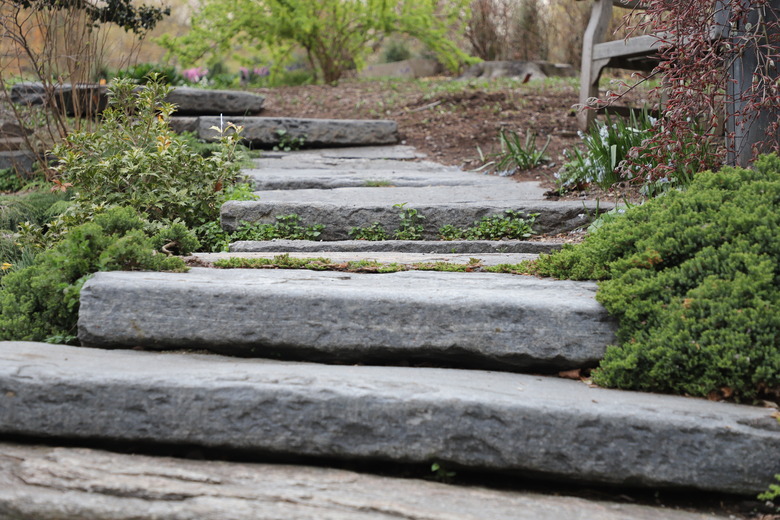
You can build your garden steps from a wide array of materials, but each has its pros and cons. Some gardeners like stone steps. Natural stone is part of nature itself and fits well in the garden.
One option is to use large stone slabs to make your steps, with each stone being a single step. Large stones are heavy, however, and you may find them difficult to work with. You may even need another person or equipment to put them in place.
Stones also tend to have a naturally textured surface, which is both a pro and a con. The texture can provide grip, but the stone's unevenness could create a tripping hazard. You can avoid this issue by fitting smooth stones like slate into a wooden frame and tamping sand between them to work like grout. These smaller pieces of stone are available in mosaic-like pieces or cut into squares and rectangles.
If you choose a smooth stone, remember that it's slippery when wet. To work around this problem, add fine sand to a stone sealer to protect the stone and add some grip.
Concrete is another popular material for constructing garden steps. You can build a frame and have them poured, or you can build steps from concrete pavers. Concrete is durable and low maintenance. You can leave it smooth, add texture or stamp the material to make it look like bricks or stones. You can also color concrete to add some flair and personality.
Concrete's only real drawback is that too much of it can look stark and cold. Dyes and stamps can easily mitigate this effect, however.
Another good choice is wood. Wood is an easy material for DIYers to work with and, like stone, it creates a more natural look. Wooden steps blend exceptionally well in gardens adjacent to outdoor decks, especially when they lead seamlessly from the deck into the yard. Like stone, however, wood steps can prove to be quite slippery when wet, so consider adding textured treads.
If you opt for wooden steps, make sure you use pressure-treated lumber. If you don't, your wood will rot everywhere it comes into contact with the earth.
How Many Steps Do I Need?
How Many Steps Do I Need?
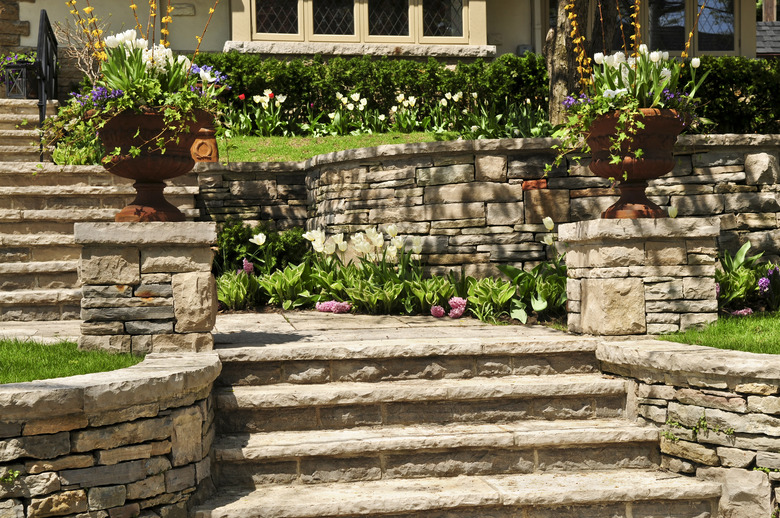
You may want to take a deep breath, as this is the part where the math happens. Ideally, the risers on outdoor steps should measure 6 inches (15 centimeters) tall, and the stair treads should be 8 1/2 to 9 1/2 inches (22 to 24 centimeters) deep.
To figure out how many steps you'll need, you also need to know the total rise of the garden stairs. As InspectAPedia explains, the total rise is the vertical height you will travel when climbing the garden stairs. To measure it, place a long board horizontally on the top of your slope. At the bottom, place a large wooden stake vertically.
Rest your horizontal board on top of your vertical stake and align the two boards to each other. Make sure your vertical stake is plumb and your horizontal one is level. The two should intersect at a 90-degree angle. When everything is properly aligned, measure the distance from the ground to the bottom of your horizontal beam. This number is your rise.
To determine how many steps you need, divide the total rise by the rise of each step. If, for instance, you have a total rise of 60 inches and plan on using 6-inch step risers, you would need 10 steps (60 divided by 6).
If your math results in a fraction, simply round up to the next whole number of steps and then divide the total rise by the number of steps. For example, if the total rise is 65 inches and you'd like 6-inch steps, you'll actually need 11 steps at about 5.9 inches each (65 divided by 11 = 5.9, or about 5 7/8 inches).
It's important to remember that all of the steps must be the same height and depth. A step that is a little shorter or shallower than the others creates a tripping hazard.
 Elenathewise/iStock/GettyImages
Super Steep Slopes
Super Steep Slopes
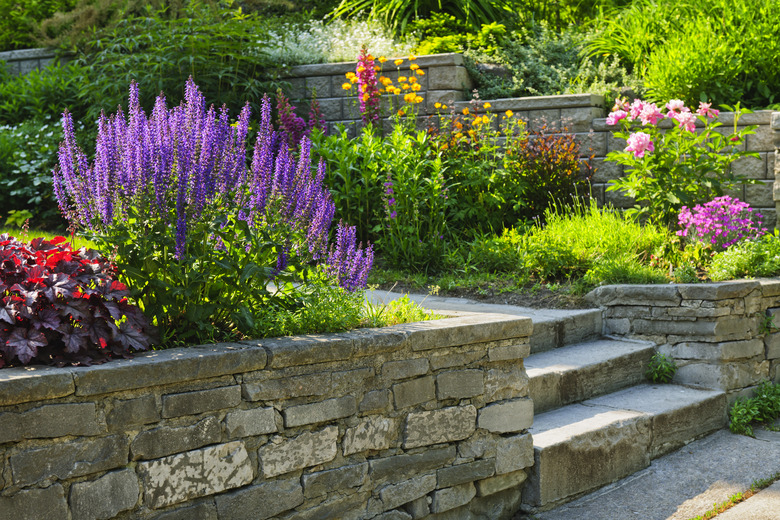
If the slope in your lawn is especially steep, you may want to alter your plans a bit. A steep slope may require a lot of steps. If so, make sure you never have more than 16 steps in a row without a landing of some sort. A landing helps limit how far you'll fall if you do happen to trip on the garden stairs or lose your balance.
Creating landings after a group of stairs requires more digging and leveling during installation but makes steep hills much easier to climb. You may also want to install a handrail for an added sense of security and stability when the steps are numerous and the climb somewhat steep.
If your hill is particularly steep, you may need to create a series of switchbacks. This is tricky, however, and requires the advice of an engineer. A professional can tell you where and how to place the garden stairs and their supports on your hillside so that everything stays securely in place.
 jorgeantonio/iStock/GettyImages
How to Install Garden Steps
How to Install Garden Steps
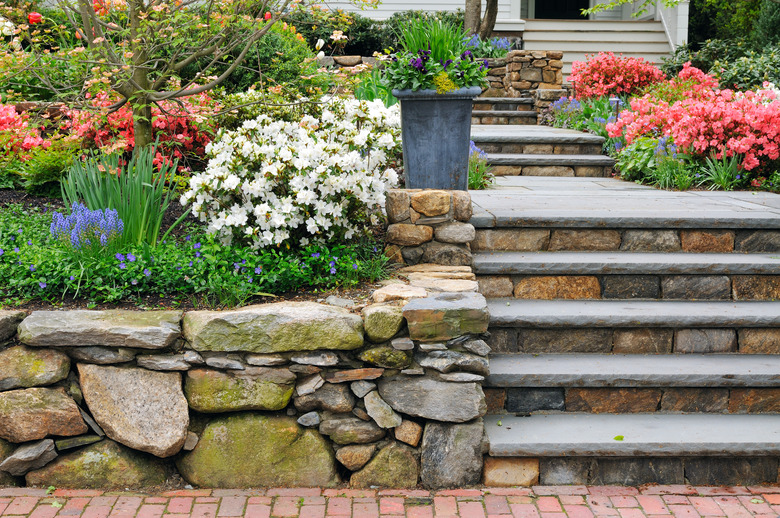
When installing garden steps, the first action is to mark the outline of the steps with string or spray paint. These markings will help you keep moving in the right direction as you work so that you don't start to stray to the left or right. Next, you'll dig out the area where the steps will sit.
Installing wooden steps essentially involves building a series of wooden boxes. Starting with the bottom step, build a wooden box to serve as your first step. Tamp down the dirt beneath this step, adding and taking away dirt until you can place the step where it will sit level.
After placing the first box, build the next one and install it the same way. The front timber on each box should sit atop the back of the frame below it. Continue building and placing boxes until you reach the top of the stairs. As you go, mount the wooden frames to the ground using rebar and to each other using lag bolts or wood screws. You're now ready to mount horizontal wooden beams to your framework to make the stair treads.
If you're using bricks or pavers for your stairs, you'll want to dig out the rough shape of a staircase. How big you make each of your stairs depends on the height of your pavers or bricks. If, for example, your pavers are 8 inches square, you'll likely want to make each step 16 inches wide with 8-inch risers.
Dig out and level each step before laying a 1-inch layer of sand. Tamp down the sand and level it before installing your pavers. Secure the pavers by filling the areas between them with more sand and then move on to the next step. Each step should slightly overlap the one that came before it.
If you want concrete steps, you'll need to build a wooden frame to pour the cement into. This frame is temporary and serves only to hold your concrete in the proper shape while it cures. As such, you won't need to secure the wood to the ground using rebar as you would for wooden steps.
Instead, you'll build the outline of your stairs using wood to form the sides of the staircase and the stair risers. When the frame is built, add some clean stones or old concrete chunks to the bottom of the steps. Follow this with rebar to reinforce the stairs and then pour and smooth the concrete, working from the top of the stairs to the bottom.
When the concrete has set, you can remove the wooden frame and enjoy your new stairs.
References
- Gardens Illustrated: Garden Steps and Ramps: Coping With a Sloping Garden
- InspectAPedia: Stair Rise & Run Calculations
- Blessing Landscapes: 5 Different Step Materials and Their Pros and Cons
- Stone and Patio Professionals: How to Properly Measure for Outdoor Steps
- Better Homes & Gardens: How to Install Timber and Brick Steps
- Better Homes & Gardens: Your Step-by-Step Guide on How to Pour Concrete Steps