Moving Kitchen Plumbing: What You Should Know
We may receive a commission on purchases made from links.
If you're tired of having a kitchen that looks like it came straight from the set of "The Brady Bunch," then it's probably time to think about doing a kitchen remodel. Moving kitchen plumbing is one of the most important issues to consider when planning your kitchen remodel. The thought of cutting and rerouting pipes, soldering copper, drilling holes and installing a sink and a dishwasher can all be overwhelming to even the handiest homeowners.
The good news is that plumbing has become easier over the years due to the introduction of materials like flexible supply lines, PEX water pipe with crimp fittings, and push-fit fittings that eliminate the need to solder. The most difficult issues when moving kitchen plumbing for a remodel are making sure there is enough room to provide the drain pipe with enough pitch and finding room to move the vent pipe.
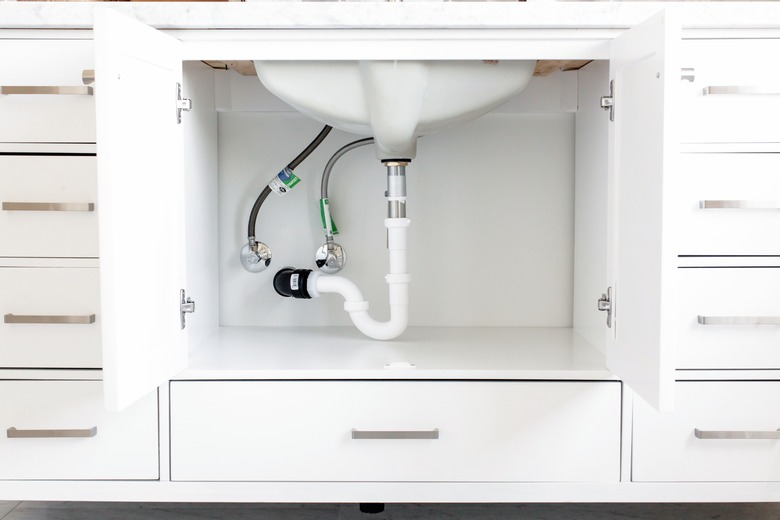
Moving a Kitchen Sink
Moving a Kitchen Sink
The difficulty level of moving a kitchen sink usually depends on how far it is being moved. If the sink is being moved a short distance, you can usually add on to or cut back the drain and vent and use longer faucet supplies to make up the difference. However, if your remodel involves moving the sink across the room, it can get a lot more difficult. Although you may need to drill a few holes, water pipes can be cut and extended and run almost anywhere. Using PEX pipe or push-fit fittings can make the job of moving the water supply much easier.
Drain and vent pipes are another matter. The main issue with moving a kitchen sink is making sure your drain has enough pitch. There should be a minimum slope of 1/4 inch per foot for your drain pipe as well as the vent. It's often difficult to find a place to run a new vent. If there is a second floor above the kitchen, you don't want a vent pipe running up through the middle of the room. Many vents for remodels are run up through an overhead closet to hide them from view.
When to Use a Plumber
When to Use a Plumber
Moving a sink a short distance from its original location is a DIY project that most knowledgeable homeowners can handle. If there needs to be a lot of changes to the drain and vent, though, you will probably be better off to let a professional plumber handle it. If the sink isn't properly vented or the drain doesn't have enough pitch, it won't drain well. Repairing this can involve ripping open your recently remodeled walls and ceilings and floors, which is why you need to make sure it is done right the first time.
Moving kitchen plumbing is very difficult if your house is on a slab foundation. Water pipes can often be rerouted through walls or ceilings, especially if you use flexible PEX pipe. However, because the drain needs to have pitch and be lower than the fixture, it requires cutting and jack hammering through the slab. If your house is on a slab and you are determined to remodel the kitchen, you'll almost certainly want to have a plumber do the work.
Installing an Island Sink

Installing an Island Sink
Many homeowners like the look and versatility of an island sink. Plumbing the water and drain for an island sink is not all that difficult. Like many regular sinks, the drain and water pipes come up from the bottom of the cabinet and are connected to the sink and faucet. If you can plumb a kitchen sink, you can plumb an island sink. It's the vent that causes the most problems with an island sink.
A regular kitchen sink vent rises at least 6 inches above the sink before it goes horizontal. Because an island sink vent can't do this, you basically have two choices when venting an island sink. You can install an island vent, which rises and loops up as high as it can under the cabinet before dropping through the floor and connecting to a vertical vent. This will provide air to the system while keeping your trap from siphoning.
Your other option is to install an air admittance valve (AAV), a gravity-operated valve that is installed as high as possible in the cabinet. This is an easier solution than an island vent, but it will not always keep up with draining a large sink or dishwasher, causing slow drainage. Before installing either an island vent or an AAV, you should check with your local code enforcement office because rules for both can vary from city to city.
Installing Dishwashers and Other Appliances
Installing Dishwashers and Other Appliances
New appliances are usually part of a kitchen remodel. Though the cost of new appliances may have you thinking that the old ones still work just fine, new appliances can actually save you money over time. According to Energy Star, a new Energy Star refrigerator can use about half the energy of an older unit.
While most appliances can be safe and easy to install, you'll want to be careful moving and installing the gas supply for your stove. Because a gas leak can be fatal, this is one job you want to leave to the professionals.
Installing the connections to your new dishwasher isn't nearly as difficult. The flexible drain and water hoses are run through holes into the cabinet under the sink, and the drain is connected with a clamp to either a dishwasher drain fitting on the sink tailpiece or to a similar fitting on the garbage disposal. You'll need to install an air gap device or run a high loop in the dishwasher drain hose and clamp it to the wall of the cabinet to prevent the drain from backflowing into the dishwasher.
The dishwasher water connection can be installed by adding a tee, a shut-off valve and a 3/8-inch compression fitting onto the hot water pipe under the sink. Again, this can be done with push-on fittings or PEX pipe to avoid soldering. The flexible dishwasher water hose is then tightened onto the compression fitting.
Installing Ice Makers and Water Dispensers
Installing Ice Makers and Water Dispensers
Refrigerators with a filtered-water dispenser and ice maker get a lot of use, but they don't just make water on their own. There has to be a water line that taps into one of the cold water pipes to supply your water dispenser and ice maker. This is often done by installing a saddle valve on a cold water pipe that is nearest and most accessible to your refrigerator. Some saddle valves require drilling a hole in the pipe, while others are self-tapping. Alternatively, you can tap into the cold line with a push-on-type ice maker connection kit, which includes a tee and shutoff valve.
After installing the valve, you connect 1/4-inch water tubing to the valve and route it up to a connection on the back of the refrigerator. This usually requires drilling a small hole in either a cabinet or the floor behind the refrigerator. The tubing is quite flexible and can be made of copper, poly or braided stainless steel. All of the materials you need can be purchased in a kit, making this a good project for most DIYers.