How To Strip Paint Or Stain From Wood
No matter what technique you use—and many options are possible—stripping paint or finish is no picnic, but there is no avoiding it if you want to refinish old woodwork or furniture. If you're planning on applying a new coat of paint, you can often skip this distasteful task by sanding down the old finish and painting right over it. However, if you want to expose the wood and apply a clear finish, stripping is the only way to go. You can strip paint and varnish using heat or chemicals along with a combination of sanding and scraping. But all methods are messy and require the use of the appropriate protective gear.
Test for Lead
Test for Lead
If you're removing layers of old paint, it is essential that you test for lead before you start. You can buy a test kit at any hardware or building supply store. If the test is positive, you can still do the work yourself, but because lead is toxic, it might be a better idea to get a pro to do it. If you decide to do the work, consider using a stripper that neutralizes lead. If you can't find this product or decide not to use it, be meticulous about collecting the old paint and stripper and disposing of it responsibly. It is essential that you remove lead paint entirely with stripper before you begin to sand, since sanding dust containing particles of lead paint will become airborne, where it poses a distinct health hazard.
Tip
Although sometimes it is necessary to strip baseboards and other trim moldings while the remain nailed in place, the job will be much easier if you carefully remove the woodwork and work with it on a workbench or sawhorses in a workshop or outdoors. Once the moldings are stripped, sanded, and refinished, they can be reinstalled.
 3M
3M
Stripping with Chemicals
Stripping with Chemicals
The most common method to strip woodwork is to brush on a chemical stripper, let the stripper soften the finish, then scrape, wash and sand. In the past, you had to use a stripper containing methylene chloride, a highly caustic and noxious chemical, but nowadays, you have your choice of a number of safer alternatives. Environmentally friendly strippers made from soy or citrus products work well, but they are slow and they don't handle multiple layers of old finish as efficiently as methylene chloride, which is why you can still buy products containing this harsh chemical. Whichever product you use, the procedure is much the same, although you have to be more diligent about protecting yourself when using a product containing methylene chloride.
Things Needed
-
Fan
-
Newspapers or drop cloths
-
Protective gloves
-
Respirator (if recommended)
-
Paint stripper
-
Paintbrush
-
Paint scraper
-
Triangular scraper
-
Awl
-
Wire brush
-
Rags
-
Particle mask
-
Sandpaper (100-grit)
-
Rotary tool with sanding drum accessory (if needed)
1. Set Up a Work Space
Find a well-ventilated, well-lit place in your workshop or outside, and clear enough space for the piece you're going to strip. If you're stripping woodwork in place, open the windows and run a fan to provide extra ventilation. Spread plenty of old newspapers or drop cloths to catch the stripper that you scrape off the wood.
2. Spread the Stripper
Wear protective gloves as you work with chemical paint stripper; it can cause burns if it touches your skin. Wear a respirator, if the chemical product you are using requires it.
Use an old paintbrush to apply stripper liberally to the wood you want to strip. More is better, so don't scrimp. Be sure to get extra material in the crevices and corners. If you're stripping a large piece, work in sections to prevent the stripper from drying out while you're scraping. Wait for the stripper to start bubbling and emulsifying the paint. Depending on the type of stripper you use, this could take 5 to 20 minutes or more. Methylene chloride works the fastest, while soy-based strippers tend to work the slowest.
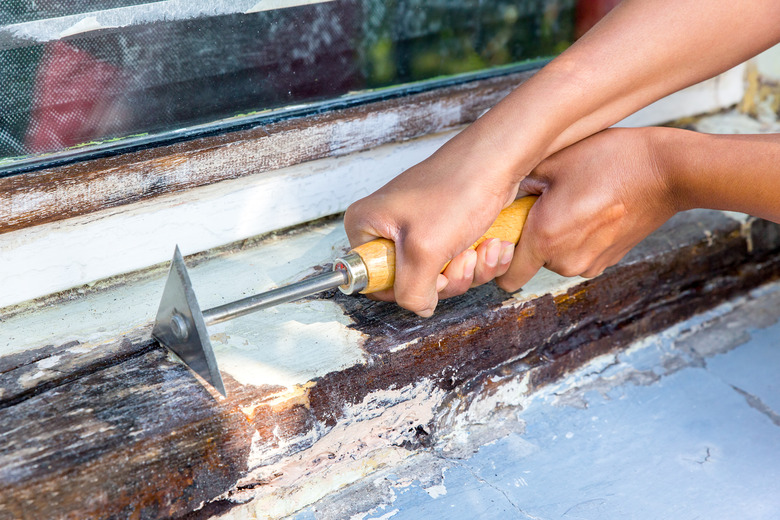
3. Remove Stripper with a Scraper and Wire Brush
.Remove as much of the stripper and the emulsified finish as you can, using a paint scraper. Get in tight corners with a triangular scraper, and in really tight corners using an awl. Rub contoured pieces, such as chair legs, with a wire brush, using moderate pressure to avoid scratching the wood. Apply more stripper to problem areas, give it extra time to work, and scrape again.
4. Neutralize the Stripper and Sand
Remove and neutralize any remaining stripper on the wood using whatever method is recommended by the stripper manufacturer. Usually, this involves rubbing the wood down with a damp rag after you're scraped off as much finish as you can.
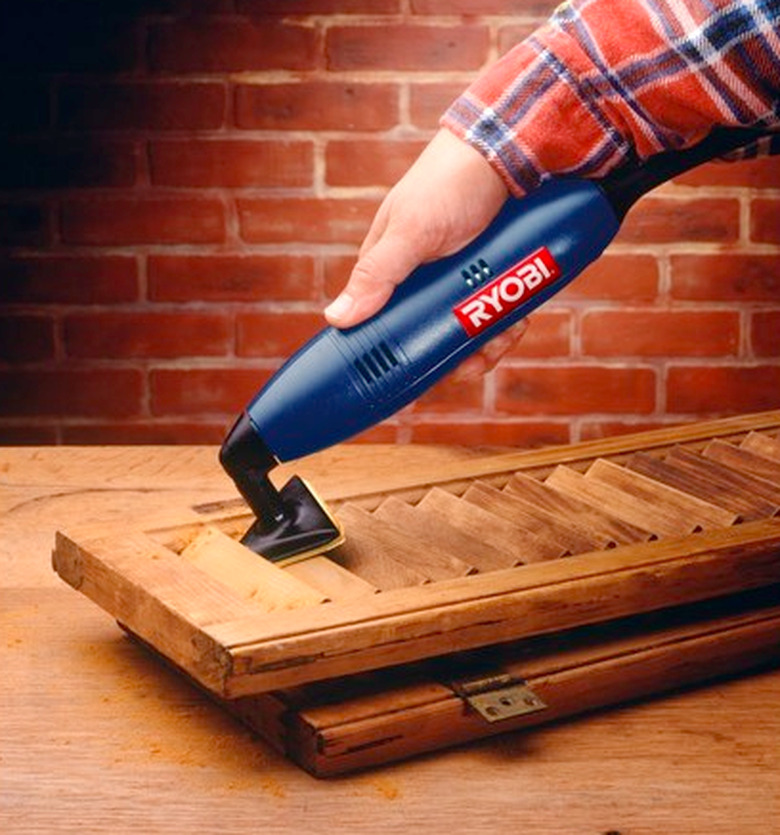
Once the wood has thoroughly dried, sand the wood with 100-grit sandpaper to remove bits of finish you can't remove otherwise. Wear a particle mask whenever sanding. A rotary tool with a sanding drum accessory may make this job easier. After you've completed this step, sand the wood with progressively finer-grit sandpaper prior to staining and refinishing.
Warning
Be sure to collect all the stripper and paint you remove and to dispose of it responsibly. Consider it hazardous waste and dispose of it following your community's guidelines.
Stripping with Heat
Stripping with Heat
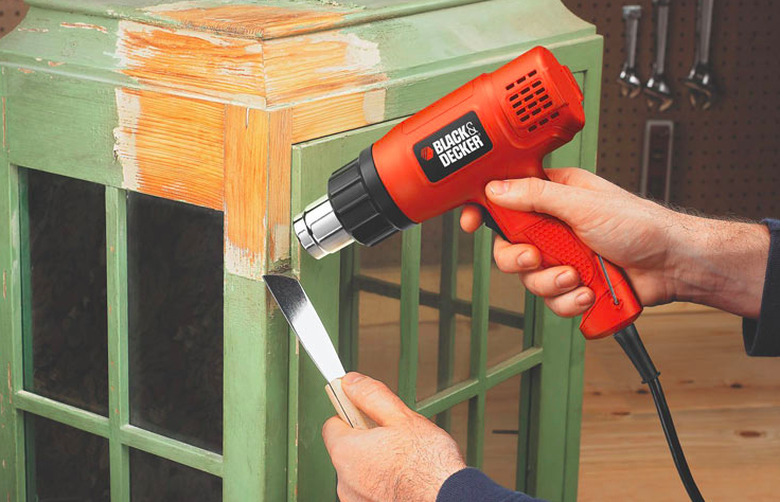
Heating the paint to soften it and make it easier to scrape is an alternative to using noxious chemicals, but you need to exercise care to avoid scorching the wood or setting the paint on fire. It's never a good idea to use a flame torch to strip paint. Instead, use a heat gun or infrared stripper. Infrared strippers are safer than heat guns, but they tend to be bulky, which makes them unsuitable for turnings, moldings and other ornate wood features. When using heat, always use heat shields to protects nearby flammable objects from catching fire.
 Toolsfirst.com
Things Needed
-
Heat gun or infrared paint stripper
-
Work gloves
-
Heat shield
-
Paint scraper
-
Triangular scraper
-
Awl
-
Chisel
-
Sandpaper
-
Rotary tool with sanding drum accessory (if needed)
1. Apply Heat
Protect nearby surfaces with a heat shield, and wear work gloves while working with heat tools. Point a heat gun at the finished surface and hold it about 3 inches away. Keep it in place until the paint begins to bubble. If you're using an infrared paint stripper, hold the infrared pad over or on the surface. Infrared heat won't damage wood or start a fire, so the tool can be in direct contact with the wood. Hold the tool in place for a few seconds, or until the paint starts to bubble.
2. Remove the Loose Paint
As the finish loosens from the wood surface, use a paint scraper to remove the finish. In most cases, the finish will come off in sections when it reaches just the right temperature. It can take some practice to get into the rhythm of applying just enough heat to allow the paint to peel away in sections—overheating the paint can make it gummy, and difficult to remove. The best technique is to apply heat just until the finish surface begins to bubble, then quickly scrape away the paint from that section.
In crevices and corners, use a sharp-edged tool such as a triangular scraper, an awl or chisel to remove the loosened paint. Be careful not to overheat the wood and scorch it. As each section of finish is removed, move to the next section.
3. Sand the Wood
Remove the remaining paint residue by sanding with 100-grit sandpaper. If you're having a hard time getting your sandpaper into crevices, use a rotary tool with a sanding drum or disc accessory. Once the paint residue is removed, preparation for repainting or staining will involve sanding with progressively finer sandpapers until the wood surfaces are sufficiently smooth.
 Ryobi Tools
Tip
If you prefer, you can make your own detail sanding tool by converting an oscillating toothbrush. Cut the bristles off the toothbrush, glue on a small piece of rubber, then attach sandpaper to the rubber pad using spray adhesive.