How To Clean The Filter On A Dirt Devil
Regardless of the Dirt Devil model you own, regular care and maintenance includes cleaning the filter for optimum performance. Most bagless models — upright, canister, and hand-held — have a high-efficiency particulate air filter that traps ultra-fine dust and pollen particles. But when your vacuum shows signs of low suction, no longer picks up dirt, or is starting to smell funny, the filter may need to be removed and cleaned.
Removing it may vary slightly among models, but the filter-cleaning process is similar across the board. The manufacturer recommends cleaning the filter every time you empty the dirt container and replacing it every three to six months depending on the level of use.
How to Remove a Dirt Devil Filter
How to Remove a Dirt Devil Filter
Though it entirely depends on what model of Dirt Devil vacuum you have, removing the filter is a pretty simple process. Here's how to remove a Dirt Devil filter from each type of bagless model.
Warning
Before you remove a filter from any model of Dirt Devil vacuum, turn the vacuum off and unplug it from the electrical outlet.
Removing the filter from an upright vacuum
Examine the vacuum to locate the filter. Some upright models have a visible filter inside the dirt container, while others have the filter located below the container in a compartment.
For filters located inside the container, push the button at the top of the container and remove it from the body of the cleaner. Open the lid, reach inside, grasp the top of the filter, and pull it out of the container.
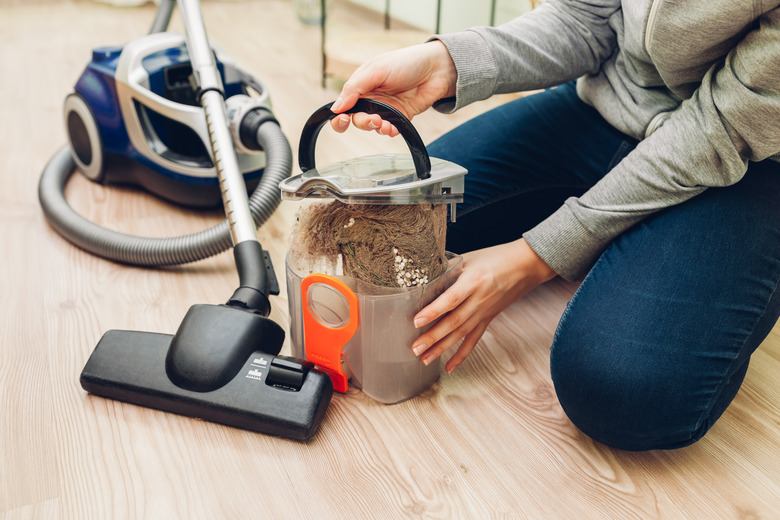
For vacuums with the filter below the container, remove the dirt container, press the button located at the front of the filter compartment, open the lid, and remove the filter cartridge. Empty the dirt container into a trash can.
Removing the filter from a canister vacuum
Press the button at the top of the dirt container to remove it from the body of the cleaner. Depending on the model, the filter may be inside the dirt container or attached to the back of the container.
If your model has the filter inside the container, open the container's lid, grasp the filter and remove it from the container.
To remove a filter from the back of the dirt container, press the lever at the top of the filter holder to release it from the container and separate the filter from the holder. Most canister models have a secondary filter located at the back of the canister behind a small trap door. Press the lever at the top of the door to remove the filter. Empty the dirt container into a trash can.
Removing the filter from a hand-held vacuum
Remove the dirt cup from the cleaner. While bagless hand-held models come in several designs, — corded, cordless, and rechargeable — most have a filter located inside the dirt cup. To remove the dirt cup, press the release clip that holds it to the body of the cleaner and remove the cup. Pull the baffle out, grasp the filter and separate it from the baffle. Empty the dirt cup into a trash can.
How to Clean a Dirt Devil Filter
How to Clean a Dirt Devil Filter
Cleaning a Dirt Devil filter will help your vacuum perform better and clean your home more effectively. Here's how to clean it in just a few easy steps:
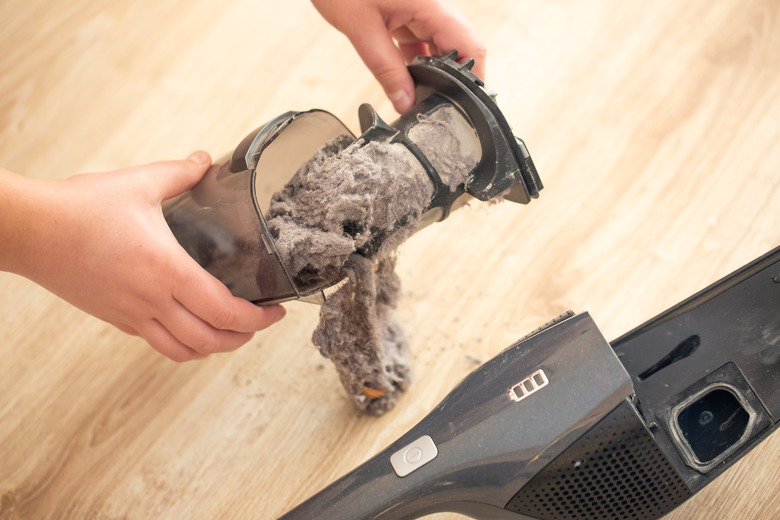
1. Shake Off the Dirt
1. Shake Off the Dirt
Tap the filter against the side of a trash can to shake loose as much dirt as possible. If you removed a filter cartridge from below the dirt container of an upright model, remove the foam filter in front of the pleated filter and brush it off with your hand to remove any surface dirt and then tap the pleated filter against the trash can. For canister models with a secondary filter, brush it with your hand to remove any dirt.
2. Rinse the Filter
2. Rinse the Filter
Hold the pleated or sponge filter under running water to further rinse away any dirt. Avoid using soap or detergent.
3. Tap and Dry
3. Tap and Dry
Tap the excess water off and allow the filter to thoroughly dry — 24 hours — before putting it back into your vacuum.
Tip
The manufacturer does not recommend rinsing all filters with water. Check your owner's manual for specific filter-cleaning instructions.