Willow Garden Edging
We may receive a commission on purchases made from links.
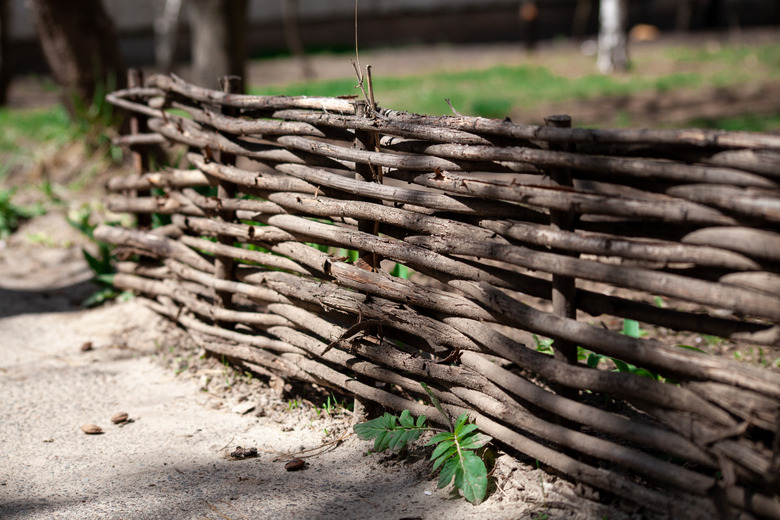
Woven willow garden edging adds a unique look and a protective fence to your garden. Made from renewable resources and one of the oldest methods of fencing, willow garden edging is a woven-stick fencing method called "wattle fencing." Archaeological evidence indicates that bent- and woven-stick fencing was in use in the Roman Empire from England to Italy. Wattle fencing is simple to construct using a flexible wood, such as willow. Willow branches that have been pruned from a tree are a good source for fencing material.
Plan Your Layout
Plan Your Layout
Every fence starts with a plan. Mark the ends of the location of your future fence by driving wooden stakes with a wooden mallet into the ground in the location where you want the ends of the fence. Tie a string between the two stakes to indicate where the walls will go and stretch the string tight to mark the fence row. If it is not straight, take the time to straighten and measure the length of the fence row. Decide how far apart you wish to space the upright posts of your fence. This will help you determine how many fence uprights you should make.
For example, if you want to create a 12-foot section of fence with uprights spaced every 2 feet, you should create seven upright supports. When you've determined your layout, mark the location of each support along the fence row by dusting the ground in that spot with bakers' flour. Bakers' flour will rinse away with water and is more biodegradable than spray paint.
Insert Your Supports
Insert Your Supports
While you don't need proper fence posts for this project, you can use metal or bamboo supports. Bamboo is a good option because it's lightweight and inexpensive. Cut pieces of bamboo to the desired height. At the points you marked with bakers' flour, dig small holes for the bamboo supports. For the best stability, bury the base of the support about 8 inches into the ground.
Prepare Willow Branches
Prepare Willow Branches
Once your supports are in, you're ready for the walls. As a guide, for a fence section roughly 48 to 52 inches long and 1 foot high, you'll need six branches for posts and 50 to 60 smaller branches for the weaving.
Using branch loppers, cut long, pendulous willow branches that are approximately 1 inch in diameter to create the horizontal fence strands. Each branch that you select for the fence strand should be at least 24 inches long.
Trim the twigs and leaves off the branches that you use for your horizontal fencing strands. Put the branches in a bucket filled with water for two hours to make them more supple.
Start Weaving Willows
Start Weaving Willows
After branches are soaked, they should be bendable and ready to weave. Take a horizontal branch and weave it back and forth between the upright fence posts, leaving 3 to 4 inches protruding past the first post. Pass the horizontal strand in front of one fence post and behind the next post in the row in a basket weave pattern. Continue to weave strands between the posts until you finish a complete row of fencing. Leave 3 to 4 inches protruding past the last post as well.
Weave a second row of willow branches on top of the first one so that the weave pattern moves the opposite direction from the first strand. Continue to weave the strands between the posts until the strands cover the upright posts all the way to the top of the fence. When complete, fill in any gaps by weaving in small branches and cut the protruding branches at the end posts to 1 inch. Remember that edging made of sticks will weather more quickly than fencing made of treated wood. You may need to replace your willow edging every three to five years.