

Cover Bottles With Air-Dry Clay To Make Adorable Fairy House Decor Gems
We may receive a commission on purchases made from links.
If you were a child who fell in love with the magic and whimsy of fairy houses, that enthusiasm may very well have followed you into your adulthood. In fact, appreciation for whimsy is on the rise, with people actively seeking ways to incorporate little lighthearted touches into their everyday lives as means of boosting their mood, according to The New York Times. Tailor-made for those seeking to add a little wonder to their grown-up lives, or to create a fairytale experience for a child, this clever craft from YouTuber Aashu Art & Craft walks you through the process of transforming a plastic bottle into a whimsical fairy house with some air-dry clay.
To make your own tiny townhouse, you'll need an old plastic bottle, air-dry clay (either in any color or plain to paint), such as a 5-pound tub of white Crayola Air-Dry Clay available for $15, some air-dry clay tools, like LINPHCEY Air-Dry Clay Tools set of nine for $9, and paint primer that will adhere to both plastic and clay, such as a 5-ounce tub of BLUEBIRD Heavy Gesso Primer for Acrylic Painting for $8, all three items available on Amazon. You'll also want an assortment of paintbrushes and colored acrylic paint for decorating your little house once it's had time to dry. Finally, you'll need some basic glue and some to hold everything in place and finish off your bottle with a shine.
How to make your fairy house decor
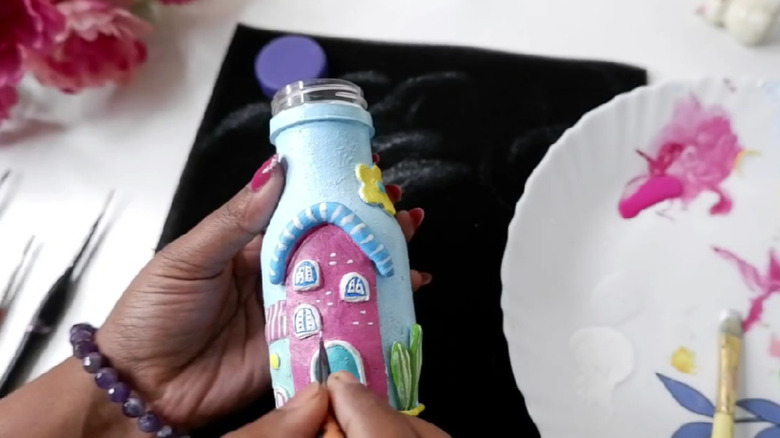
To create your own version of this charming fairycore decoration, start by removing any labels from your plastic bottle using warm water and a solvent like Goo Gone. Next, take your clay, and mold it into the component parts to create a two-dimensional house on the side of your bottle. The house can take any form you want, but some elements for inspiration could include a roofline, chimney, windows, front door, front steps, and even foliage. You can use your clay tools to add as much detail to these pieces as you desire, and when you're satisfied, glue them into place on the bottle.
Once your house is assembled and both the clay and glue have had time to dry, it's time to paint. Start by covering the entire bottle and clay surface with your primer and allowing it to dry. Then, feel free to have fun with color, painting each element of the house, as well as the rest of the bottle, and adding details like window panes, doorknobs, leaves on trees, and individual bricks for texture.
The best part about this design is how easily you can mix it up. If you're doing this craft with kids, give them free rein to create their fantasy fairy house, and to create any other plants and animals they think should live there with clay. They can also mix and match colors to their hearts' content, or, if they prefer to follow a pattern, use the video's prescribed pink house with a blue roof and door, green cacti, and a blue sky. Meanwhile, more adult crafters can opt for a slightly more sophisticated design and color palette, and the highly ambitious can even create a few of these bottle fairy houses to position on bookshelves or tuck into windowsills as whimsical decor.