

Use Old Wood Pallets To Build A Custom Bike Rack And Organize The Garage
While there's hardly anything more delightful than taking a good-for-the-soul bike ride on a nice day, storing and organizing the family's bicycles in the garage is another story entirely. Rather than bringing joy, finding the room to stash this unruly form of transportation brings nothing but headaches and a disorganized mess. However, YouTube user This Dad Goes to 11 shared how a basic, free wood pallet was the answer to wrangling his family's chaos of wheels, handlebars, and helmets once and for all.
To make the bikes fit, he cut the wood pallet in half lengthwise and adjusting the boards across the top to function as properly-sized wheel dividers. Every cycle received a dedicated parking space, making this DIY a perfect fit alongside other clever and practical bike storage and organization solutions. With a fairly small floor footprint and a no-fuss concept perfect for family members of all ages, this no-cost, beginner-friendly project will work in any storage space where you have clearance to store bikes on the ground for quick, easy access.
It's worth noting that this setup is compatible with any style of bike with its own kickstand or training wheels. For bikes without those additions, you'll need to add a vertical component to your organizer for additional support. Either way, grab your circular saw, hammer, and an old pallet to display your bikes alongside other handy DIY garage organizers.
Cut the pallet in half and adjust the slats to support bike tires
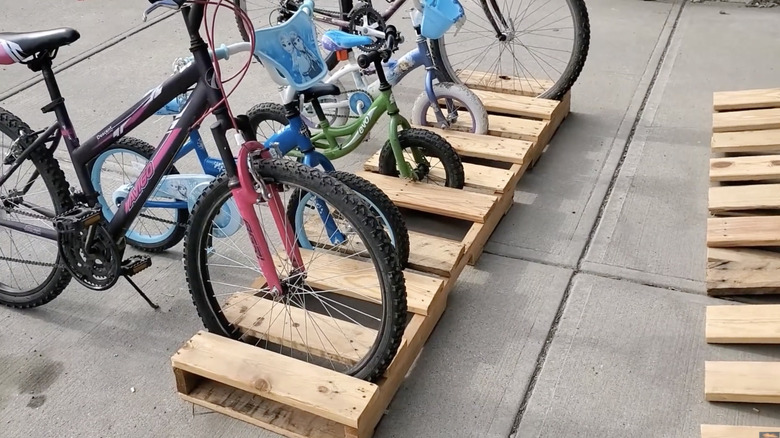
To create this bike rack, use a circular saw to cut the pallet roughly in half lengthwise along one side of the center support to create a narrow, single-row pallet. Stick as close as you can to the center board for a neat finish (and the ability to reuse the other half later if necessary as a vertical support). The openings between slats might be too large to support your average bike tire. Therefore, use the back of a hammer or crowbar to carefully remove some of the decking slats. Position them so that they offer enough wiggle room — about a quarter of an inch — to insert the bike tire easily without jamming it in, but not so much room that the tire can turn or tip. From there, the YouTuber simply straightened and reused the existing pallet nails to re-secure the decking slats to the outer frame. If yours are missing or damaged, remove any remaining nails and use wood screws to reattach the pieces.
The extra-wide pallet accommodated a line of five bikes with a slat on either side of each tire, for ten slats in all. But you can adjust your spacing and layout to accommodate your particular pallet size and bike quantity. Once everything's assembled, it's wise to give the rack a thorough sanding to avoid splinters, especially if your pallet was in rough shape to begin with. Finishing or sealing is optional, depending on your preferences and anticipated wear and tear. Younger families may also want to label the bike slots with names to make cleaning up straightforward and easy.
Adding vertical support to your wood pallet bike rack
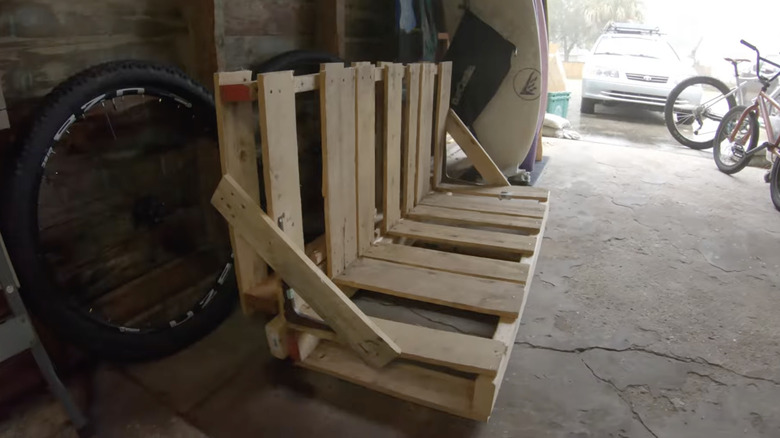
If you have bikes without kickstands or training wheels, you can follow the tutorial by YouTuber Your Own Adventure, who used the other half of the pallet cut off in the first step as a vertical support for the tires. Add a scrap 2x4 brace back in place of the missing center support on the discarded portion of the pallet, which essentially results in a second standalone single-row pallet. Also add a few pieces of 2x4 lumber to beef up the back side of the floor organizer for the vertical support to sit on. Temporarily rest the vertical portion of the bike rack on the new base, and mark all of the slat adjustments you made to fit the bike tires in the first portion of the project so that everything lines up. Make the appropriate slat movements on the upper pallet in the same manner as you did on the base.
Once your vertical slats are in the right place, it's time to secure the two pieces together so the top is perpendicular to the floor organizer. The YouTuber used metal shelf brackets for additional bracing on the front side, but you can also use L-brackets or mending plates on the rear side if you have extras lying around. Using whichever method you prefer, attach the vertical portion to the new 2x4 base and bolster the support with brackets. Additionally, use two removed pallet slats as diagonal side supports for extra bracing. This reinforced L-shaped setup will offer extra support for heavy or tippy bikes that need it.