

Skip Traditional Window Treatments: This Easy DIY Is Cheaper & Looks 'Bougie On A Budget'

We may receive a commission on purchases made from links.
Window treatments can completely change the look of any room. Unfortunately, they can also cost a fortune. That's especially the case when you want to achieve a custom look that covers windows and adds vintage charm. And it can be extremely tricky when you're trying to decorate a window in a temporary space, like a rental or dorm room. That's exactly what TikToker Jennifer Kilpatrick set out to do with her easy DIY that one fan called "bougie on a budget." To create a structured window treatment for her daughter's apartment that could be temporarily installed, she combined inexpensive foam board, repurposed bedding, and duct tape before hanging it with monkey hooks and Command Strips.
The structured nature of this cheap window treatment actually makes it more like a cornice board (sometimes called a pelmet) than a traditional valance. The foam board is used to create a lightweight but rigid box that gets attached to the wall on either side of an existing curtain rod. Valances, on the other hand, are usually made from fabric that simply hangs across the top of a window. While both are excellent at hiding outdated curtain rods or ugly blind hardware, this easy DIY project is a good option for anyone who wants to create a highly tailored and traditional look without making a huge investment or dealing with a complex installation process.
How to make this DIY window treatment on a budget
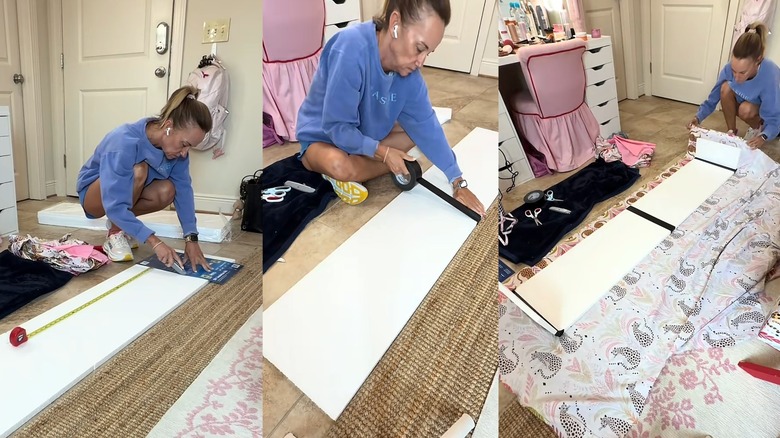
The first step is cutting your foam boards into three pieces, but the process is slightly different than measuring for curtains and drapes. One board will need to be the width of the entire area you want to cover, which should include at least the molding on both sides of your window. The other two pieces of foam will be identical side boards, which determine how far your finished window treatment will be from the wall. If you anticipate mounting it over thin blinds, 4 inch side boards should be adequate. However, if you'll be covering up thick curtains, the boards should measure at least 7 inches each.
Kilpatrick used Insulfoam Rigid Foam Insulation, which is available at Home Depot in a 6-pack for around $15. This should be more than enough material even for particularly large windows. After cutting her boards to the correct length, she used black Gorilla Glue Duct Tape to connect them. The $10 rolls are also available at Home Depot. Several commenters recommended using white instead of black to ensure it doesn't show through lighter colored fabrics. Kilpatrick agreed, calling it a "rookie mistake."
@kilpatrickrealtor Cheap, custom window valance built off vibes & false confidence #diywindowtreatment #windowvalance #dormdecor #collegeapartment #dormhacks
The next step is covering the foam frame with fabric. To keep the project budget-friendly, consider repurposing old bedding that's been washed and steamed. Simply cut it to the length and width of your boards, adding a generous border along every edge. Then, wrap the fabric tightly around each edge before securing it along the back side of the window treatment with more duct tape and a few sewing pins.
Ideas for hanging and customizing your new window treatment
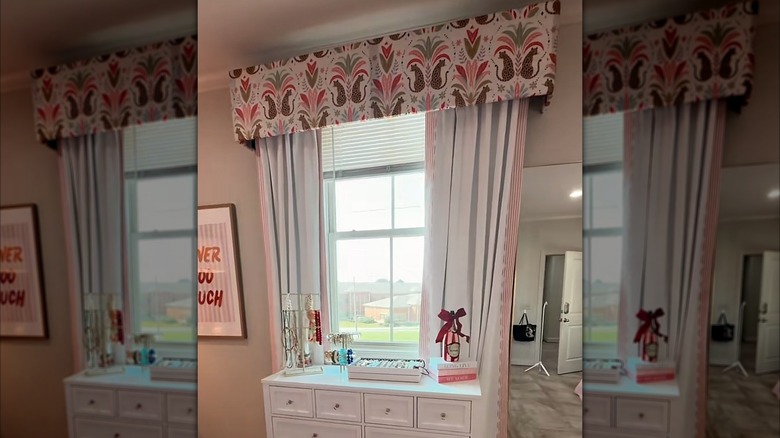
The basic materials for this project cost around $25, instead of the hundreds you would spend on similar custom window treatments. Even when your budget is extremely tight, it's highly customizable. If you don't have old bedding to repurpose, consider using inexpensive curtain panels or discounted upholstery remnants from your local craft store. For a more upholstered look, consider wrapping the foam form with batting before adding your fabric. If you're leaning into maximalist looks that are larger than life, use a panel that matches your curtains to bring the drama. To ensure a long-lasting result, keep in mind the overall weight of your fabric choice.
@kilpatrickrealtor Replying to @CassyMiller full tutorial on how o hung the valance #DIYdecor #collegeapartmentdecor #DIYvalance #windowvalance #tutorials
Finally, you'll need to hang your new window treatment. This part can be tricky, so enlist the help of a friend — especially if your window is on the larger side. In a highly-requested follow up video, Kilpatrick demonstrated her preferred method. She started by inserting two Ook Monkey Hooks from Home Depot into her drywall on either side of the window, twisting them so the hook pointed toward the ceiling. She then cut a small opening into both pieces of her fabric-covered board, on the shortest sides. Pressing firmly, she pushed the monkey hook into the foam board until the window treatment was flush with the wall. Then, she used Command Strips to secure the bottom of both sides in place. A level can help you make sure they stay perfectly vertical for a professional look.