

Woman Uses Dollar Tree Frames To Create Chic Bathroom Storage With An Impressive DIY
We may receive a commission on purchases made from links.
A clean and neatly organized bathroom can be a relaxing retreat from the hustle and bustle of the rest of your house. It's impossible to make such a space feel comfortable, though, if it doesn't have enough storage. Popular solutions include upgrading your vanity cabinets or installing wall shelving — but these can be unnecessarily pricey fixes. Luckily, Jay Munee DIY on YouTube shared a DIY project that provides the same functional and aesthetic benefits for a fraction of the cost. She built a freestanding bathroom cabinet unit from the ground up with Dollar Tree picture frames and plastic crates. The crates form the cabinet's frame, while the picture frames serve as glass doors.
It's the sort of fixture that can hold just about anything, from towels and washcloths to cosmetics and hair styling tools. Plus, the finished DIY looks surprisingly luxurious and chic, too. To get started, pick up a handful of picture frames and crates that are roughly the same size. While Jay Munee DIY opted for Dollar Tree's Special Moments Black Picture Frames and mini plastic crates (which are no longer available), you can use something like the Sterilite Mini Crate from Walmart and pair it with 9-by-8-inch frames. Other than that, you'll need a couple of small hinges similar to these LifCratms Brass Mini Hinges, as well as E6000 adhesive, some cable ties, gold spray paint, and optional accessories like hooks to make the cabinet even more practical. Build a similar unit, and you might just make your bathroom feel more like a spa.
How to build a bathroom cabinet using Dollar Tree picture frames and crates
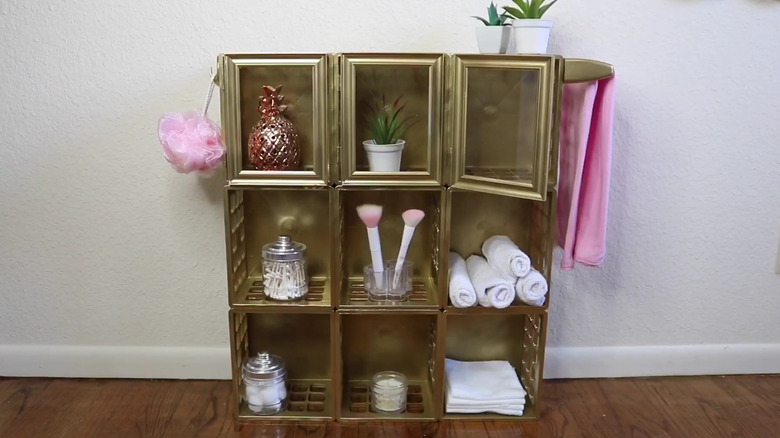
The original DIYer assembled her bathroom storage unit using nine plastic crates arranged in a three-by-three grid. However, you could easily alter the size of this project by adding or dropping a row or column of crates. Once you've decided on a crate arrangement, you'll need to choose which of the crates will have a picture frame door attached to them. For those that will, glue your mini hinges along one side with E6000. Then, remove the glass panels from the frames, clip away any small metal pieces, and attach the frames to the hinges with more E6000. Once that's done, glue the sides of the crates together in your desired configuration and use clamps to hold them in place while the adhesive dries. You can skip this step if you opt for stackable crates designed to click together, but just make sure to fasten them with cable ties for added security.
Now comes the fun part: customizing the unit. Consider attaching adhesive hooks (for loofahs and brushes), a toilet paper holder, a hand towel rack, or even a hair dryer holder to the sides before spray-painting everything. After it dries, glue the glass panels back into the picture frames and install a product like the Jiayi Adhesive Cabinet Door Magnetic Catches if the doors swing open on their own. Households with small children and pets will also want to use the Booda Anti-Tip Furniture Anchors, or similar, to secure the cabinet to the wall for safety purposes. Finish off the bathroom cabinet with jars, trays, and other small organizers for a truly satisfying, well-organized bathroom.