

Neither Blinds Nor Curtains: A More Beautiful Way To Add Privacy To Windows

There's no need for dated, flimsy blinds for your windows when there are far more charming solutions out there. Install a window treatment that provides more privacy and has more aesthetic appeal than basic blinds and uninspired curtains. The TikTok account diyinprogress_ designed one-of-a-kind wooden shutters for their windows — the likes of which should inspire DIYers everywhere — using a laser cutter. Solid wood window treatments that are engraved with gorgeous patterns will boost an interior design, while providing more privacy and insulation. This makes them effective in making a home more stylish, comfortable, and energy-efficient.
This laser-cutter wood shutter idea is completely customizable, allowing the DIYer to choose the color and the carved pattern. It's made of solid wood panels that block more light and visibility than slatted blinds and lightweight fabric curtains, making it practical for spaces requiring privacy, like bathrooms and bedrooms. In fact, it can even be combined with curtains for more aesthetic appeal.
Though the original DIYer behind this project designed the wood panels from scratch using a laser cutter, they recommended the use of hand tools if you don't have this specialized tool. Using hand tools may not result in detailed work or be as efficient, but you can use jigsaws or handsaws to carve many generic patterns perfect for interior shutters. You'll also need ¾-inch plywood, eight 2-inch utility hinges, a table saw, a drill, and paint to make the finishing touches.
How to make gorgeous privacy shutters for indoor windows
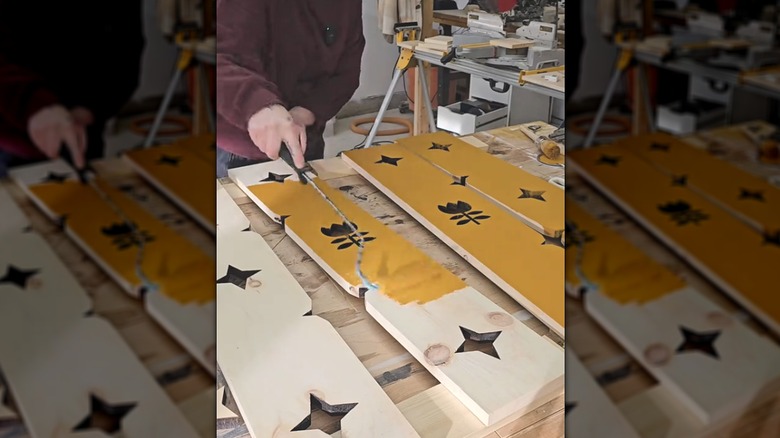
Most shutters are designed in a basic four-panel shape, so they can be folded open and closed. Start by measuring your window width, subtracting about ¼-inch to account for the space between the hinges and two pairs of shutters. This small space won't compromise much privacy, and it'll ensure the shutters fit correctly to the window. Also, measure the window from top to bottom while accounting for another gap, and divide both numbers by four to get the correct dimensions for all four planks.
@diyinprogress_ DIY Folk Window Shutters! ✨ I needed some window privacy for my walk in closet, but I wanted to try something new! Using my laser cutter, I designed a cute folk pattern and painted it in the colour ochre! But don't worry – you don't need a fancy laser cutter to create a project of this scale- you could also use basic hand tools to achieve the same look! I can't believe how well these turned out – especially considering I got the idea to make them from the movie SIGNS (yes, the alien movie 🤣) it's a long story – go watch the tubes if you want to hear it. These shutters absolutely boosted the folk charm of this room. Should I make shutters like this for every window in my house? 😅 #diy #woodwork #makeover #transformation #folk
Once the planks are cut, move onto carving the shutter design. If you don't have a laser cutter to do the work for you, begin by tracing the design onto the wood board. If you love the look of the original DIYer's shutters, replicate their idea with a basic flower and star stencil. However, you can also try various other stencils that better fit your interior. For example, if you have a coastal-style room, you may want to trace a sailboat or seashells. Or if you prefer a more whimsical vibe, try carving a crescent moon. Follow your chosen tracing with a saw, preferably a jigsaw set to a precision cut.
When designing this window treatment that allows you to see out but also blocks the view inside, be mindful of how large you carve the wood patterns. The larger the wood carving, the less privacy it'll provide. Of course, you can always pair this idea with window treatments that block the sun to make up for the carved-out holes. Finish off the project by painting over the wood with a paint and primer, attaching the hinges, and drilling it onto the inside of a window frame.