Reuse An Old Glass Jar To DIY A Beautiful Home Decor Piece You'll Love
We may receive a commission on purchases made from links.
Mason jars are popular for all kinds of uses, from organizing goods to serving as DIY decor. Even if you don't need the jars themselves, there are genius ways to use just the jar lids instead of tossing them. If you have a few extra glass jars lying around and you're looking for a creative way to dress them up, try out lelya.creates's gorgeous idea.
This influencer took to Instagram to show how she turned ordinary mason jars into unrecognizable rustic canisters. These stylish, farmhouse-esque pieces are unlike anything you can buy in a store, giving them a bespoke quality that shines amongst other decor. They work in most rooms of a home and fit well on everything from a hallway console table to a kitchen countertop. In fact, they could even be added to creative farmhouse table centerpiece decor ideas for a completely personalized design.
The jars aren't reserved solely for decorative purposes, though. The finished project is covered with an opaque layer of paint that hides its contents. You could use them to store valuables, like extra cash, heirloom jewelry, or other items you'd rather keep hidden. This gives them functional value in addition to boosting an interior space.
What you need to upcycle glass jars into farmhouse-style canister decor
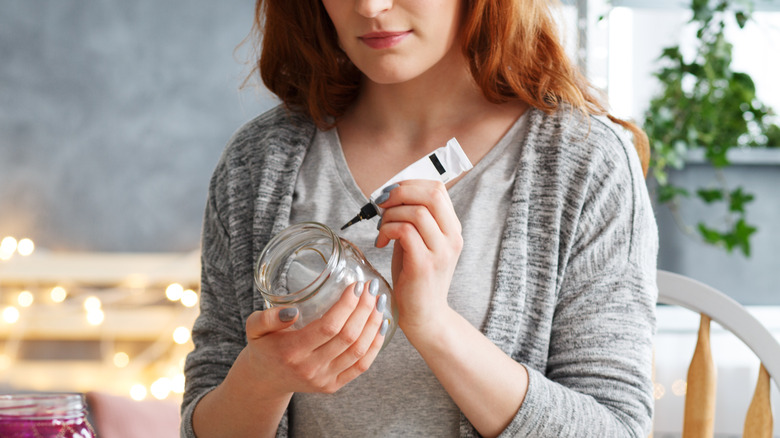
In addition to being a gorgeous addition to rustic country-inspired interiors, these homemade jars are cheap and easy to make. Many of the necessary tools are common DIY essentials, including a sponge, scissors, hot glue, and a paintbrush, so there's no need to invest in any fancy embellishments. If you don't have a hot glue gun, you can even use super glue instead.
As for materials, you'll need twine, a roll of burlap, a wood bead, a floral or vintage-patterned stencil, and a jar of brown paint. Use any stencil pattern that appeals to your aesthetic. However, to create a design similar to the original DIY, opt for the Show-Offs Floral Stencil. To get a similar jar color to theirs, use a blend like FolkArt's Home Decor Java Chalk Paint. If you prefer a brighter aesthetic, replace the brown with a lighter neutral color, like the FolkArt's Home Decor Sandstorm Chalk Paint.
How to make and style the decor piece
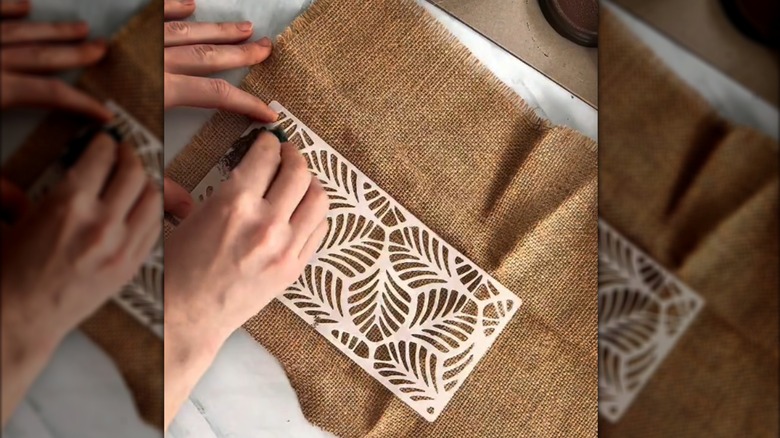
Once everything is on hand, start by painting the glass jar and lid with a brush. Be sure to follow the tips on how to paint mason jars, so you know how to properly recolor the smooth surface. Dab the wet paint with a sponge before it dries to give it a rough texture, and let the lid and jar dry separately. For the next step, lay the stencil on an unrolled piece of burlap, and use the sponge to dab the paint over it. Don't use too much paint, and keep your dabs gentle, so the liquid doesn't glob and spread beneath the stencil. Repeat this with another section of burlap and set it aside.
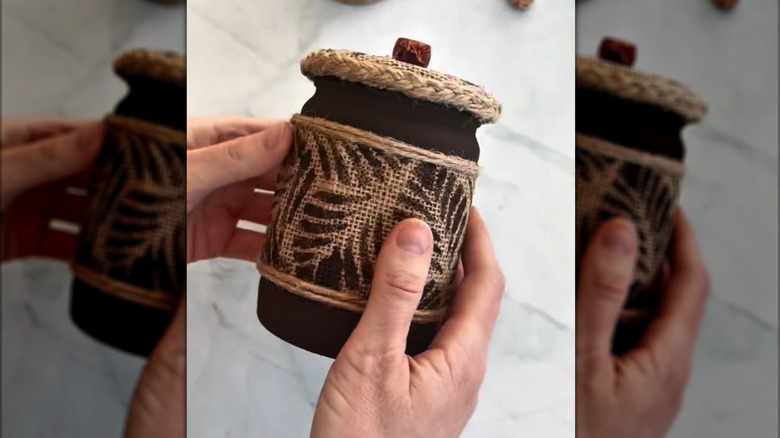
Once the paint dries, cut out the painted section and hot-glue twine around the edges. This will give it a stylish border that doesn't unravel. Put the twine-bordered burlap around the middle of the mason jar. Style the other piece of burlap over the lid, trim the excess edges, then secure it in place. If you want, you can add another piece of twine around the edge to keep it from fraying and to add a bit of style. Finish off the design with a wood bead on top.
At this point, the project is finished and ready to adorn an open surface in a home. Craft a single jar or a set of multiple jars. If you're going with the set, try mixing them up with different mason jar sizes or mismatched stencil patterns to add more complexity to the look. Style them on their own, atop decorative trays, or alongside leafy table garlands to create gorgeous, one-of-a-kind centerpieces.