Transform An Old Pot Lid Into Clever Storage With This Fun DIY Idea

We may receive a commission on purchases made from links.
Got a pot lid orphan? Maybe its companion got scorched beyond repair, or you've decided to upgrade your kitchen with a new cookware set. Don't toss that old lid or send it to the donation pile. With a bit of glue, Mod Podge, a glass bottle, beads, skewers, paint, braided twine, and patterned paper, you can turn a lonely glass pot lid into an attractive storage tray, perfect for use in the kitchen, bathroom, or entryway.
At the heart of the pot lid transformation is decoupage (attaching and sealing paper to a surface, usually using a glue like Mod Podge). The paper doesn't have to be fancy — patterned napkins will work, as will pretty wrapping paper. Another option is to use quilting fabric, such as Craftido 100% Cotton Quilting Fabric Bundles.
Along with saving a pot lid from the trash heap, the project gives you another way to upcycle a glass bottle or jar. To add a bit of visual interest to the project, look for a textured bottle or one with ridges. Also, try to choose a bottle whose diameter matches the lid's to make the finished project more stable, and skip those with long, skinny necks. A wide lid may work best with a glass jar, such as an empty pasta sauce jar or a quart-sized milk jar, while a smaller pot lid pairs perfectly with an Italian soda bottle or a glass water bottle.
How to decoupage a pot lid
Start by cleaning the pot lid and glass jar or bottle with soap and water. Remove the handle from the lid, so that there's a hole in the middle. Paint the exterior of the pot lid, the lid handle, and the bottle with an acrylic paint, such as Apple Barrel Acrylic Paint, and let everything dry. The paint provides a durable surface for the glue to adhere to.
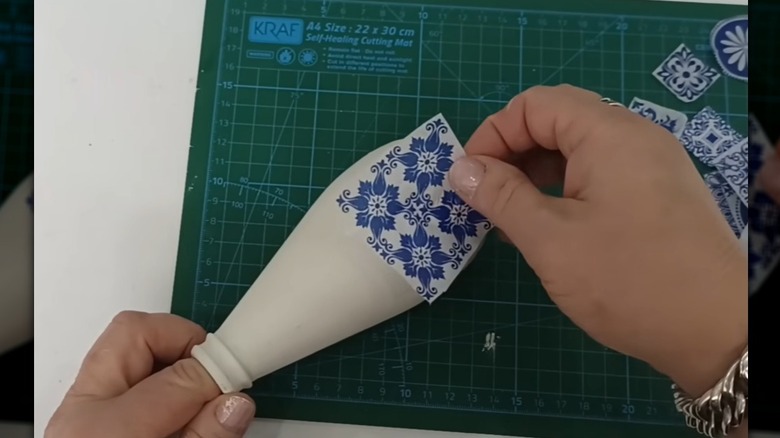
Using a paint brush, spread a thin layer of the decoupage glue over the exterior surface of the pot lid, then smooth the paper or fabric over it. Use your fingers to remove any air bubbles or wrinkles, or a small roller tool, known as a brayer. Repeat with the glass bottle, then trim away excess paper or fabric from both. Instead of covering the entire lid or bottle with the paper or fabric, try cutting out shapes from the material's pattern, such as flowers, and decoupage individual shapes onto the lid and bottle. Decoupage the pot lid if you'd like.
How to assemble the storage tray
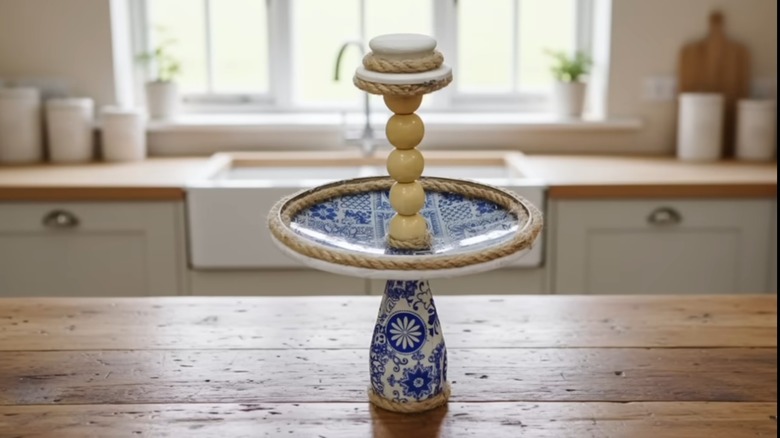
Run a bead of hot glue or epoxy (for a stronger hold) around the inner rim of the lid, then push a length of twine into the glue, tracing the lid's interior circle. Repeat along the outer rim of the pot lid and around the base of the bottle. Thread some wooden beads onto a small bunch of skewers or a wooden chopstick. Add a bit of epoxy or glue to the top of the skewers and position the painted pot lid on top.
Put a bead of epoxy around the hole in the lid on the interior (concave) side, and slide the opposite ends of the skewers through the hole so the beads are sandwiched between the lid and the handle. A few inches of skewers should stick out the other side. Place a bead of epoxy around the lid hole on the exterior (convex) side, and slip the bottle opening over the skewers, so that the top is flush with the lid. Before gluing in place, fill the bottle with sand or rice to weigh it down and make the storage tray a little less top-heavy.
When dry, use the storage tray to display small knick-knacks or to hold your jewelry or other small accessories. In the kitchen, it can hold a few fruits. The storage tray is just one of many ways you can reuse old lids from pots and pans around the house.