The Easy IKEA Hack That Transforms Empty Wall Space Into Chic Hanging Storage

We may receive a commission on purchases made from links.
Some IKEA items are made to be DIYed, such as the MOPPE Mini Storage Chest. This IKEA product is built from unfinished birch plywood and is essentially an open template to assemble and decorate as you wish. The TikToker lonefoxhome came up with an ingenious way to turn it into a stunning storage cabinet for empty walls. This idea is easy, can be done in a day, and doesn't require any specialized tools to complete, making it ideal for beginner DIYers.
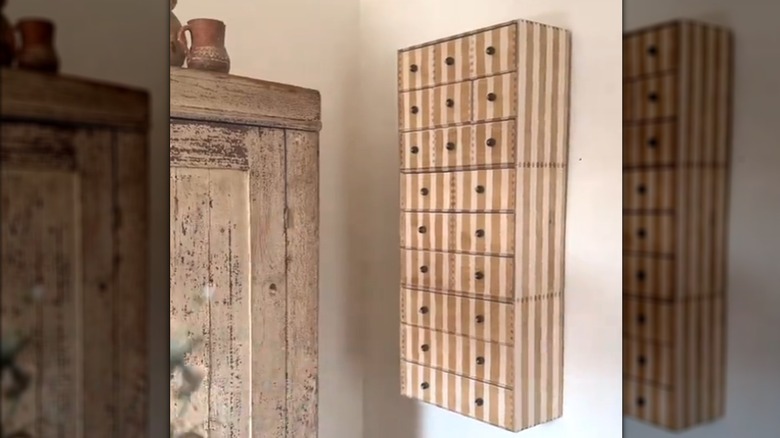
This hack is especially notable because it's as functional as it is decorative. The TikToker combined three MOPPE storage chests, and the finished cabinet has 18 different compartments for clutter. It's relatively small in size, even with the three furniture pieces combined, and can hang above other furniture, making it a great IKEA hack for small spaces.
The other benefit of this finished piece is its timeless appeal. The TikToker added a muted stripe pattern to this design that gives it a truly chic aesthetic. Stripes add visual depth in interior design and befit many room styles, like modern, transitional, and traditional-inspired looks. Neutral color combinations are great for adding complexity without being too bold. As a result, natural wood-colored, striped cabinets are ideal for many living room styles. They add creative storage and decorative appeal without being too flashy.
What you need to turn the IKEA MOPPE into chic hanging storage
Although this project is brilliant and has a charming aesthetic, it isn't budget-friendly like other IKEA storage hacks. Each MOPPE Mini Storage Chest costs $39.99. Therefore, the starting price for this project is upwards of $120. Of course, one can always simplify this hack by only using one or two cabinets instead. You can also opt for the smaller version of the cabinet, which is $4 cheaper. This will make it more affordable, and it could make the hack more practical for limited spaces with shorter ceilings.
@lonefoxhome I decided to mix two of my favorite things, wood & stripes into one stunning little wall cabinet! I've seen these IKEA moppes storage boxes for a while and always wanted to create something with them. The little #diy handles are just the perfect addition to the drawers 🤎 ps. I added two small D rings to the backside to hang it on the wall
Aside from the IKEA chests, this idea requires a drill, painter's tape, wood stain, and wood glue, such as Gorilla Wood Glue, for the main cabinet build. Remember, the darker the stain, the more prominent the stripes will be. The chosen stain affects whether the furniture blends into the background or stands out as a focal piece. The original DIYer used an oak-colored stain, like the Minwax Classic Oak, for a more subdued, traditional style.
The DIY handles also need some supplies. Pick out another wood stain darker than the one used for the cabinet. Stick to a similar color temperature, so the knobs complement the furniture base. For example, if using the warm-toned classic oak, opt for another darker warm-toned oak wood stain for the knobs. You'll also need a roll of jute string and a pack of wood beads, like the Darice Unfinished Wood Round Beads. Ensure the chosen beads have pre-drilled holes, so no additional steps are needed.
How to assemble and style the hanging storage IKEA hack
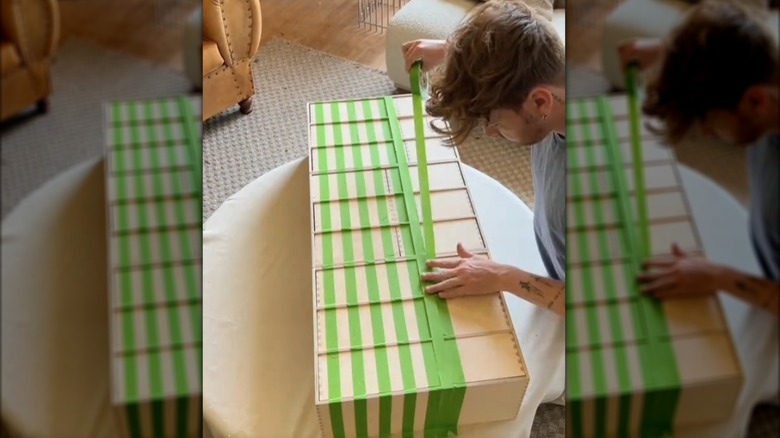
Whether using one, two, or three MOPPEs, start by assembling them with wood glue. Flip the drawers backward, so the cutout handles are in the back, since you'll be adding customized, stylish handles later. Glue the cabinets on top of one another, then lay down lines of painter's tape with space in between each strip.
Stain the space between the painter's tape and let it dry for up to two hours. If you want the stripes to be more prominent, add a second coat. While the stain dries, prepare the knobs by dipping them in the darker wood stain and letting them dry. After dipping the beads, poke a skewer or the end of a paintbrush through the bead holes so paint doesn't dry over the opening. Attach the dried beads to the cabinet by drilling holes in each compartment, threading jute through the holes, and tying a knot on the inside of the drawer.
You can hang the finished project as is, but it's smarter to add a top coat to protect the finished work. Use a glossy sealant for a more elegant aesthetic or stick to a matte finish for a classic look. Hang the finished wood cabinet on studs to ensure it's secure. If hanging the finished piece higher up, there's no need to add any other decor. However, if the cabinet is lower to the ground and you only DIYed one or two chests, consider decorating the top with some personal touches. Add a potted plant or a stack of books on top. Another option is to assemble other easy DIYs, like the decorative IKEA planter hack, to further customize an interior design with homemade touches.