Transform A Bowling Ball Into An Adorable Garden Decor Piece

If you've been looking for whimsical decor to make your garden stand out, you're going to love this fun and affordable DIY. There are tons of unique ways to reuse old household items in your garden instead of tossing them, and this easy upcycling hack makes the most delightful garden decorations from bowling balls. With just an old bowling ball, some paint, and a little tape, you can make an insanely cute ladybug statue to reside in your garden or yard!
Whether you have a bowling ball lying around or grab one from a thrift store, this project is cost effective and so simple to complete. While paint is really all you need to transform your bowling ball into a garden ladybug, thick-gauge wire and wood beads can be helpful accents to make antennae that really bring it to life. Depending on how you style this decoration, you may need caulk to fill the finger holes or a drill to alter the bowling ball to fit the ladybug's antennae as well.
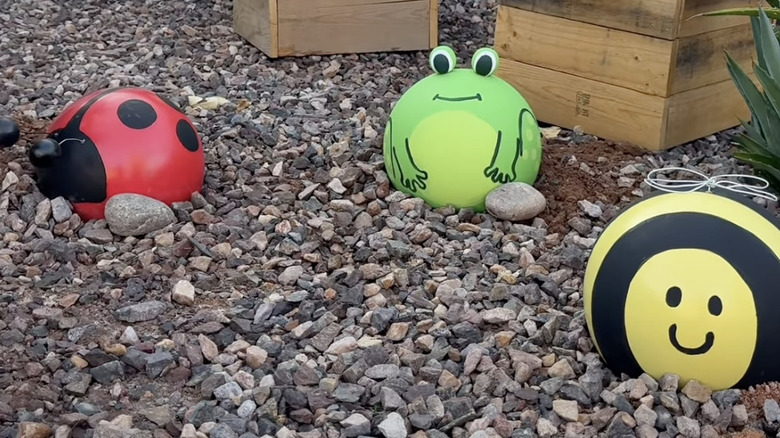
Bowling balls are heavy and durable, making them great for upcycling into garden statues to use as quirky front yard features or to fill out your side yard landscaping. Because of its round shape, digging a small divot in your garden where you can set your bowling ball helps keep it in place. This also adds to the look of your decor, making the ladybug appear flat on the bottom with a rounded back. You could use multiple bowling balls in different sizes to create several ladybugs. Alternatively, you might design your decor to look like a bee or even another garden friend, such as a frog. With a little imagination, this project's possibilities are endless.
DIYing a ladybug garden statue from an old bowling ball
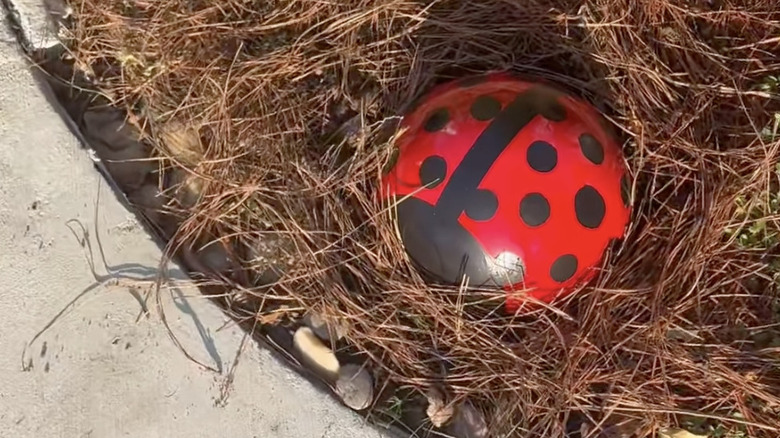
Even though it looks so delightful in a DIY landscape design, this project is super easy to complete. If you'd like to ensure the paint sticks as securely as possible, you can sand and prime the bowling ball, though this step isn't strictly necessary. Spray paint your bowling ball red, orange, yellow, or whatever color you'd like for your ladybug, using paint rated for outdoor use. Alternatively, leave the ball the color it is for a unique design. After the paint dries, place two parallel strips of painter's tape on the ball, outlining a narrow strip in the center to represent the gap in the wings. Use a brush to paint this portion black, and then peel off the tape.
With a round sponge brush, create black dots on both sides of this middle line. To make larger dots, you can use a round object to trace onto the bowling ball and fill the outline with black paint. Finally, paint a black semicircle at the front of your project, connecting it to the middle line. This forms the head of your ladybug. The plain black face of the ladybug is simple and super cute and will add a dash of whimsy to your garden. To give it a more cartoon-like style, paint eyes or a smiley face onto your DIY ladybug decor. If you're worried about any of the details holding up in the weather, you can also spray your project with a clear sealer or top coat designed for outdoor use.
Personalizing your bowling ball garden statue
One cute way to customize this project is to give your ladybug more details. To add antennae to your DIY garden feature, drill two holes above the ladybug's head where you can insert craft wire. If you don't have a drill, orient your project so that the wires fit in the holes in the ball. There are a couple ways to style your ladybug antennae. Either bend the wire into a spiral at the top for a cute and simple look, or glue painted wood beads onto the ends of the wire. To attach your antennae, glue the wires into the drilled holes. Otherwise, fill your bowling ball's finger holes with caulk to keep the wire in place (you'll need to support the wires as the caulk dries to prevent drooping).
If you have more than one bowling ball or you'd prefer a different species of friend for your garden decor, get creative with this project, as Instagrammer morganzuhmakes did to fill out a garden full of smiling wildlife. Try painting the bowling ball yellow and using your tape to help you create bee stripes. Alternatively, use green paint for a frog statue, painting on accents like the frog's legs and belly and attaching large wood beads onto wire to make two eyes for that classic cartoon frog shape.