The Genius IKEA Shoe Bench DIY That Will Add Style To Any Entryway
We may receive a commission on purchases made from links.
The entry is your guests' first impression of your home, setting the tone for your personal aesthetic and overall vibe. However, nothing drags down the look faster than walking in to see a chaotic, unruly pile of shoes on the floor. Listen, we all know shoes unleash a new level of clutter that is challenging to deal with and organize, perhaps thanks to the fact that they come in unattached pairs and often carry in outside dirt. However, this is even more of a reason to create thoughtful storage solutions where each pair of shoes has its place in order to keep your entry looking its best.
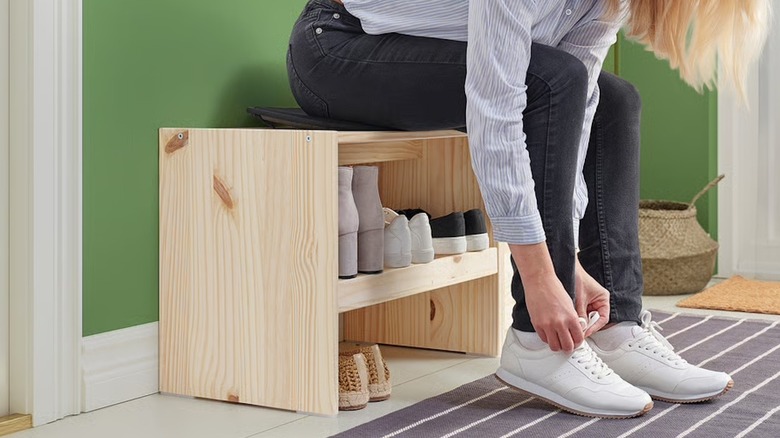
Some people are lucky enough to have spacious entryways with plenty of room for robust shoe storage setups. However, what happens when you are working with a very small entry that only has a couple feet — pun intended — to spare? Not to worry, because IKEA is once again at the ready with a perfect, inexpensive, and small space shoe storage solution, the RAGGBERG bench with shoe storage for only $24.99. While the natural pine frame is certainly pretty, the piece is fairly basic in terms of contributing to the design of your entry space. However, Mirella Schraven (@lifeofmirella_) shared on Instagram how she took the IKEA RAGGBERG to the next level by adding an alternating pattern of stripes with contrasting wood tones for an exceptionally upscale and impactful look in her tiny entry. By simply taping off the stripe pattern before assembly, staining the open stripes, and putting the bench together, Schraven's finished two-tone beauty looks like expensive designer alternatives. Learn how you too can keep entryway shoe clutter nice and organized with this stylish IKEA hack that takes an entryway of any size from blah to beautiful.
Tape out the striped pattern on each piece of the IKEA RAGGBERG before assembly
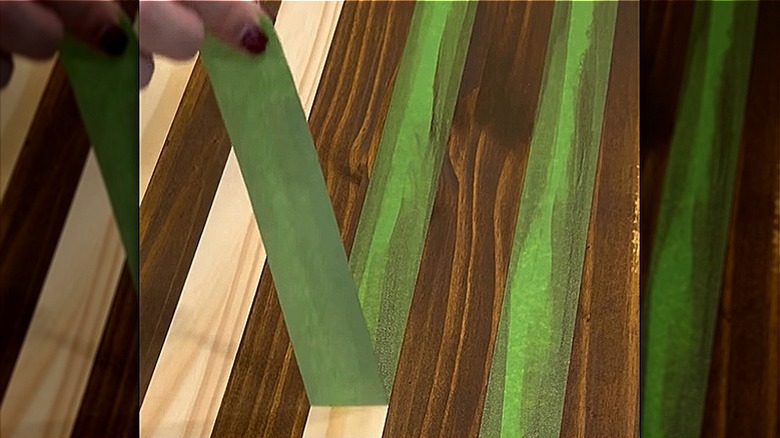
Prior to assembling, you'll want to create the wood stain stripes with the IKEA RAGGBERG pieces still separated, though it's helpful to familiarize yourself with how the pieces, and therefore stripes, will connect together. Using 1.5 inch wide FrogTape or something similar, cover the strips where you'd like the natural pine to remain untouched. If you get stain on the pine stripes, there's no removing it, so take time and care to firmly secure the edges of the painter's tape down with a credit card to ensure a tight seal and satisfyingly crisp line. Wrap the taped pattern all the way around each piece so it carries from the front to the back and across the edges of the wood.
To create the pattern, grab the top bench piece of the RAGGBERG and begin with a taped natural pine stripe from front to back (the short way), followed by an exposed stripe that will receive stain. Repeat this alternating pattern until you have 15 stripes total, ending on taped, natural pine. The Instagrammer appeared to add a detail to the underside of the bench piece where the stripes changed direction after they wrapped onto the bottom, but this is optional. For the two upright side panels, create an alternating vertical pattern beginning and ending with a stained stripe and containing nine stripes total. There are three small horizontal connecting support pieces, one directly under the top bench and two on either side of the lower shelf, all of which will get 15 stripes beginning and ending with a stained stripe. Leave the lower shelf grate natural pine.
Stain the stripes and assemble the IKEA RAGGBERG for a jaw-dropping shoe storage bench
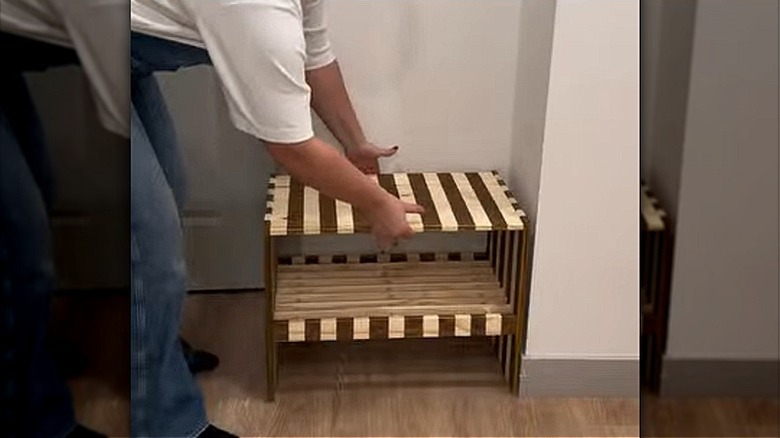
Once your pattern is fully taped on the IKEA RAGGBERG pieces, it's time to stain. While you can use regular wood stain, the Instagrammer chose to use a "less mess" stain product with a sponge applicator tip for more control over the placement and quantity of stain on the narrow stripes. Dab on the dark walnut formula, the perfect shade for contrasting with the light natural pine, then wipe the excess off immediately with a rag or towel. If the color isn't dark enough to your liking after the first coat, you can build on your coverage with a second coat. Once the stain is fully applied and dry, remove the painter's tape, revealing beautifully crisp stripes of alternating dark walnut and natural pine. To protect the finish and wood, you can cover the pieces in a coat of matte polyurethane.
Assemble the RAGGBERG according to the instructions to see the whole thing come to life in all of its banded glory. Once assembled, this petite bench, at just under 24 inches wide and 14 inches deep, can be nestled in an entryway of nearly any size. While the seat is the perfect size for perching when removing or putting on footwear, you can also store two to three pairs of shoes on both the lower shelf and in the space below it on the floor, keeping shoe clutter from piling up in the entry.
By creating an alternating striped stain pattern on the small-space-friendly IKEA RAGGBERG, you can easily elevate this basic wood shoe storage bench into the standout piece of furniture in your entry, as beautiful and high-end as it is practical for keeping shoe chaos in check.