Easy Dollar Tree DIY Turns Broken Hangers Into A Countertop Clutter Buster

We may receive a commission on purchases made from links.
Attempting to clear away the clutter from your kitchen or bathroom countertops? You might have noticed that the trickiest step associated with this sort of project is deciding what you're going to do with the smaller miscellaneous items that you have lying about. What you need to do is give these objects a new dedicated home where you can quickly locate them — instead of sweeping them into the nearest drawer and calling it good. There's no need to spend lots of money on a decluttering solution, though. By following an inventive DIY from TikTok user @lizfenwickdiy, you can craft a tiered countertop organizer using just a broken plastic hanger and a pair of inexpensive Crafter's Square Wooden Crates from Dollar Tree. The coat hanger pieces will serve as triangular side supports for the organizer to hold the tiered crates upright.
In addition to the crates and coat hanger, you'll need E6000 glue for keeping your components together and a strong pair of shears or perhaps mini bolt cutters for clipping the hanger. You might also want some wood stain or a nice acrylic paint for the crates to complement your interior. In the bathroom, this organizer is perfect for things like hair ties, bobby pins, and travel-size soaps for guests. If you're going to put this organizer to use in the kitchen, fill it up with teas, sugar packets, and stir spoons to help you create the ultimate coffee station — it's just one of many options to keep your counters clean, organized, and easier to manage.
Making and customizing your Dollar Tree countertop organizer
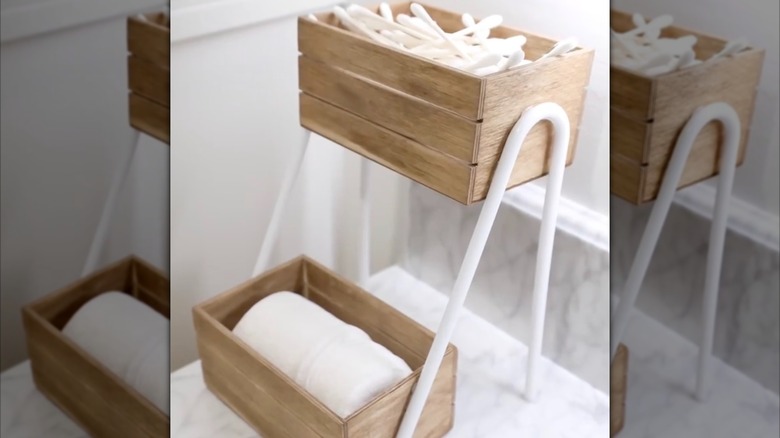
To get started, clip away the middle section of your coat hangers so you're left with two matching U-shaped pieces. Then, paint or stain your crates according to your preference. Once they're dry, use your E6000 to attach the clothes hanger pieces to their sides. One crate should sit directly on the countertop with the angled ends of the hangers fastened to it to keep the organizer stable. Situate the other crate between the bends of the hanger pieces so it's at the top of the fixture. If the back legs of the organizer aren't flat enough on the bottom, try sanding them down gently with a high-grit sandpaper. You may also want to consider holding up a level along the tops of the crates before the glue sets to make sure your project is perfectly level. Give the E6000 at least 24 hours to cure before you put anything in your organizer. To secure the pieces in place while it sets, apply some quick-drying hot glue alongside the E6000 or tape the boxes to the hangers for a temporary hold.
Want to use a hanger for this project that has an ugly color? All you need is a can of spray paint formulated for use on plastic. Rust-Oleum Painter's Touch Ultra Cover Spray Paint, for example, should work perfectly for painting a matte finish on plastic. To make this project larger, try clipping down a second coat hanger and attaching it to the back of the organizer to make a pyramid-like structure. Then, attach a third Dollar Tree crate to the back that mirrors the one in the front. The completed project should pair nicely with lots of small kitchen organization ideas to solve your countertop clutter issues.