Upgrade Outdated Wood Paneled Walls With A Simple, Affordable DIY Refresh
We may receive a commission on purchases made from links.
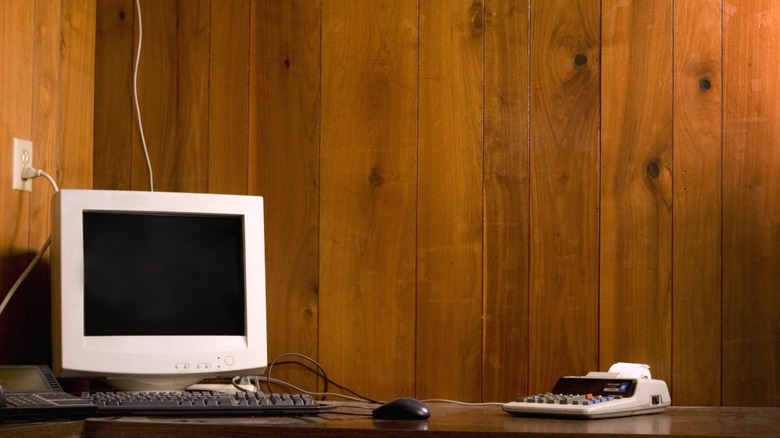
When I was young, wooden wall paneling was considered very upscale, radiating warmth and style. I remember helping my father panel our walkout basement in the 1970s and thinking how cool it looked. As a professional woodworker, I've learned that styles and popular aesthetics change, and today those paneled walls would be accurately seen as tatty and old fashioned (though some designers say wood paneling is back). That said, those worn-out wood paneled walls are still in many homes. With them comes a legitimate question: How do you update and refresh those artifacts from the days of disco and super bell bottom trousers? Changing the color is always an option, and one of the more practical ways to do that is with a product called gel stain.
Wood paneling already has a stain color with a clear finish over the top. To remove the finish and stain color would require sanding through those layers. That's a big job that creates tons of sanding dust to get to raw wood. So, why would you need to do that? Most liquid wood stains work best on raw wood. Applying that stain over a finish is a difficult task that is easy to do poorly, resulting in an unpleasant appearance. Now, that's the case with your typical treatment, but there is a big difference between gel stain and liquid stain. Gel stains, such as Minwax Gel Stain, are specially formulated to be used over the top of an already existing finish to save time and trouble. As its name indicates, it is a gel that is thick, does not run, and subsequently provides a clean, consistent cover for a paneled wall.
Prepping your wood paneled wall for gel stain
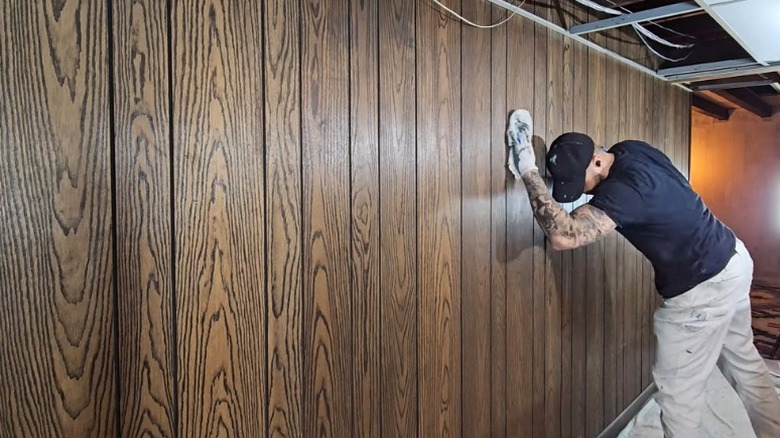
Gel stain is an approachable option when you're considering what to do with your dated wood paneled walls, and getting started is easy. First, use a strong cleaner like Simple Green (or even the old-fashioned TSP cleaner) to remove the years of crud and corruption from the surface of the paneling. Wear gloves during the cleaning. Sadly, you cannot escape sanding. I like to use a pole sander, which is often used in drywall installation, to sand the paneling with 100-grit sandpaper, sanding with the grain of the wood. The goal here is to create a uniform smooth surface onto which you apply the gel stain.
The tiny scratches made by the sandpaper will provide purchase for the gel stain and make it easier to apply an even coat of the product. Wear an effective dust mask and eye protection for this task. When you've finished sanding, vacuum the area clean before wiping the paneling down with a damp cloth to remove the sanding swarf.
Applying the gel stain
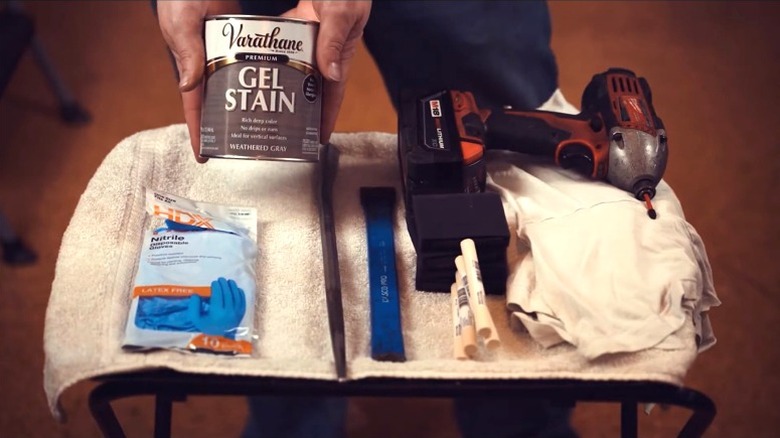
How you apply the gel stain affects the final look. A thicker coat will provide more coverage but will obscure the wood grain of the paneling to a greater extent than a thin coat. I recommend experimenting in an area that is hidden from view to get your procedure down. You should maintain proper ventilation and wear gloves and eye protection during the staining process. And if you are like me, you'll want to wear old clothes.
A typical application process is to apply the gel stain with a rag or brush saturated in the stain. Then, follow behind and wipe away the excess stain with a cloth. How much you wipe away the stain will determine how heavy a coat you are leaving behind. The trick is to create an apply-wipe off technique that leaves behind an even coating (therefore an even stain color) on the paneling. Remember, once the stain has cured, you can add more color with an additional application, but removing the color is much harder.
With the stain applied and cured, you'll need to apply a clear finish over the top of it. I recommend a water-borne polyurethane finish (it is far less stinky than oil-based poly). I prefer a semi-gloss or low-gloss sheen to a very shiny finish, but that is up to you. Apply the poly with a rectangular foam paint pad. In my experience, two coats of water-borne poly will provide a lovely protective finish on your newly refreshed wooden wall paneling. Put it on in thin coats to avoid drips. When you are done, you can step back and take in the fresh look of your once-outdated wood paneled wall.