14 Smart Ways To Use Milk Crates Around The House Instead Of Throwing Them Out
We may receive a commission on purchases made from links.
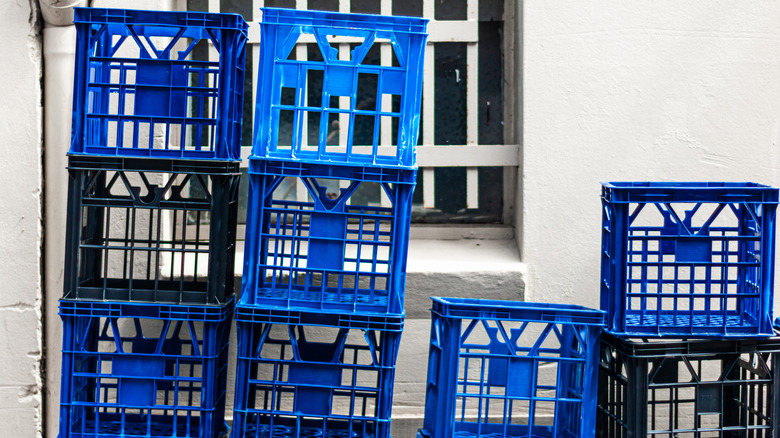
Who would have thought the most utilitarian storage item would become a design trend? Milk crates are heavy-duty plastic containers that were originally used to transport heavy milk bottles. Nowadays, they're used to transport all kinds of food and drinks to restaurants and retailers, and they have another unique use. These leftover plastic bins make perfect materials for smart DIYs around the home.
Below are 14 clever methods to reuse and repurpose milk crates. Pair these ideas with smart ways to reuse milk jugs to truly optimize a home. Since milk crates are stackable and durable, they're suitable for a multitude of household projects. They store items, serve as seating, and can be disguised as decorative objects. Many of these projects only require simple DIY tools and supplies, making them doable for people of all skill sets. The craft storage ideas will inspire you to stay organized, while repurposing a useful item instead of throwing it away. Read on to learn the many ways to upcycle these plastic bins around a home.
Create storage cubbies for living room decor and essentials
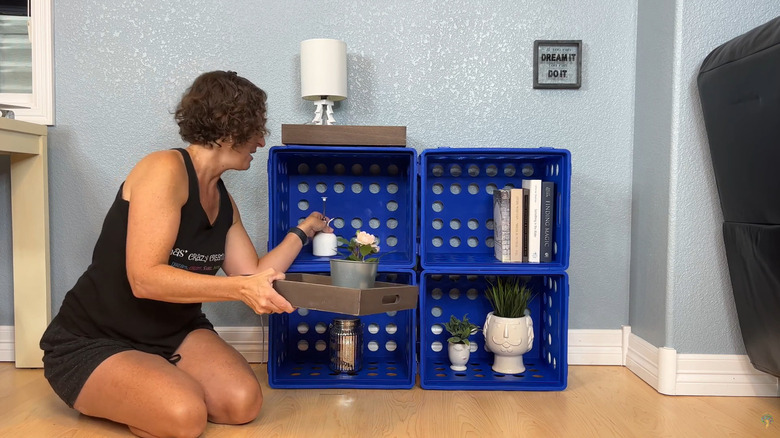
Bind four plastic bins together with zip ties to create a mini shelf unit that can be placed in a living room to organize essentials by type. By adding one or two decorative trays on top, you can also create a stable surface to hold a lamp for ambient lighting, allowing you to utilize every shelf tier. Be sure to use bins that match the rest of the room's color scheme. In most cases, neutral colors like beige, black, gray, or white are easier to coordinate with various interior designs.
Illuminate an extra large crate shelf with LED puck lights

To create another storage shelf on a much larger scale, combine up to eight milk crates in a vertical column with E6000 Craft Adhesive. Make three columns total, using zip ties to attach them side by side. The result is 24 open cubbies for storing everything from books to artificial plants. On the roofs of the cubbies, install lights to make items easier to see, such as Unisame LED Puck Lights. If keeping live plants, use designated grow lights like Barrina Orbgrow OG09 Puck Grow Lights.
Build a tall milk crate bookshelf
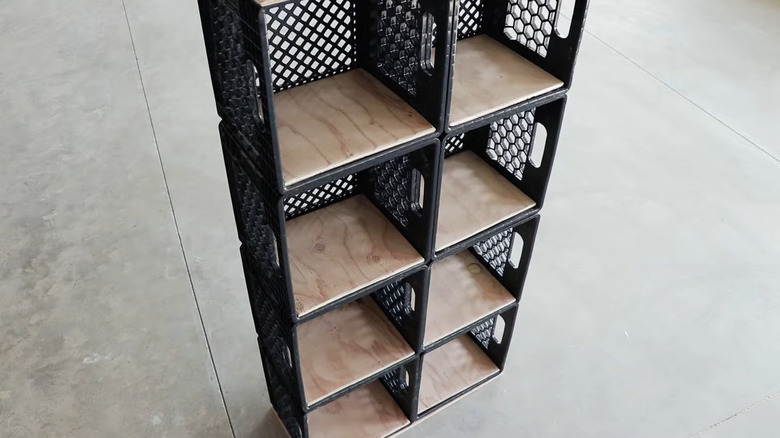
A third storage shelf idea requires eight 12-by-10.25-inch wood slabs. Combine eight plastic bins with zip ties, making two columns of four. Slide the wood slabs into each shelf as they are, or decorate them to better fit a room theme. The most budget-friendly method to dress them up is wrapping them in Con-Tact QC Adhesive Covering Shelf Liner from Dollar Tree. Another option is sealing and finishing the wood with Rust-Oleum Professional Primer Spray. There are a variety of sheens and colors to choose from.
Turn milk crates into a stylish organizer
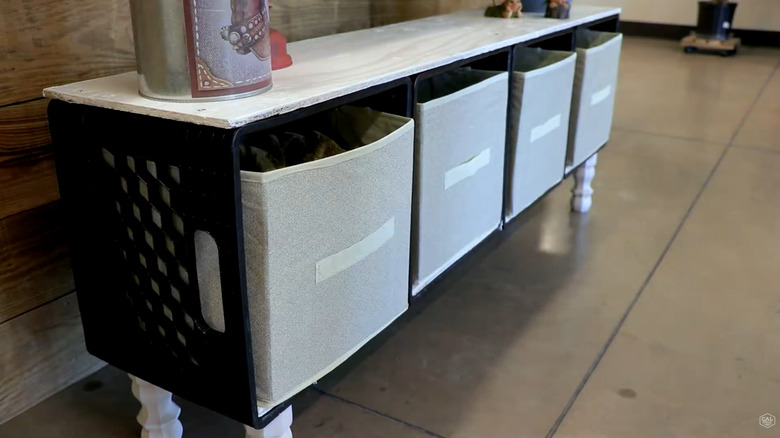
This organizer is a little more stylish. It requires paint, four 12-by-10.25-inch plywood pieces, one 11-by-52-inch plywood slab, and four milk crates. Start by zip-tying the crates in a row of four, and slide the smaller pieces of wood into each one. Then lay the larger piece of wood on top. To emulate YouTuber C-A-L Ranch Stores' finished project, DIYers must paint a set of sofa legs, such as Crawopft Wooden Furniture Legs, drill holes into each corner of the organizer, attach the mounting plates with a power screwdriver, and screw the legs on.
Stagger milk crates into an unconventional nightstand
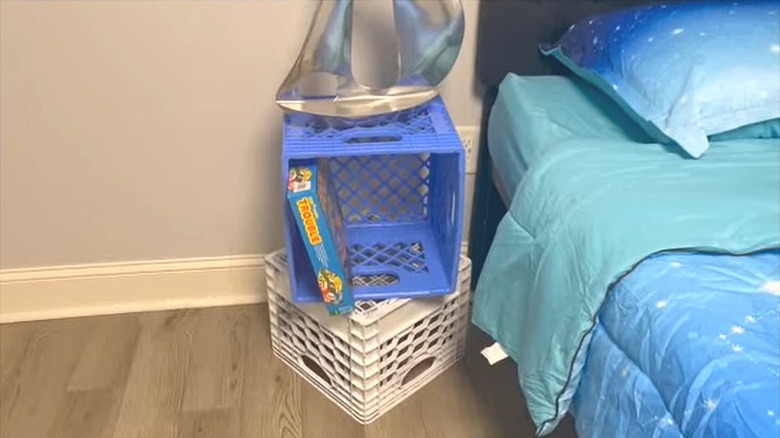
If you're looking for an easy end table idea that you can DIY, this method takes minimal effort. Stack two different colored milk crates on top of one another, turning the bottom one upside down. Place the top one on its side to create a shelf. The heavy-duty plastic is sturdy enough to support bedside items without any additional crafting. Even so, we recommend adding zip ties to keep from accidentally knocking them over. Put a lamp on top and tuck a catchall tray in the cubby to maximize bedside storage.
Craft a wall organizer for arts and crafts and DIY supplies
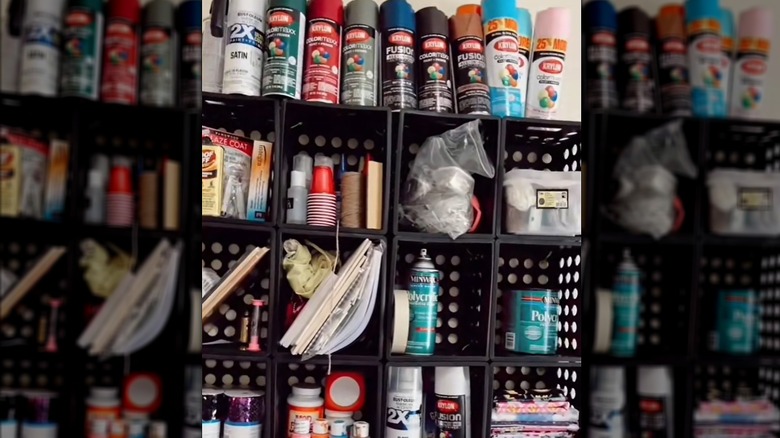
Milk crate organizers don't have to be on the ground. Create DIY shelves by attaching them to the wall using a 3-inch drywall screw and drill. Use a level to ensure they're hanging straight. Don't worry about the screw being an eyesore, as stored items will hide it from view. Use alternating crate colors for a bold, maximalist look, or stick to a single color for a more modest aesthetic. This storage idea is especially useful for keeping diverse item collections, such as crafting supplies, organized.
Make cushioned stools out of milk crates
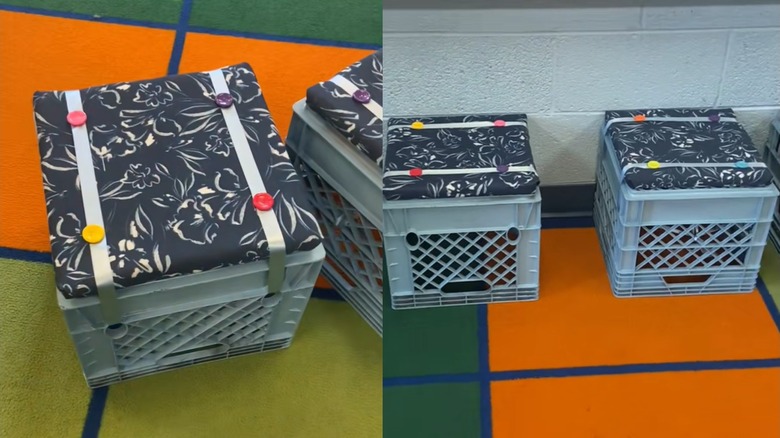
Adding cushions to milk crates to make cozy, miniature stools is easy with this no-sew DIY. Trim an American Excelsior Co. Premium Poly Foam Chair Pad to the same size as the crate's plastic bottom, which is usually about 13-by-13 inches. Wrap the foam in fabric that is 2 to 3 inches wider on each side, and hot glue it in place. Use solid-colored fabric for a minimalist or modern look, or use floral-patterned material for a more eclectic style. Finish the design by tying it onto the crate with two ribbons wrapped around each side.
Turn a milk crate into a stylish ottoman

Instead of adding a single cushion to a spare crate, transform the entire container into a plush ottoman. Wrap the whole crate in thin foam, such as American Excelsior Co. Premium Poly Foam Cot Pad. Use hot glue or E6000 adhesive to attach the foam to each side. Wrap the entire ottoman in fabric, and secure it with a staple gun. Use a plush velvet material for a more luxurious look. If you live in a busy household, you're better off using a durable, easy-to-wash material like microfiber.
Use milk crates as an impromptu bed frame
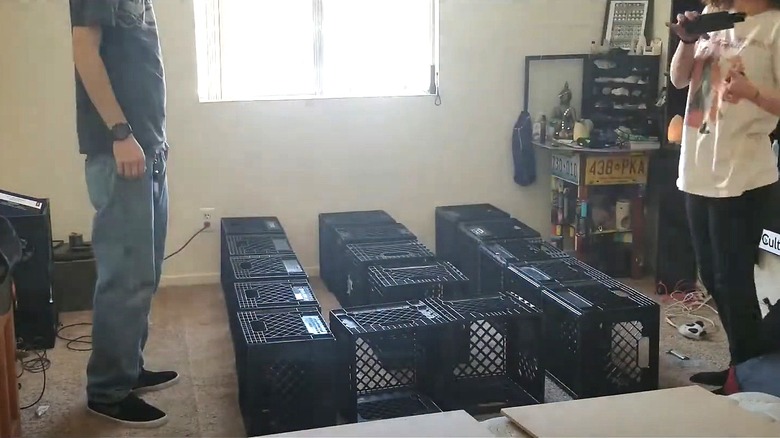
Milk crates are one of the most innovative box-spring alternatives. Line the crates up against each other, or space them out slightly, so it takes fewer to cover a space. For reference, YouTuber JayyBird Soars used 15 staggered milk crates for a full-size bed. Don't forget to turn some of the crates sideways for under-bed storage. The last step is placing a wooden board with the same dimensions as the mattress on top.
Stow items in a handy smaller crate on the back of a toilet
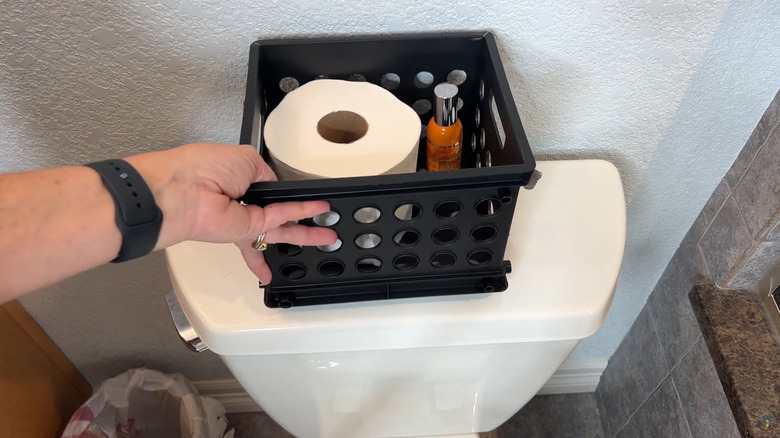
Creativity isn't a prerequisite for upcycling a milk crate. Simply place an empty small crate on the back of a toilet. This creates a perfect storage pocket for toilet paper rolls and fragrant room spray. When dust and grime accumulate, wipe down the hard plastic with soapy water or a vinegar-based cleaning solution. If you don't like the look of your box, you can always spray paint it, add artificial vines, or decorate it with other embellishments to upgrade it.
Transform milk crates into artificial bushes for your house
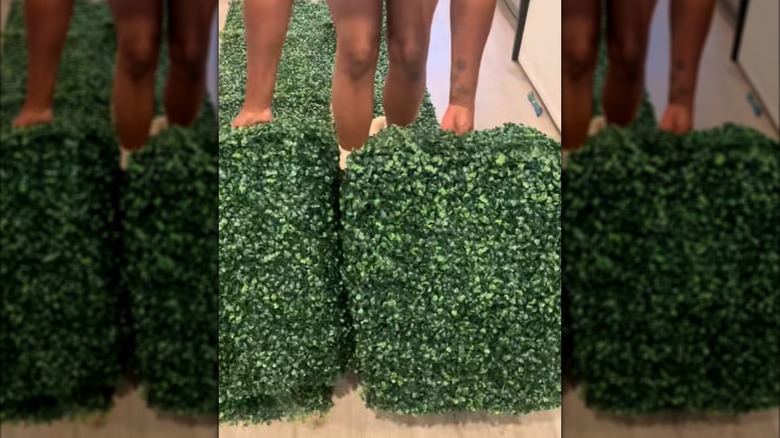
Make old plastic bins unrecognizable by turning them into artificial greenery for indoor or outdoor spaces. Like most of these projects, this idea requires a pack of zip ties. Order a pack of boxwood hedge wall panels, like the Aokie 12pcs 20"X20" Artificial Grass Wall. You'll need at least five pieces per milk crate. Go with the larger option: the 20-by-20 inch panel sizes. Trim the panels using standard craft or kitchen scissors, and secure them with zip ties to create the miniature boxwood hedges.
Use milk crates to safely stow musical records
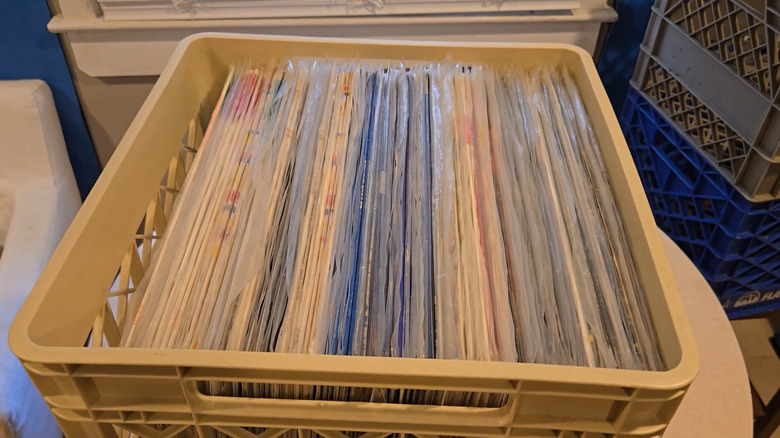
Standard vinyl records are 12 inches on all sides. This makes them the perfect size to safely tuck into a spare milk crate. Before putting records in storage, take precautions to protect them from dust, scuffing, and humidity. Put each record in an Eveo Vinyl Record Sleeve before putting it in the plastic bin. Also, line the inside with a High Caliper Smart Pot Milk Crate Liner, especially if there's a risk of the records getting bumped and jostled while in storage.
Store and organize tools in a portable milk crate
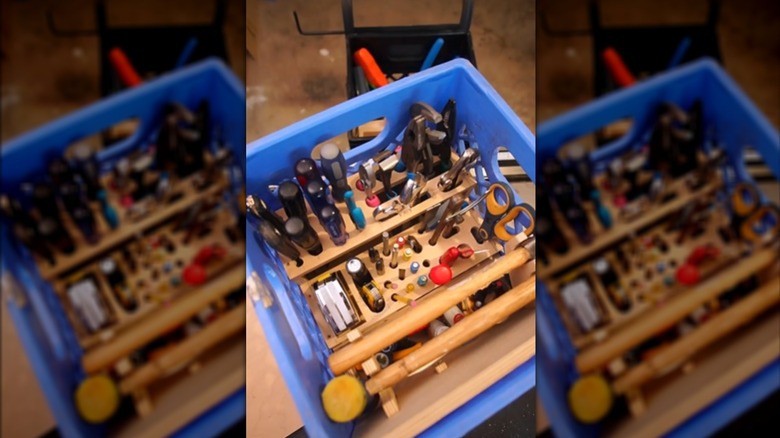
A milk crate is designed for portability; the top rim has handles on all sides for carrying as needed. This makes the crates perfect makeshift toolboxes. Optimize their storage even further by crafting your own tool organizers like @mosermakes on Instagram. Another option is purchasing premade dividers like the Fpvera Screwdriver Storage Rack. Double-check the dimensions of any and all organizers before ordering to ensure they fit within the confines of a repurposed bin.
Divide a room in your house using stacked milk crates
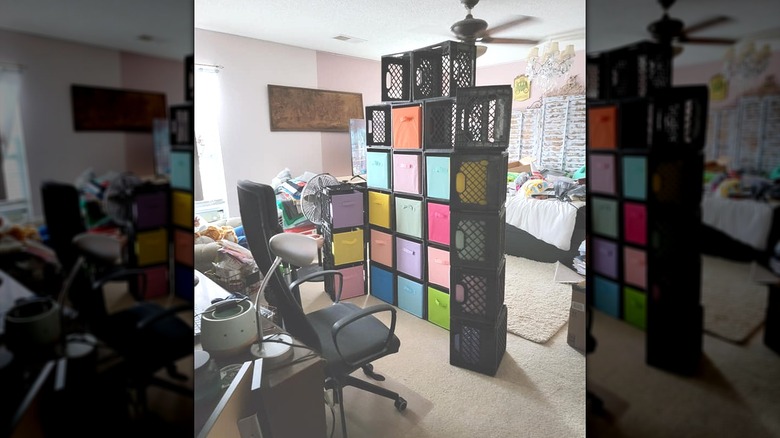
Another clever way to upcycle these retro storage containers is by stacking them on top of one another to create a massive room divider. Make each column at least five or six boxes high. Turn some of them sideways to create organizer cubbies as needed throughout the design. Since this is a large-scale DIY, use zip ties and hot glue to secure the crates together and keep them steady. Keep heavier objects on the bottom so it doesn't tip over, and add a curtain to one side to improve aesthetics.