How To Insulate Water Pipes To Prevent Freezing (Or To Save Energy)
We may receive a commission on purchases made from links.
Not only is insulating your pipes a smart idea because it'll prevent your pipes from bursting in freezing temperatures, but it'll also reduce heat loss in your home — both of which can save you money. Fixing the damage from burst pipes can easily cost you over $5,000 or more in property damage, and insulating your pipes will cost you significantly less (right around $100–$150, depending on how large your plumbing system is).
Luckily, doing your own pipe insulation is a simple DIY task that takes only a couple of hours to complete.
What Does Pipe Insulation Do?
What Does Pipe Insulation Do?
Insulation does not make your pipes warmer. What it does is slow heat transfer, meaning that insulating a hot water pipe reduces the amount of heat or cold pulled from the pipe by the surrounding air. In the summer, insulating cold water pipes keeps the water cooler than the warm air around it, but in the winter, it helps prevent frozen pipes by keeping the water inside the pipes warmer than the freezing cold air outside the pipes.
Cold water pipes only need to be insulated in areas where they will be exposed to freezing temperatures, such as basements, crawl spaces, attics, and along uninsulated exterior walls. Pipes in bathrooms and kitchens are usually fine since these areas tend to be heated and insulated areas of the home. However, no insulation is 100 percent effective, so pipes consistently exposed to freezing cold may require additional protections, such as heat tape. The best way to prevent frozen pipes is to insulate and air-seal the area where the pipes are located so they are no longer exposed to such cold air.
On the other hand, hot water pipes should ideally be insulated all the way along the line from the water heater to each faucet, fixture, or appliance. To ensure the pipes are insulated along this entire path, it's preferable that the job be done by a plumber when the pipes are originally installed (since it's not worth opening the walls just to install insulation for your hot water pipes). However, if you find that your hot water pipes are not insulated, you can still gain some energy savings by adding insulation material to all exposed pipes to which you have access. Pipes tend to be exposed in cooler areas, such as crawl spaces and basements, making insulation worthwhile.
Buying Insulation Materials
Buying Insulation Materials
Home improvement stores carry a variety of pipe insulation materials. Foam pipe sleeves, also called pipe wrap insulation, are made from either polyethylene or neoprene and are the most popular choice because they are so easy to use. To make the job as easy as possible, look for pipe wrap that is self-sealing since this means you won't need any additional supplies to fasten the insulation. If you do not go with self-sealing insulation, be sure to purchase duct tape or zip ties to secure the sleeves in place.
Pipe sleeves are also sold in fiberglass. This material has a higher R-value rating than foam sleeves, meaning the material provides better insulation, and it is preferable for use near gas furnaces since it is more heat-resistant than foam. However, fiberglass insulation is more expensive than foam. It is best to secure fiberglass sleeves with aluminum foil tape since it creates a vapor barrier between gaps in the material. While the installation process is largely the same whether you use foam or fiberglass sleeves, it is important to always wear gloves, long sleeves, and pants when working with fiberglass since the small fibers can be very irritating to the skin.
When purchasing pipe insulation sleeves, be sure to find out what size pipes you have before shopping to ensure the sleeves will fit. While it's easy enough to measure the length of pipe you need to cover, when it comes to diameter, pipe sizing is confusing since the stated sizes typically refer to the interior diameter of the pipe, while the outer diameter (the size that matters when insulating) varies by pipe material.
If you have copper or PEX pipe, look for the size printed on the pipe itself: 1/2 inch, 3/4 inch, etc. This number will tell you which size of insulation will work because most insulation sizing is based on these pipe materials. If you have galvanized steel pipes, measure the diameter of the outside of the pipe. When you get to the store, measure the diameter of the hole in the insulation to make sure the sleeve will fit completely around the pipe.
Remember to buy insulation elbows in the same insulation size to cover any elbow joints in the line. Alternatively, self-adhesive foam insulation tape is a very versatile option for areas with a lot of connections, corners or valves.
Things Needed
-
Duct tape (if needed)
-
Zip ties (if needed)
-
Aluminum tape (if needed)
How to Insulate Water Pipes
1. Prepare for the Job
If you are insulating hot water pipes or using fiberglass materials, start by putting on protective gloves. Clean and dry pipes to prepare for the installation.
2. Cut Insulation to Fit
Choose a straight section of pipe to start the insulation process. Measure the pipe and then use a serrated knife to cut your insulation sleeve to the appropriate length.
When insulating pipes connected to a gas water heater, keep a clearance of 6 inches away from the flue to avoid creating a fire hazard. This means that pipes 8 inches away from the flue can be fitted with 2-inch-thick insulation without creating a hazard, but pipes 7 inches away can only be fitted with 1-inch-thick insulation.
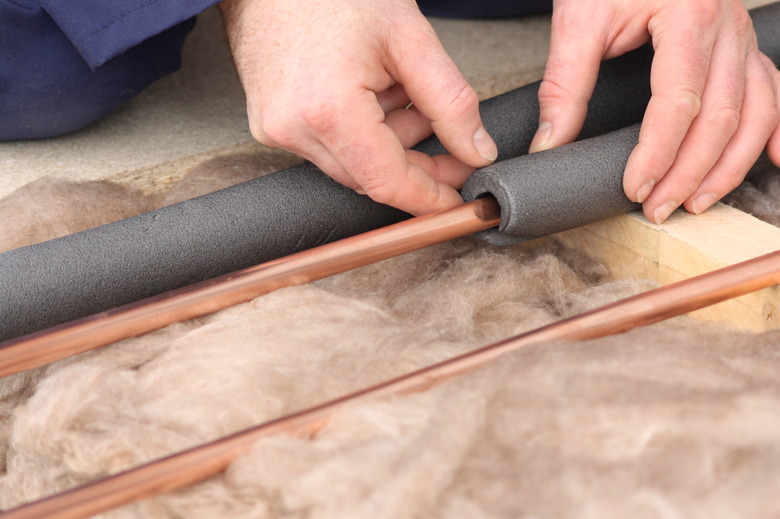
3. Install and Secure the Insulation
Open the sleeve and slide the insulation over the pipe with the seam facing down. If using a self-sealing product, simply remove the backing on the adhesive and press the edges of the sleeve together. For sleeves that are not self-sealing, you will need to secure the material with another product. Duct tape (for foam sleeves) or aluminum tape (for fiberglass sleeves) should be applied down the entire seam of the insulation sleeve. Alternatively, zip ties can be used to secure foam sleeves, with ties applied a foot apart from one another.
Fiberglass needs to be fully covered to be protected from moisture that will ruin the insulating properties of the material. This means that since fiberglass pipe sleeves are typically only 3 feet long, you'll need to cover the ends of adjoining pieces and any exposed ends of your insulation with aluminum tape even if you are using self-sealing sleeves.
4. Cover Joints and Connections
On joints and other connections, apply foam tape or use elbow insulation of the right size and shape. To install elbow insulation, simply slide it into place and secure it with zip ties or tape.
To apply foam tape, remove the backing and apply the tape in a spiral motion around the pipe. Do not tightly stretch the material.
References
- Bell Brothers: How to Insulate Hot and Cold Water Pipes
- Washington State University: Pipe Size Estimate
- PlumbingSupply: Pipe Sizing Explained
- Rise: How To Insulate Your Hot Water Pipes
- Energy.gov: Do-It-Yourself Savings Project: Insulate Hot Water Pipes
- Buyers Ask: Insulation on Hot & Cold Water Lines
- American Home Shield: DIY: How To Insulate Your Hot Water Pipes
- Consumer Reports: How to Prevent Your Pipes From Freezing