Got High Energy Bills? You Might Want To Try Duct Sealing
We may receive a commission on purchases made from links.
Duct sealing is a great DIY project for anyone who is tired of having a cold house, a warm crawl space and high energy bills. The joints of your HVAC system should have been sealed when it was installed, but the seals can fail over time. If you know how to use a paintbrush or apply tape, you can seal ducts. It's only a tough job if the ducts are in an inconvenient location, like a narrow crawl space.
For best results, insulate the ductwork after sealing it. Don't make the mistake of assuming your ducts are already sealed because they are insulated. If air is coming out of gaps in the insulation, it's best to fix the leak at the source by removing the insulation and sealing the duct. Sealing the insulation is insufficient.
By combining duct sealing with duct insulation, you'll receive a greater quantity of air at your desired temperature — a very reasonable expectation considering that's what an HVAC system is designed to do. Fortunately, this project quickly pays for itself through decreased utility bills. According to ENERGY STAR, unsealed ducts are about 20 percent less efficient than sealed ducts, which means you could see up to 20 percent in savings on your gas or electricity bill after completing this project.
Types of Duct Sealing
Types of Duct Sealing
Homeowners have two options for DIY duct sealing: duct mastic or furnace tape (HVAC tape). Duct mastic is sold in a bucket or a caulk tube and looks like gray joint compound or plaster. Furnace tape is made of thin, pliable material so that it conforms to the surface for an airtight connection. Choosing one or the other comes down to personal preference. Mastic is more cost-effective, should last longer and is easier to apply in hard-to-reach areas or areas that well up with condensation. On the other hand, tape often looks cleaner, isn't messy and can be immediately covered with insulation, whereas mastic needs two or three days to dry.
For gaps larger than 1/4 inch, grab some fiberglass tape as well. Mastic already contains fiberglass, but the mesh tape (also called drywall tape) offers more structural support for the mastic across large gaps. Mastic and fiberglass tape are also the recommended materials for patching all seals on ductwork made from duct board.
Aerosol sealants also exist. A liquid polymer is transformed into a fine mist that coats the inside of the ducts, creating an airtight but flexible seal when it dries. Expensive equipment is needed to diffuse this material through the duct system, so it's not a DIY-friendly option.
 JanJutamas/iStock/GettyImages
Choosing Safe Duct Sealing Materials
Choosing Safe Duct Sealing Materials
Regardless of whether you choose mastic or tape, it's vital to use a product specifically meant for ducts and furnaces. Ironically, duct tape is no longer considered safe for use on ductwork, as it cannot withstand the heat flowing through the duct. It may turn brittle, smolder or emit volatile organic compounds when used on ducts. It was originally called "duck tape" and was not intended for ducts at all but rather to give World War II soldiers an all-purpose, durable tape they could tear without scissors.
Not all aluminum foil tape is meant for duct use either. Look for tape that says it meets UL standards UL 181A-P (for rigid ductwork) or UL 181B-FX (for flexible ductwork) to ensure you've chosen the correct tape. Mastic products suitable for sealing ducts will also show a UL 181 rating.
How to Find Duct Leaks
How to Find Duct Leaks
Some duct leaks may be very easy to find, such as metal duct seams that wiggle when palpated or seams that have obvious gaps. Tears on flexible ducts in particular are a little more difficult to detect. Pros have equipment that helps them find leaks and determine the amount of air lost in the entire HVAC system, but you can discover many leaks on your own with a hands-on method.
To increase air pressure in the system and make air leaks even more obvious, tightly tape a piece of foam over the supply vents in your home. Next, remove any insulation sleeves on the ductwork by slitting it longways with a utility knife. Then, turn on the system. Run your hands over the entire surface of the ductwork (being careful to avoid the sharp edges of metal ducts) and feel for any air leaking. Circle leaks with a brightly colored permanent marker.
You can also use a smoke pen to visualize from where the air is coming. Slowly move the smoke pen along all sides of the ductwork, noting when the smoke starts to blow rapidly away from the ducts. Feel the area with your hands to pinpoint the exact location of the leak and circle it.
How to Seal Ducts With Mastic
How to Seal Ducts With Mastic
Like all adhesives, mastic performs best when applied to a clean surface. Use a damp rag to wipe any dust off the ductwork. If the ducts have rust near the joints, scrub it with a wire brush and steel wool to pop off any flakes. You may also need to scrub off old mastic with a wire brush or tackle the ducts with soap and water to remove grease and oil.
Check the product label for the recommended application temperature. Mastic needs about 48 to 72 hours to cure, and it cannot freeze or get wet during that time. Rainfall isn't the only enemy here; even indoor ducts are susceptible to water due to their tendency to "sweat" when the air conditioner is running, especially during humid weather or in the absence of proper insulation. If the weather and temperature forecast meet the product's specifications, continue. Otherwise, it's worth waiting for more appropriate conditions.
Use a chip brush to slather a thick coat of mastic sealant on every single seam, joint or screw head on the ducts as well as any leaking areas you previously circled. Smooth the mastic to remove air bubbles or gaps. If you're reinforcing the seams with fiberglass tape, apply a long strip of it on top of wet mastic and apply a second coat of mastic on top of the tape. Check your product label to see if a second coat is recommended after 72 hours.
How to Seal Ducts With Tape
How to Seal Ducts With Tape
As with mastic, it's vital to start with a clean surface before applying furnace tape. Make sure the surfaces of the ducts are completely dry as well. Cut off a manageable piece of tape, remove the backing and smoothly apply the tape over the seam or tear. As you get the hang of working with the tape, you can also pull off the backing with one hand while smoothing the tape with the other hand, which allows you to lay down much longer pieces of tape and move more efficiently.
Try to avoid creating any wrinkles or air bubbles along the edge of the tape. If this happens (and it will), just firmly place another piece of tape over the wrinkle or bubble. Overlap the edges of the tape when sealing a long or circular seam. When taping over rips in flexible ducts, try to separate the accordion edges of the ducts to ensure the tape seals tightly over the tear. Flexible ducts tend to sag over time, and the tape could come loose if it's applied across the folds.
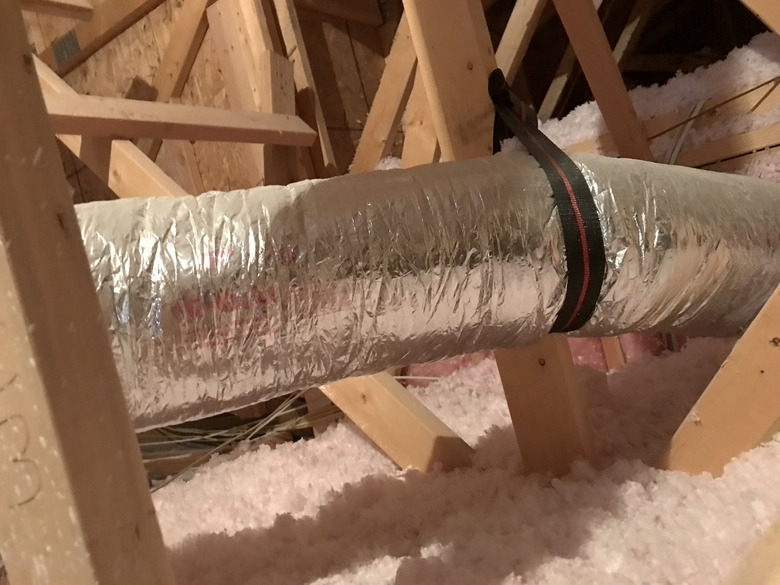
This is a great time to look for any tight bends or deep sags in the flexible ductwork that could restrict airflow. Flexible ducts should be supported at least every 4 feet by straps at least 1.5 inches wide with no more than 1/2 inch of sag per foot. If your ducts don't meet these standards, fixing them could increase the efficiency of your HVAC system.
 Kameleon007/iStock/GettyImages
Pro Option: Aerosol Duct Sealing
Pro Option: Aerosol Duct Sealing
The major flaw inherent in DIY duct sealing is that you can only seal the most accessible leaks. Some of your ductwork might be in hard-to-reach places, like in the walls or ceiling. It doesn't make sense to tear open the drywall to patch leaks in these hidden ducts, but you also don't want to pay to heat or cool these unused spaces.
If a significant portion of your ductwork is inaccessible and your DIY duct sealing efforts have yielded poor results, consider calling in a pro for aerosol sealing. This method sprays a mist of rubbery sealant through the ductwork, patching holes from the inside out. Because special equipment is required for this method, it's best to let the pros handle it.
Insulate After Sealing
Insulate After Sealing
Finally, don't forget to insulate the entire length of the supply ducts. Your sealant efforts ensure most of the air running through the ducts reaches its destination; insulation ensures the air is still warm or cool when it arrives. For example, if it's the middle of winter and the room furthest from the furnace gets nothing but cold air, heat is being lost as the air travels through the duct, even if it's well-sealed. Your home will stay comfortable (and your bills will be lower) just by wrapping the ducts in insulation. Keep in mind that you don't need to insulate the return ducts because that air isn't meant to be warm.
Use foil insulation around rigid ducts. Do not pull it completely tight; leaving a small air gap between the duct and the insulation improves the insulation's efficacy. Seal the seam with furnace tape. Flexible ducts can be retrofitted with foil-faced insulation already fashioned into a tube. Unfasten the flexible duct, slide on the insulation and refasten the duct.
You can also use fiberglass insulation. Make sure it has a foil backing (also called a "face") instead of paper or no backing at all. Wrap it around both rigid and flexible ducts with the foil backing pointing toward you, not toward the duct. Secure the seam with furnace tape. Do not compress the insulation too much when you apply the tape, as this would squeeze out insulating air from the fibers. Always wear long sleeves, gloves, eye protection and a dust mask when working with fiberglass insulation.
Apply Foam Sealant Around Registers
Apply Foam Sealant Around Registers
You've worked hard to ensure air moves through the ductwork and into your home, but there's one last location where air might sink out of the room: the register boot. Take the register cover off and inspect the seam where the metal register boot attaches to your wooden floor joists. It should be a tight fit.
If you see gaps, access the register from the other side (i.e., via your attic or crawl space) and apply a bead of fire-safe expanding foam sealant between the metal and the wood. Don't use too much or the foam could expand around the boot and make it difficult to install the register cover. It also has the potential to burst up through the side of the vent and possibly stain your floor. Always wear eye protection and gloves when working with expanding foam.