How To Install Plastic Lawn And Landscape Edging

We may receive a commission on purchases made from links.
Plastic edging is a handy device to keep one yard feature out of the other. Along the border between a garden and the lawn, the edging helps keep grass from invading the garden bed. When used on either side of a walkway surrounded by flower beds or grass, the edging helps keep dirt, mulch and plants from covering the walkway.
While it's not difficult to perform the actual installation, manually digging a trench for the lawn edging could be a lot of work. Installing the plastic landscape edging when the soil is wet and soft makes the process infinitely easier than when the ground feels rock hard beneath a shovel or garden spade.
First Things First: Measure
First Things First: Measure
Before shopping for lawn edging, measure the length of the area you plan to edge. Unroll and cut a length of twine from the starting point of the project area to the end, adjusting the twine along the ground to account for curves or other changes in the shape of the landscape. The twine should be in the same location and with the same general curvature as the forthcoming edging in order to get a fairly accurate measurement. If desired, trace along the line with marking chalk or spray paint to mark the trench for digging.
Straighten the twine and measure its length. Add at least an extra foot if edging a large area; this accounts for overlap if you intend to use a snap-together type of plastic edging. Once you're ready to buy edging, it's better to buy a little more than you need rather than ending up a tad short, as the edging can be cut to length.
Types of Plastic Edging
Types of Plastic Edging
One type of plastic edging is not necessarily equal to others that are for sale on the same shelf. While they all have a similar purpose, some types of edging handle frost heave better than others. If you live in an area with winters that reach freezing temperatures, look for edging that looks wavy from top to bottom or that has one or more angled lips near its bottom edge. Freeze and thaw cycles often lift standard straight vertical edging partially out of the ground, which means you'll have to tap the edging back into position each spring. Edging with waves or lips underground keeps that from happening, so it's a great choice in cold-winter climates.
The top of the plastic landscape edging varies from one type to another as well. A common style is a black or green edging with a rounded top that's slightly visible once installed. The rounded part may be anything from a thin, hollowed area to a circle that's about an inch in diameter. Rigid types of plastic edging may have a scalloped top or a picket-fence shape or may even look like a series of uniform tree-branch cuttings pounded into the ground.
The most flexible lawn edging is sold in rolls that are often 20 or 40 feet long and fairly easy to cut with a utility knife. Rigid plastic landscape edging is sold in short, straight pieces ranging from under 12 inches to about 4 feet long. These pieces usually have some sort of slot on one end and a groove on the other so the pieces easily interlock. Some rigid landscape edging can be tapped into place with a mallet as long as the soil is soft enough to receive it, while the flexible rolled edging most often requires a trench.
The exception to the trench rule is no-dig edging, which looks similar to the standard rolls of edging but with horizontal protrusions at the bottom. Stakes tapped into the protrusions hold this type of edging in place along the side not facing the lawn. Then, it's backfilled with mulch, landscaping rocks or your choice of garden toppings.
 BanksPhotos/iStock/GettyImages
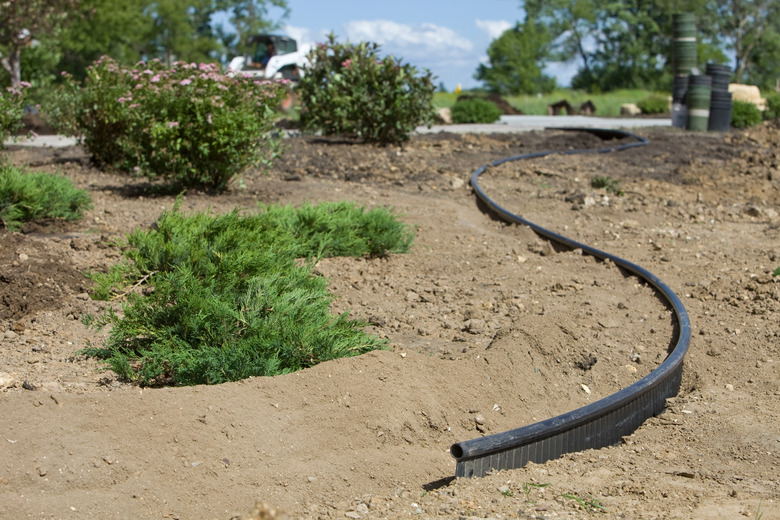
Digging the Trench
Digging the Trench
Depending on the total length of the area you need to dig out, use an edging shovel, a garden spade or an electric edging/trenching tool. Keep the edge of the trench nearest the lawn as vertical as possible, as this helps the edging stand straight as you install it. The trench should be about an inch deeper than the height of the edging and at least several inches wide if you're using an edging such as the type that has a curved top and is sold rolled up.
If you are using a decorative edging designed to protrude quite a bit, read the packaging or look at the edging to determine how deep to dig. For somewhat rigid edging that doesn't require a deep hole, a lawn edger may cut a path deep and wide enough to install the edging between the lawn and a walkway, for instance.
Save the dirt that comes out of the trench if digging by hand; a wheelbarrow or a sheet of plastic set along the project area comes in handy for this. Test fit the edging from time to time to ensure it fits as intended. You may need to slice through some of the dirt near the grass to keep a vertical edge at times, or you may need to shovel some of the excess dirt or debris out of the hole to ensure the edging fits.
Installing the Landscape Edging
1. Position the Edging
Unroll the landscape edging and let it sit in the sun for a bit to flatten if it holds an arched shape. Once it's relatively flat, set the edge of the piece into position at the beginning of the trench. If you are using edging with a loop on top, the loop hangs out over the lawn side of the hole. Likewise, if the edging has angled lips or hooks on one side, those face the area opposite the lawn.
2. Keep it Vertical
Keep the edging as vertical as possible as you unroll it into the trench (this may require the assistance of a friend to keep it steady and upright). Use a mallet or your foot to help tap it into place as needed. The top curl of the edging should barely stick up above lawn level.
3. Secure the Edging
If working a large area, backfill the installed portions of the edging every few feet to help the edging stay in place. This method works well if you are using gravel or soil that contains a little gravel. Landscaping fasteners offer even more support and are a good idea for a large edged area. Tap a fastener at a nearly horizontal but slightly downward angle so the fastener travels beneath the lawn. The head of the fastener should be a couple inches below ground level.
4. Connect Edging Pieces
Connect pieces of the curled-top edging by using the somewhat cylindrical pegs that came with the edging. Push the peg into the end of the curl on one piece and then into the starting end of the adjoining piece. For best results, cut a slit several inches long horizontally below the curl on just one of the two interlocking pieces and then cut the same amount of curl off the cut piece before inserting the peg and joining the pieces. This allows you to overlap each connection to ensure no gaps arise between edging pieces over time.
5. Finish the Job
Once you've edged the entire area and have verified the edging sits vertically, backfill the trench with the dirt you previously saved. Water the area with the hose and walk over the filled area to tamp it down a bit.