How To Install A Recessed Medicine Cabinet
With storage space being a much-needed commodity in many homes, a recessed medicine cabinet offers an ideal solution for even the tiniest bathroom. Installation is not as difficult as it may seem, even if you've never attempted any wall modifications. As with any project that involves cutting holes in a wall, it's crucial to determine where studs, pipes and wiring are located as you lay out the location for the cabinet.
Wall Studs and the Installation Location
Wall Studs and the Installation Location
While the medicine cabinet goes directly above the bathroom sink in many bathrooms, that's not always the case. No matter which wall will house the cabinet, you'll need to locate the nearby studs, as some of the framework you'll need to support the cabinet involves the studs. The studs are 16 inches apart center to center in most homes, although they may be 24 inches apart in some scenarios.
Use a stud finder to locate the studs on the project wall. If you don't have a stud finder, measure 16 inches out from one of the walls for a probable stud location or stand near the wall and shine a flashlight to look for drywall seams. The seams always join over a stud. Electrical boxes are also usually attached to studs, so any place you find an outlet or light switch likely has a stud on one side or the other.
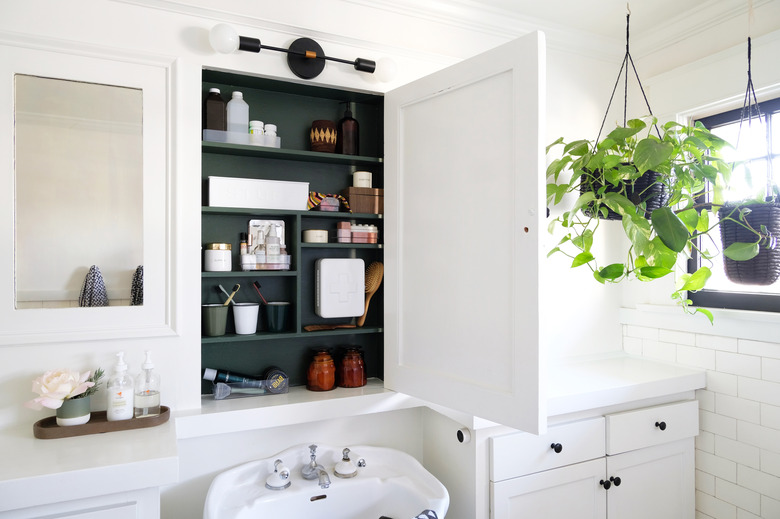
If you're planning to install the recessed medicine cabinet above the sink, Kohler recommends choosing a cabinet that offers 3 inches of space between the bottom of the vanity light fixture and the top of the cabinet and another 3 inches between the bottom of the cabinet and the top of the faucet. This ensures plenty of clearance for opening and closing the cabinet door. Also note which way the door opens if your bathroom has an adjacent wall nearby. Some cabinets can be installed so the door opens either from the right or left, which may come in handy in tight situations.
Creating a Test Hole for the Medicine Cabinet
Creating a Test Hole for the Medicine Cabinet
Once you've determined the ideal cabinet location and have marked the nearby studs, trace the recessed portion of the medicine cabinet frame on the wall in pencil or with painters' tape while a helper holds the cabinet up against the wall with a level atop the cabinet to ensure it is level. Set the cabinet well out of the way or even in another room.
To find out whether any pipes or wires are in the wall where the cabinet belongs, you'll have to look inside the wall. If there's a plumbing access panel below your work area, this could prove helpful if you have a clear view inside the wall looking upward. If you can't see the entire area slated for the medicine cabinet, you'll have to cut test holes to investigate.
Cut one or two 4-inch square test holes with a keyhole saw within the area marked for the recessed medicine cabinet. The hole size doesn't have to be exact, but it should be large enough to offer a good look inside. If there's a stud somewhere near the middle of the proposed location, you'll need one hole on either side of the stud. If the nearest stud is closer to an edge of the cabinet outline, then one hole may suffice.
Look into the hole(s) with a flashlight, shining the light in all directions. Look for wires, vent ducts or plumbing. You may be able to reroute wires a little, but large obstructions such as a vent are best left intact. If you run into such a situation, consider a surface-mount medicine cabinet instead or choose another location for a recessed cabinet.
 Joe Schmelzer/Corbis Documentary/GettyImages
Prepping for Medicine Cabinet Installation
Prepping for Medicine Cabinet Installation
Before dealing with the studs and any modifications they may require, cut out the space for the medicine cabinet using a keyhole saw, cutting along the lines previously traced on the wall. Do your best to not damage the drywall outside the cut lines. If wall studs are within the perimeter of the outline on the wall, just cut and remove the drywall within the outline as much as possible.
It's OK if some of the drywall attached to the studs within the outline doesn't come off easily; just work on cutting out the hole for the medicine cabinet. Any drywall pieces attached to a stud within the project area can be removed later — chances are that stud piece must be cut out anyway. Before cutting any studs, look in the crawl space or basement for beams or columns directly beneath your house's interior walls; these are load-bearing. Load-bearing walls also usually run perpendicular to the floor joists.
Cut out any exposed nonload-bearing stud area with a handsaw so the hole for the medicine cabinet has no obstructions. In some cases, you may need to use a hacksaw blade or oscillating tool to cut through screws on the back side of the stud if the stud doesn't easily lift out. Don't cut through or damage the drywall on the other side of the hole. Once the hole is free from debris, test fit the medicine cabinet. A utility knife comes in handy for cutting away jagged bits of drywall blocking the cabinet.
You'll also need to install 2x4 blocking as a framework for the medicine cabinet, especially if there aren't wall studs perfectly aligned with the left and right sides of the hole in the wall. These new 2x4 pieces attach to the stud ends cut out of the hole or to studs just beyond the cutout area of the hole.
Drill pilot holes and use 2 1/2-inch screws to attach the blocking to the studs, ensuring that the screw heads don't protrude, as they could obstruct the cabinet. The exact blocking method will vary for every installation situation depending on the exposed studs. The goal is to completely frame the hole area inside the wall so the medicine cabinet has something solid to hold it in place.
 Jeran McConnel
Installing the Medicine Cabinet
Installing the Medicine Cabinet
With a helper's assistance, slide the medicine cabinet into the hole, ensuring the cabinet is aligned so the door swings open in the direction that works best for your bathroom. No shelves should be in place at this point. Attach the cabinet to the framework using 2 1/2-inch screws or the screws provided with the cabinet, inserting them into the predrilled holes around the cabinet's perimeter or along its vertical sides.
Insert the shelf clips as indicated in the cabinet's installation instructions; the specifics may vary based on brand and model. In many cases, these can be positioned in a variety of holes depending on how high you'd like the shelves. Add the shelves once you've ensured the clips are parallel for each shelf.