How To Remove A Medicine Cabinet
We may receive a commission on purchases made from links.
Whether you are completely renovating a bathroom or simply updating a few outdated elements, removing the medicine cabinet may be necessary. Both recessed and surface-mounted cabinets are fairly simple to remove from the wall, even for cabinets with a built-in light fixture. The hardest part of this DIY project is repairing the wall after removing a recessed medicine cabinet, but that process is manageable even if you've never worked with drywall.
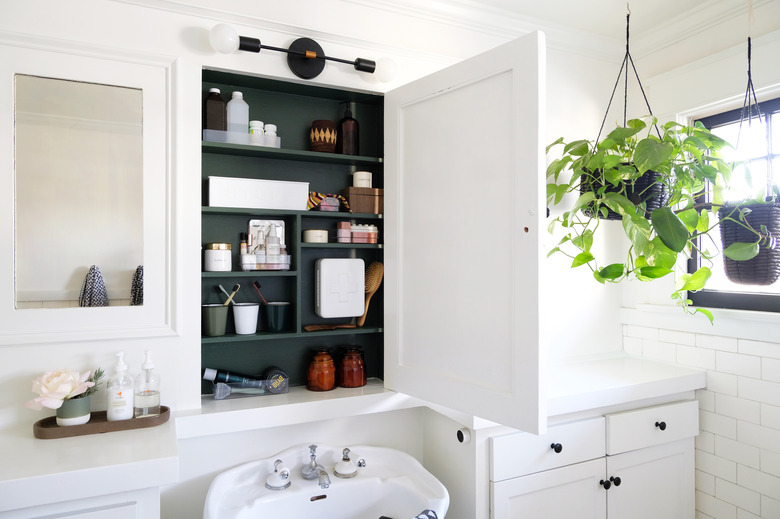
Removing the Medicine Cabinet
Removing the Medicine Cabinet
Whether removing a recessed or surface-mounted cabinet, a little preparation will help prevent wall debris and screws from falling down the sink drain. Remove everything from the sink area and then cover the entire sink with a towel or dropcloth. This ensures that anything that falls while removing the medicine cabinet won't make its way down the drain, where it could cause a clog. If your medicine cabinet isn't near the sink, move anything that rests below the cabinet. This makes it easier to clean up after completing the project, and it's easier to spot fallen screws.
Warning
Wear eye protection and heavy-duty work gloves when removing the medicine cabinet. A metal cabinet may have sharp edges. If a recessed cabinet is so old that it has a razor-blade slot, be cautious when pulling it away from the wall since there may be dozens of razor blades visible within the opening.
- Remove everything inside the medicine cabinet, including the shelves if they're not attached. Set all of these items outside of the work area.
- Remove the cabinet door by loosening the screws attaching the door to the hinges. Set the door and screws aside.
- If the cabinet has built-in lighting, turn off the circuit breaker connected to the bathroom. Test the wiring with a non-contact voltage tester to ensure the power is off. If the cabinet has no wiring that will be affected by removing the cabinet, there's no need to turn off the power.
- Loosen the screws holding the cabinet to the wall. For a surface-mounted cabinet, loosen each one a little at a time so the entire cabinet doesn't drop. For either type of cabinet, ask a helper to hold up the cabinet as you pull it from the wall. For a recessed cabinet, you may have to use a putty knife to loosen any caulk around the cabinet's perimeter.
- Disconnect the electrical wiring, if any, from the cabinet and then pull the cabinet completely off. If you don't plan to wire another light source to the old wiring, find out where these wires connect to the power source and remove them while the power is still off. Otherwise, these former light wires could be used to power a vanity light if the wires are in a junction box, which should always be used for wiring connections, according to Frye Electric.
 Stephen Paul for Hunker
Patching Screw Holes
Patching Screw Holes
If you don't plan to put another medicine cabinet or a mirror in the old cabinet's location, you'll have to patch either the screw holes from a surface-mounted cabinet or the gaping hole left from a recessed cabinet.
Patching screw holes is easy. Simply fill the holes with spackling and smooth it out with a putty knife, which also helps remove the excess. For added convenience, look for a type that starts out pink and turns white when dry, such as DAP DryDex Spackling. Sand gently with fine-grit sandpaper afterward and then touch up with the wall paint.
How to Patch the Hole from a Recessed Cabinet
How to Patch the Hole from a Recessed Cabinet
Patching a huge hole from a recessed cabinet is a lot more work, but it is still manageable to DIY. Since the hole is most likely a perfect rectangle, it's fairly easy to patch. If the edges of the hole sustained damage as you removed the medicine cabinet, just make the hole square again by cutting a rectangular piece of drywall that is slightly larger than the hole. Then, trace around it and cut the irregular wall edges straight with a drywall saw.
- Measure the height of the hole.
- Cut a 1x3 brace for each side of the hole, each a couple inches longer than the hole. Any straight, sturdy scrap wood will do; it doesn't have to be a 1x3, but it does need to fit into the hole and offer enough space to provide a backing support for the new drywall.
- Slide one of the wood scraps into the hole and align it vertically so about 1 1/2 inches of its width shows through the right side of the hole. The rest of the wood is behind the existing drywall.
- Attach the wood to the existing wall with several 1 1/4-inch drywall screws. This may be easier if one person holds the wood in place and another drives the screws.
- Place the other wood scrap along the left side of the hole, aligning it and attaching it in the same fashion.
- Cut out a piece of new drywall that is exactly the same size as the hole using a drywall saw. Hold it up to the hole to make sure it fits, trimming as needed.
- Press the drywall patch into place and then secure it with several 1 1/4-inch drywall screws on the right and left sides of the patch. The screws should go into the wood strips you've attached to the wall.
- Spread drywall joint compound over the seams using a 4- or 6-inch drywall knife. It should be thick enough to fill any gaps. Cover screw heads as well.
- Smooth drywall tape onto the wet joint compound, applying it as if applying sticky tape over the center of each seam. Use the drywall knife to smooth down the tape and remove excess joint compound. Allow the compound to dry as recommended on the package.
- Sand the dried compound with a fine-grit sanding block.
- Apply another coat or two of compound over the seam as needed using a 6- or 10-inch knife. Allow each coat to dry and sand between coats. The finished project should be as smooth as the surrounding wall.
- Wipe any dust off the wall and then prime the patched area, allowing the primer to dry completely.
- Paint the patched area with the same paint used on the wall. Expect to apply two coats, allowing the paint to dry between coats.