Installing Floor Joists: What You Should Know

Floor joists are a critical part of the overall frame design in a building's structure. These supports run horizontally across the span of the building and are an important part of the engineering, helping to make the house solid and sturdy for the long term. Floor joists also provide a foundation for the subfloor, which is installed right on top of them. Since these joists have to provide a strong foundation for both the subfloor and finished floor, it's important that they are up to proper specifications and are installed correctly.
Framing is generally not a good DIY project unless the job is something like a small shed or maybe a simple garage. Homes are complex structures, and the work of framing out a floor is best left to a professional carpenter or framer. Less-complicated flooring tasks such as shoring up floor joists or adding bridging to decrease floor deflection may be better suited for a homeowner than taking on a project of this magnitude.
Flooring joists run perpendicular to the bearing walls of the home. Along with the foundation and wall and roof frame, these structures provide the entire base on which the house will be constructed. Once this frame is finished, it will be sheathed, and subfloor is then installed on top of the joists — but before any of that can happen, the load will need to be calculated. Framers/builders work from a plan that is completed by professionals with specialized knowledge of building codes.
Calculating the Load
Calculating the Load
An engineer and architect will spec out the load requirements for the plan. Their calculations take both dead load (weight of the building and materials) and live load (weight of the building with people and furniture added) into consideration, among other things. Depending on where the home will be built, it may also include calculations for wind, seismic activity or snow load. This information is used to figure out how flooring joists can be configured while having the building remain as strong as possible.
Now is also the time to decide on material. If a builder wants to use I-joists, floor trusses or solid-wood joists, this will also be reflected in the plan and figured according to code. The type of material used, the grade of the wood and other factors also affect the load calculation. In addition to working off the plan, when using prefabricated joists, it is always important to follow the fastening instructions so that these structural items are installed properly. Structural engineers use specific tables to figure maximum load capacity.
Floor-Joist Basics
Floor-Joist Basics
Floor joists are installed early in the building process, and this work is typically done by the framing carpenter since it is part of the structure of the home. Once a foundation is poured, the framing contractor goes to work building the skeleton of the building, part of which is the flooring area. This construction follows the overall plan for the layout of the house based on load factors, style and the size of the house that will be built. Each building's layout will require its own unique plan.
 SBS/Moment/GettyImages
In many builds, standard flooring joists run 16 inches on center, attaching to sill or top plates at the perimeter or beams/wall framing if the span doesn't reach across the entire distance. The areas where the beams/framing are placed are then deemed "load-bearing areas" because they provide the strength and support needed to make sure the framing remains solid. Besides solid-wood joists, systems such as I-joists and flooring trusses provide other options for consideration when it comes to installing a flooring framework.
In cases where greater open spans are needed, framers often use joist hangers, which are U-shaped hardware pieces that are nailed in to accept, hold and support flooring joists. Sometimes, the plans for a home may call for additional joists to be "sistered" next to the other floor joists for more strength. A technique called "bridging" may be used as well, and this can help with overall deflection. Bridging is simply cross pieces of wood that are attached inside the joist cavity to lend more support and minimize bounce.
Solid-Wood Joists
Solid-Wood Joists
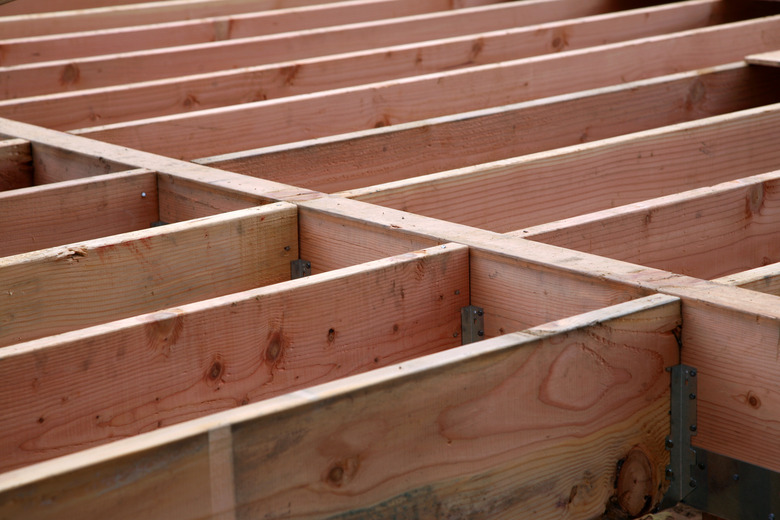
Traditional dimensional lumber is a popular choice for floor joists. Some of the more common types of wood used for this purpose include certain species of pine and Douglas fir, but the type of wood available depends on the region where the construction is taking place. Dimensional lumber is kiln dried so that it is more stable, and it provides a good option for flooring joists. There are three main steps to installing solid wood as flooring joists in home construction.
First, a "sill plate" is attached to the foundation. According to the American Wood Council, sills that rest on a masonry foundation are usually 2x4 or 2x6 lumber anchored flat with 1/2-inch bolts. Since these come into direct contact with masonry, they should be treated wood. If wind is a concern, metal tie-downs can also be added to keep the home anchored properly to the foundation. Higher floors use a "top plate" instead of a sill plate that forms the the top of the wall on the lower level as well as the outside structure for flooring joists on that level.
Next in line are the rim joists, which attach on end to the sill or top plate with framing nails, forming a border around the entire foundation and upper frame of the house. These are usually 2x10 or 2x12 pieces of lumber, and they'll match the size of the floor joists. The top of the joist should install level with the rim joist to make it easy to place the next layer of flooring material, which is often plywood or oriented strand board (OSB). This rim joist serves as a nailing surface, as an end cap for joist cavities and as a lateral-support structure.
 yenwen/iStock/GettyImages
The third step is attaching the floor joists to the rim joists, again generally spaced at 16 inches on center. The framer uses a tape measure to make sure these are installed properly. When needed, beams or load-bearing, framed walls are added to help the lumber span large distances that will need additional support to meet code. The exact requirements for these are called off by the architect and are included in the plan. This gives the framer/builder the correct specs for what joists will need additional support.
The I-Joist Option
The I-Joist Option
Not all residential projects use dimensional lumber for flooring joists. These days, there are other choices that work well in typical home construction, and one of these is called an I-joist. I-joists are so named because they are prefabricated joists that are shaped just like the letter. According to the Engineered Wood Association, these joists are comprised of laminated-veneer lumber or solid-sawn lumber on both sides of the "I" with a web of plywood or OSB in between. This makes them extremely strong.
This type of joist is able to bridge longer spans without additional support. It also resists twisting and warping and has an excellent shear resistance. Another reason builders like to use I-joists is because they are fairly light and easy with which to work. They also provide a more stable surface for subflooring. During construction, I-joists attach to a specific type of rim joist that is shaped to work properly with its unique profile, and they connect with the framing in much the same way as solid-wood joists.
I-joists come in a range of different sizes, and the most commonly used ones can usually be found in stock and available for purchase when needed, much like traditional lumber. This is another factor that makes these joists desirable. Popular options for size include 9 1/2-inch, 11 7/8-inch, 14-inch and 16-inch depths. The flange widths that go with those sizes span from 1 1/2- to 3 1/2-inches long.
Using Floor Trusses
Using Floor Trusses
Floor trusses are yet another type of floor-framing system that is used in residential construction. This type of support is composed of varying layouts of engineered lumber and metal connector plates, and they look much like roofing trusses. Floor trusses come in a variety of different configurations, allowing for different bearing situations. In addition, they are prefabricated and are all one piece, making them quick and easy to install. That said, floor trusses are not a stock item, so there is usually some wait time involved.
Floor trusses can span even greater distances than I-joists, making them a smart pick for homes that have an open floor plan or those that need a lot of extra strength for particularly heavy loads. They also have space built right into their structure where electric, plumbing and HVAC lines can be run quite easily without decreasing the strength of the support system. The same cannot be said of solid-wood joists or I-joists.
Floor trusses have one major drawback — they can't be easily modified beyond a certain point, or the structure will not be sound. If any changes are needed on-site, they will have to fall within the manufacturer's guidelines for trimming down the piece. If they do not, they will have to be reordered. That said, this is only a problem if there are significant changes to the plan.