How To Cut Laminate Countertops
Plastic laminate is surprisingly easy to cut. You can do it with a circular saw, a jigsaw, a router or even some hand tools. Cutting a sheet laminate by itself is best done with tin snips or aviation snips, provided you're cutting it oversize and will trim it later. Cutting an assembled laminate countertop is a little trickier, and this is best done with power tools—and great care. For as easy as laminate is to cut, it's even easier to chip, and chips cannot be repaired. But with the right tool setup and technique, you can cut a custom or prefab post-form laminate countertop with confidence.
 photovs/iStock/GettyImages
Cutting Laminate Sheets
Cutting Laminate Sheets
Laminate, the raw material, is a sheet good made with layers of paper bonded and compressed with resin and topped with a protective clear coating of melamine plastic. It is about 1 mm thick and is semi-flexible but brittle. One standard way to cut a laminate sheet is to score it with a utility knife or a linoleum knife and snap it off, somewhat like cutting glass. This works fine for straight cuts that are relatively short. You can also make very short cuts, such as when cutting strips to length, with a miter saw.
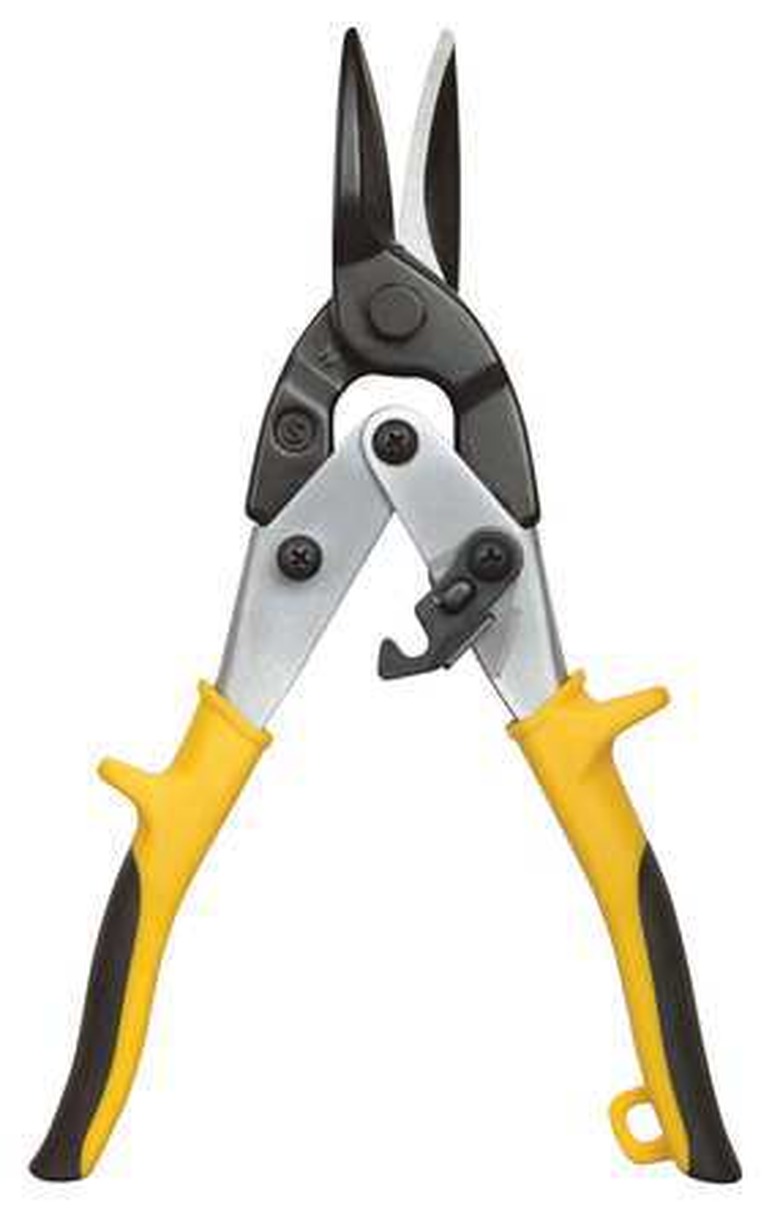
The simplest way to cut a laminate piece of any size or shape is with tin snips or aviation snips (metal snips with short, pointed cutters). Snips cut through laminate with ease, but they don't make a perfectly clean cut, so this technique is suitable for when you're cutting the laminate oversize and trimming it flush with a router after the laminate is bonded to a substrate. If you need a really clean edge on sheet laminate, the safest method is to use a router with a straightedge guide.
 Zoro
Zoro
Making Straight Cuts in Laminate Countertops
Making Straight Cuts in Laminate Countertops
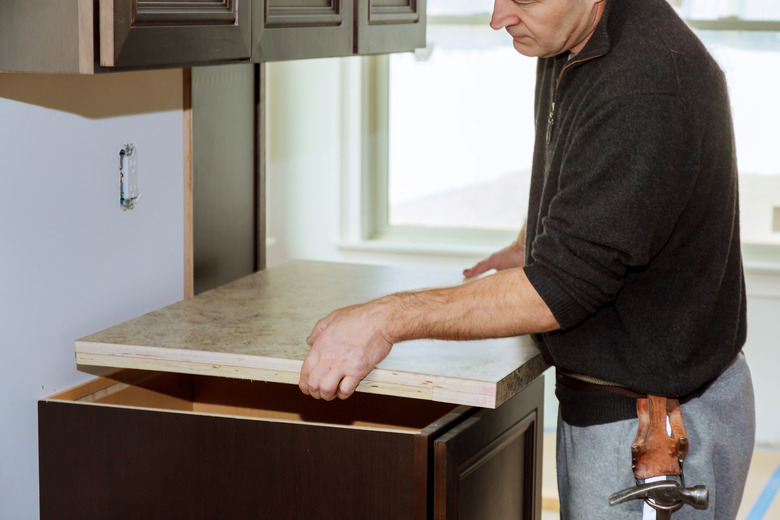
Cutting becomes a little more complicated when the laminate is already bonded to a substrate. Cutting a post-form laminate countertop to length requires a clean, straight cut. The best DIY tool for the job is a circular saw with a fine-tooth carbide blade made for laminate (the same blades are typically sold for non-ferrous metals and other types of plastics). You can also use a jigsaw with a fine-tooth blade. In this case, you're cutting from the bottom side of the countertop, using a standard up-cutting blade; you use a down-cutting blade for sink cutouts (see below).
The trick to a clean cut with either saw is to use a straightedge or, better yet, a custom jig to guide the saw throughout the cut. Post-form countertops have an integrated backsplash that sits at 90 degrees to the countertop surface. This means you have to make two cuts: one that starts at the front edge and goes all the way to—and through—the lower part of the backsplash, and a second perpendicular cut to finish off the top edge of the backsplash. For this reason, a custom jig is more convenient than a straightedge because a jig allows you to make both cuts with one setup.
You can build a jig with two pieces of 3/4-inch-thick plywood joined together with screws to form an "L." Add two narrower pieces of 3/8-inch plywood over the L to create a guide for the saw base. These strips should be positioned so the setback from the edge of the lower plywood assembly is exactly equal to the distance from the edge of the saw base to the blade. With the countertop turned upside down, clamp the jig to the underside of the countertop. The long leg should rest on the main countertop section and the short end should fit over the back of the backsplash. Make the cut while holding the saw base tight against the edge of the 3/8-inch plywood guide as you feed the saw.
Always cut from the underside of a laminate countertop when using a circular saw or a jigsaw with a standard blade. This is because the blades cut as they come up through the material, and the top side (in this case, the underside) is much more likely to chip than the bottom side.
Cutting Curves, Holes and Sink Openings
Cutting Curves, Holes and Sink Openings
Curves and curved cutouts, including large holes and sink cutouts, typically are made with a jigsaw, especially if the edges of the cut will be hidden in the finished installation.—such as when the lip of a sink will cover the edges of the cutout. Curves and large holes that need a precisely machined edge are best made with a router and a jig or template for guiding the cut. Smaller holes—up to about 2 inches in diameter—can be cut with a drill and a hole saw, just like drilling through wood.
 DeWalt/Amazon
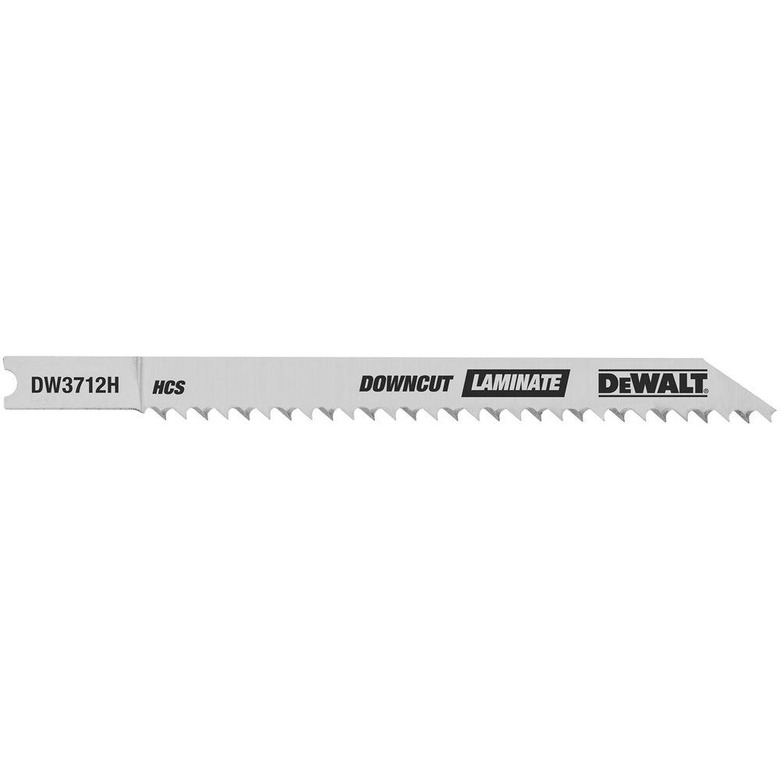
A sink cutout is one of the most common laminate countertop operations. The standard method is to use a jigsaw with a reverse-tooth, or down-cutting, blade, which cuts down through the material rather than the up-cut of a standard jigsaw blade. A down-cutting blade, often called a laminate blade, allows you to cut from the top side of laminate countertops without chipping the finished surface.
To make a sink cutout:
- Apply strips of masking tape where you will mark the cutting lines; this makes the lines more visible and protects the laminate surface from scratches.
- Mark the cutout on the masking tape.
- Drill a 3/8-inch starter hole down through the countertop at each corner of the cutout, just inside of the cutting lines, using a drill and a sharp spade bit or standard twist bit.
- Place a scrap board (such as a 1 x 2) centered over the cutout so it extends beyond the cutting lines on both sides. Fasten the board to the center of the cutout area with a single screw. The board prevents the waste piece from falling through the hole at the end of the cut and possibly breaking off the last bit of laminate.
- Insert the blade of the jigsaw into one of the starter holes, and complete the cut, using the starter holes to make the turns at the corners. Rotate the board out of the way as needed when cutting the sides.
Tip
If the sink cutout is too close to the backsplash for the jigsaw to fit, make the cut along the backsplash with an oscillating multitool.
Trimming Laminate With a Router
Trimming Laminate With a Router
When building a custom laminate countertop, the standard process is to cut the laminate a little large, then mount it to your substrate (usually particleboard or MDF) and trim it precisely to fit with a router and flush-cutting bit. This bit has a bearing (much like a skateboard wheel bearing) at the bottom end. The bearing rides along the substrate while the bit's cutters trim the laminate perfectly flush with the substrate's edge.
 Freud
Freud
There are flush-cutting bits for trimming laminate with standard routers. There are also small router-like tools called laminate trimmers made just for this purpose. The advantages of laminate trimmers for this job are their small size and light weight, but a standard router trims just as well.
Warning
The cut edges—and especially routed edges—of laminate are razor-sharp and must be filed to make them smooth and safe. This takes just a few strokes with a fine metal file held at a slight angle and moving parallel to the laminate edge.