A Homeowner's Guide To Steel Framing
The use of steel studs in residential construction has its advocates, with good reason, but an objective assessment of the advantages and disadvantages of steel versus traditional wood studs depends on whom you talk to.
The Advantages
The Advantages
Metal studs are generally considered suitable for framing non-load-bearing walls and in particular for finishing basement spaces where the potential for excess moisture presents the problem of rot and mold growth with wood construction. Although steel studs are not susceptible to mold or rot, they can rust in damp situations, so the use of a vapor barrier or gasket between the bottom plate and the floor is advisable.
Partisans of steel framing will tell you that steel is lighter in weight than lumber and thus easier to handle; that it's strong, especially when incorporated into a complete drywall structure; that it's fire and termite-proof; and that it's less expensive than wood. They also contend that steel studs are uniformly straight and even, easier to cut and easier to assemble into a wall.
Potential Disadvantages
Potential Disadvantages
While steel studs are undoubtedly more uniform than wood (and manufactured largely from recycled steel besides), the relative cost will vary regionally and with availability. The steel studs most commonly offered to do-it-yourselfers are, unlike wood studs, not strong enough to comprise a load-bearing wall. Ease of cutting and of wall assembly will depend in part on the tools you have at your disposal and your depth of experience. It's hard to imagine anything easier than cutting off a 2 x 4 wood stud with a power miter saw; steel studs are somewhat more difficult to cut, requiring aviation snips or power saws with special blades.
Heavier steel studs, capable of load-bearing construction, do exist but are more commonly used in commercial construction. Steel has distinctive properties that pose problems, especially when used in load-bearing external walls.
- Steel is a great conductor of heat and cold. When steel studs are employed in external wall construction, the effect of "thermal bridging"—cold or heat being readily conducted through the wall at the studs—renders any insulation placed in the wall cavity ineffective. Extra measures, such as rigid foam insulation affixed outside the wall structure to compensate, must be taken.
- While steel does not burn, it will fail suddenly and catastrophically when it approaches the melting point. That may be of little consequence in a non-load-bearing wall, but with a load-bearing one, it becomes critical.
Framing of the Future
Framing of the Future
Is steel stud framing the construction method of the future? Probably. The supplies of quality lumber will continue to dwindle and new solutions to steel's limitations will be developed, while steel's advantages will become more important. Framing with steel will become an essential skill set, since the special tools and abilities that working with steel entails are minimal.
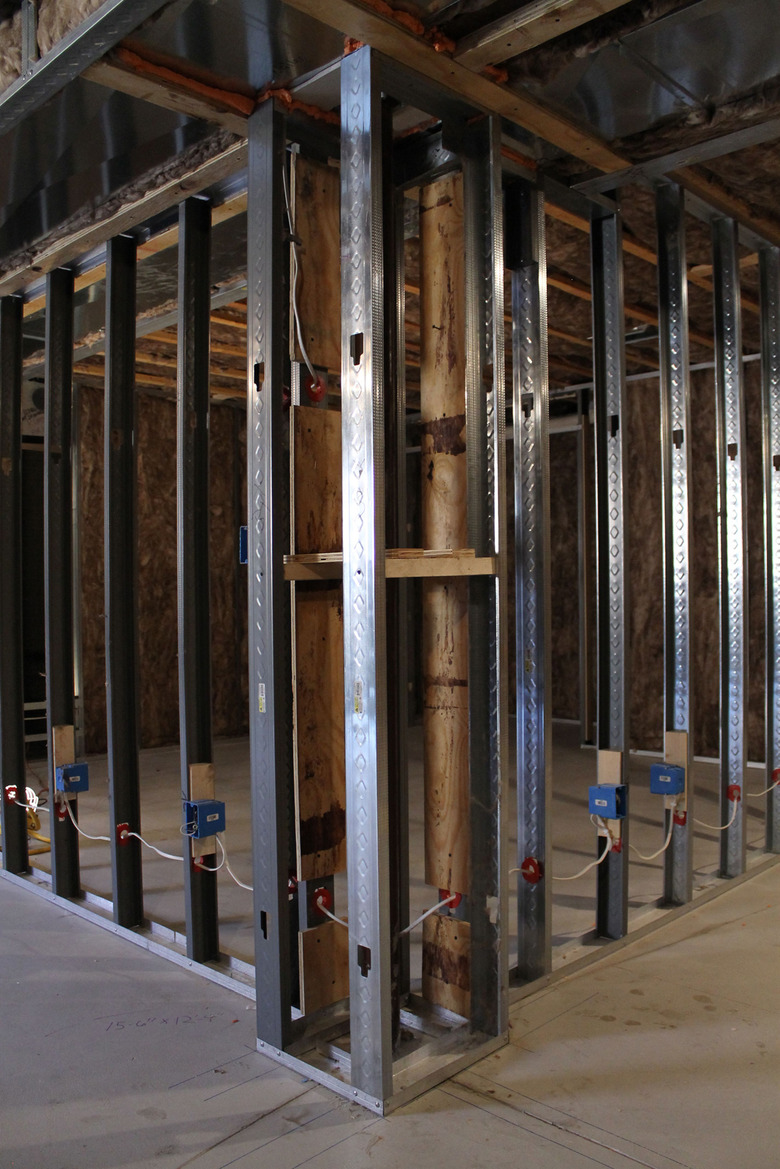
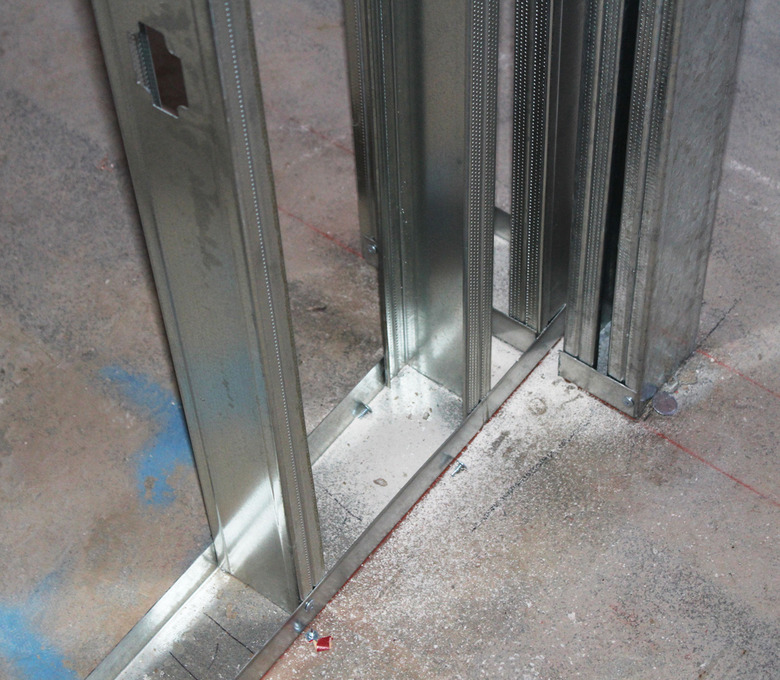 Image © PhilCo Commercial Construction Inc
How to Frame a Partition With Steel Studs
How to Frame a Partition With Steel Studs
For the sample project described below, let's say you are planning to build a simple non-load-bearing basement wall that runs perpendicular to the overhead joists. The metal framing components you will be using are the steel tracks, also called channels or runners, which come in ten-foot lengths; and the studs, which are available in several lengths. Both the tracks and the studs are C-shaped and open on one of the long sides. The studs have a small lip on either end of the open side that lends them additional structural strength. As seen in profile, the long sides of the track and the stud are known as the web. The short sides are called the flanges.
Since this is a simple hypothetical project, we'll keep the tools required to a minimum, some of them you likely already own.
Things Needed
-
Aviation snips
-
1 1/2-inch hex head concrete screws
-
Hammer drill and carbide-tipped masonry bit
-
4-foot level
-
Variable-speed drill with 2-inch extension bit holder
-
C-clamp-style locking pliers
-
Heavy work gloves
-
#8 x 1/2-inch modified truss-head self-drilling screws with Phillips head
-
1 1/2-inch self-tapping fine-thread drywall screws
 Image © 2017 My Wall of Life
1. Install the Bottom Track
Where wall insulation or vapor barriers are called for on foundation walls, make sure to install this before wall construction begins.
- Begin by marking out the location of the wall on the floor.
- Cut the floor track to the proper length by first cutting both flanges with the snips. Then bend back one of the flanges to enable you to cut across the track's web.
- Uses on the bottom track.
Tip
Aviation snips come in three "flavors" and the handles are color-coded: left cuts (most comfortable for right-handers) are red, right cuts are green, and straight snips have a yellow handle.
2. Install the Upper Track
The upper track should be installed exactly above the lower track. The easiest way to do this is by using a stud adjusted for plumb to position the upper track.
- Cut the upper track to length—usually, it will match the length of the upper track.
- At the ends of the floor track, use one stud to determine the location of the upper track. Insert the stud into the track and use a level to adjust it so it is perfectly plumb.
- Mark the end positions on the joists to guide placement of the track.
- Attach the upper track to the ceiling joists using 1 1/4-inch self-tapping drywall screws.
Tip
Where the wall runs parallel to joists, you may need to install cross blocking between joists to provide screwing surfaces for attaching the upper track.
3. Cut the Studs
For small jobs, metal studs can be cut with ordinary aviation snips. For large jobs, you can also cut the studs with a circular saw or chop saw, using a special metal-cutting carborundum blade—be aware that this produces smoke, noise, and an impressive shower of sparks. Cutting metal studs with power tools requires hearing protection.
- Carefully measure the height for each stud before cutting. Subtle variations in the floor or ceiling may mean that they won't all be the same. If you always cut your steel studs from the same end, the knockouts for electrical and plumbing lines will stay aligned.
- Cut the flanges as you did with the track, then cut across the web. The cut metal will be especially sharp, so protect your hands with sturdy gloves. Y
4. Install the Studs
As you install the studs, make sure that each is perfectly plumb and that they are aligned so the knock-out openings line up.
- Begin mounting the studs by inserting the first one into the bottom and top tracks. Accomplish this by placing the ends of the steel stud into the track at a slight angle and then twisting it into position. Make sure the stud is aligned with the marks you made.
- Clamp the stud to the track with C-clamp pliers and secure the bottom of the stud to the track with #8 self-drilling screws.
- Using a level, adjust the stud at the top so it is perfectly plumb. Clamp and screw the top of the stud to the upper track.
- Proceed to the next stud and repeat the alignment process. The open side of the stud should always face in the same direction unless you are framing around a doorway, in which case, you will want to turn the web side of the stud toward the opening and allow an extra 3 inches on the sides and 1 1/2 inches at the top of the door opening to accommodate 2 x 4 wooden blocking around the inside.
5. Installing Drywall
Drywall installation for metal studs is really no different than for wood framing, although it can take some practice to make sure the screws bite properly into the steel. Applying heavy horizontal pressure with the drill as you drive the screws will help.
- To make it easier to attach baseboard moldings, add wooden blocking between the studs at the bottom before you begin putting up wallboard. This provides an attachment surface for the drywall.
- Install the drywall using 1 1/4-inch fine-thread, self-tapping drywall screws. Begin at the end of the wall with the web side of the stud facing out. Drive the screws about 8 to 10 inches apart along one stud before moving on to the next.
- Tape and finish the drywall using the same techniques as with wood frame construction.