This DIY Moss Shower Mat Will Turn Your Bathroom Into A Spa-Inspired Sanctuary

Spa-inspired bathrooms are one of the top trends to try for 2018. (Just ask Pinterest.) So it got us thinking: why not bring serene nature vibes into your bathroom by creating a living moss shower mat? Not only will it help transform your bathroom into a spa-like sanctuary, but you'll definitely start your day off on the right foot when you step out on this soft and springy mat. Trust us — you'll be surprised how much you'll love this.
 Trisha Sprouse for Hunker
Things Needed
-
Cork bulletin board, 17 inches by 23 inches
-
Non-slip shelf liner
-
Waterproof glue
-
Cork tiles, ¼ inch thick ( 4 )
-
Live or preserved moss
-
Moss adhesive
-
Spray bottle
-
Ruler or tape measure
-
Scissors
-
Utility knife with a sharp blade
-
Marker or pen
Tip: You won't need to use the hardware that comes with your bulletin board to create this shower mat. However, keep it handy — it easily converts to a beautiful vertical moss garden if you decide to hang it on the wall instead.
Step 1
Step 1
Measure the length and width of your bulletin board and cut a piece of non-slip shelf liner to the same size. If your shelf liner isn't as wide as your board, you'll need to cut two pieces of liner to cover the entire back of the board.
 Trisha Sprouse for Hunker
Step 2
Step 2
Glue the piece(s) of shelf liner onto the back of the bulletin board. Make sure the non-slip side is facing up. This will create a non-slip base for your shower mat.
 Trisha Sprouse for Hunker
Step 3
Step 3
Once the glue has dried on the shelf liner, turn the bulletin board right side up and place cork tiles on top of it so that they cover the entire surface inside the frame. You'll likely need to cut a few tiles so that they fit perfectly.
 Trisha Sprouse
Step 4
Step 4
Once you fit the tiles on top of the bulletin board, arrange the moss pieces on top of them to form the design you prefer. Use a marker or pen to trace around the moss shapes.
 Trisha Sprouse for Hunker
Step 5
Step 5
After you've settled on a design, remove the moss pieces and cork tiles from the bulletin board and use a utility knife to cut out the shapes you traced on the tiles.
Tip: Be kind to yourself and use a fresh blade in your utility knife. This is the most tedious step of the project, and it'll go by much faster with a sharp new blade.
 Trisha Sprouse for Hunker
Step 6
Step 6
Place the cork tiles with the shapes cut out back on top of the bulletin board and glue them in place.
 Trisha Sprouse for Hunker
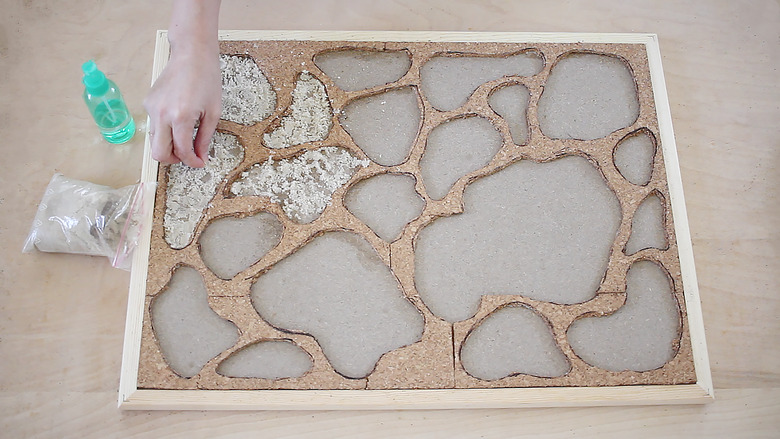
Step 7
Step 7
Sprinkle moss adhesive in the surface of each hole and then spray it liberally with water. (Skip this step if you're using preserved moss.) The adhesive is an organic tackifier that helps the moss bind to the surface.
 Trisha Sprouse
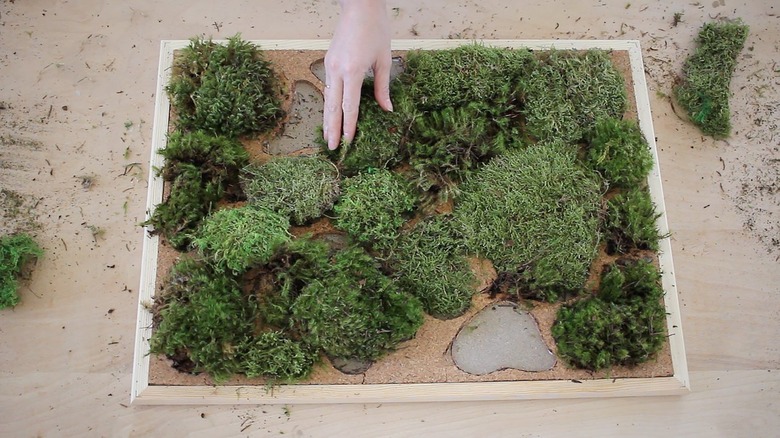
Step 8
Step 8
Place each moss piece in the corresponding hole on the cork tiles, and press/shape them to fit snugly within the shape of the holes. If your moss pieces arrive dried out, submerge them in a bucket of water for about 15 seconds to rehydrate.
If you're using preserved moss, there's no need to submerge in water. Simply glue the moss pieces inside each corresponding hole.
 Trisha Sprouse for Hunker
Place your beautiful new moss mat in front of your tub or shower and step directly on it after bathing. The water that drips off of you (as well as the moisture in your bathroom) will keep the moss moist enough to continue growing. If needed, you can spritz it with water here and there if it ever looks dry.
 Trisha Sprouse for Hunker
 Trisha Sprouse for Hunker