Instructions For The Rowenta Self-Cleaning Iron
The Rowenta Company, founded in 1884, has been manufacturing clothes irons and improving their design since 1909. The most recent self-cleaning models are exceptionally easy to use and require little maintenance, as long as you use the self-cleaning feature every two weeks, as recommended. When you employ this feature, the iron's internal boiler blasts hot water through the steam ports, clearing them of scale and other debris present in most household water. Because the iron has this feature, you don't have to be too careful about the quality of the water you use for ironing. Unless it's unusually hard, plain old tap water is suitable and recommended by the manufacturer.
Tip
Rowenta irons have a minimum power rating of 1,500 watts, and some are rated for 1,750 watts, which is higher than most electric heaters. To avoid tripping the breaker, it's best to operate the iron on an outlet controlled to a 20-amp circuit breaker.
First-Time Use
First-Time Use
When you unpack your Rowenta iron, the manufacturer recommends following a simple procedure to get it ready to use. The control buttons are identified by icons — not words. They are self-explanatory, but it's still a good idea to read the manual to be sure you understand what they mean. Once you understand the icons, follow this procedure:
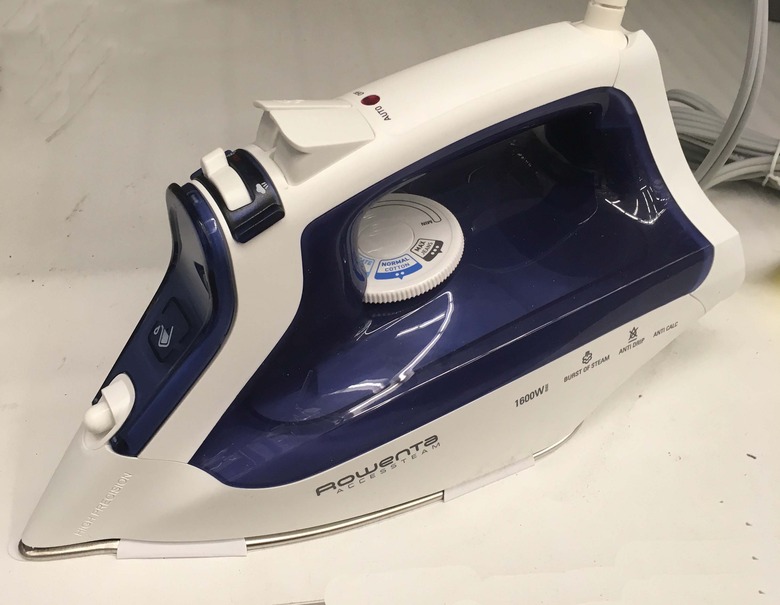
1. Fill the Reservoir
Remove the protective film from the soleplate; locate the reservoir cover and open it. While the iron is unplugged, fill the reservoir to the maximum fill line with plain tap water. Do not overfill. You should unplug the iron whenever you fill the reservoir.
2. Set the Steam Control
Plug in the iron; set the control to maximum steam, and wait for the LED indicator to go off, which indicates the iron has reached the proper temperature.
3. Prime the Steam Ports
Hold the iron over a sink and press the steam button four times. Steam jetting freely from all the apertures in the soleplate indicates the iron is ready for use.
Setting the Temperature
Setting the Temperature
Place the iron on a fire-retardant surface and set the heat control to an appropriate temperature for the material you want to press. Use the lowest setting (one dot) for nylon, the middle setting (two dots) for wool and silk, and the highest setting (three dots) for cotton and linen.
Tip
To prevent scorching, the iron will automatically turn off after 30 seconds if you leave it in a horizontal position. When in the upright position, the iron will shut off after eight minutes if you don't move it.
Steam or Spray
Steam or Spray
The iron produces steam only in the triple-dot setting, so you can turn the variable steam lever off when using lower settings. Wait for the heat indicator light to go off before using the steam setting. The iron automatically steams when it's in a horizontal position and stops when you set it upright.
If you want to iron wrinkles out of fabric too delicate for steam, press and hold the spray button when the temperature setting in in the single- or double-dot position, and the iron will shoot out a jet of water. Press and release the button quickly to get a single squirt of water.
Self-Cleaning Procedure
Self-Cleaning Procedure
Rowenta irons contain a built-in antiscale cartridge, which eliminates the need to add descaling chemicals to the water. However, scale can still clog the steam ports after extended use. Following the self-cleaning procedure every two weeks eliminates this potential problem.
1. Fill the Reservoir
Unplug the iron; fill the reservoir to the maximum fill line, and plug it back in. Set the temperature to the highest setting (three dots). Set the iron upright, and wait for the temperature indicator light to go off.
2. Set the Control to Self-Clean
Unplug the iron. Hold it over a sink and move the steam control to the self-clean position, which is all the way at the end. On some models, the self-clean control is a separate lever on the side of the handle. Move this lever to the on position. Water will emerge from the steam ports and clean them. Allow the water to flow for one or two minutes.
3. Dry the Sole Plate
Move the steam control one notch from the self-clean position to maximum steam. Plug the iron back in; set it on its heel and allow it to heat up. The heat will evaporate all the excess water on the soleplate. After this has happened, unplug the iron and let it cool down, which could take as long as one hour.
4. Wipe Down the Soleplate
Use a damp cloth or sponge to wipe down the soleplate after the iron has completely cooled. Never use an abrasive cloth or cleaner to do this, as it will damage the protective coating on the plate.
Tip
Some Rowenta self-cleaning irons have an additional valve — the Vapodur valve — on the front of the iron next to the variable steam lever. This valve clears hard water deposits from the small opening that permits water to enter the steam chamber from the tank. To keep your iron functioning properly, it's important to open and close this after each ironing session by moving the valve from left to right a few times.