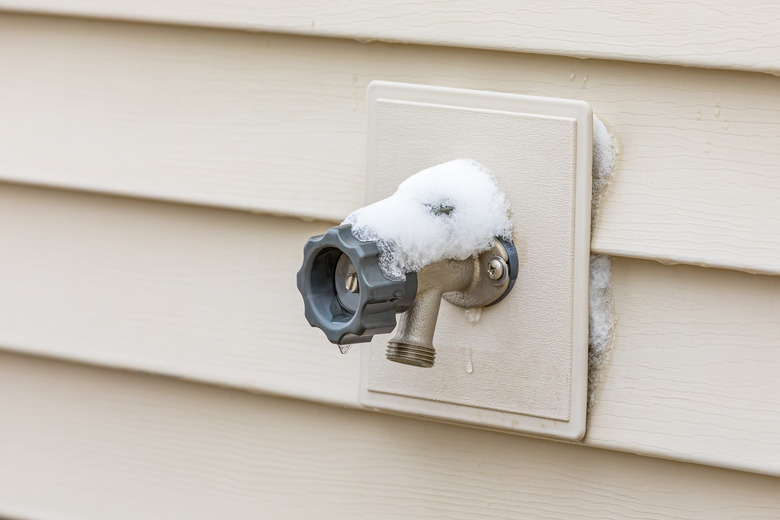
Thawing A Frozen Hose Bib
We may receive a commission on purchases made from links.
A frozen hose bib is more than an inconvenience. It's true that you probably won't need your hose again until spring, but leaving water frozen in the pipes is just asking for trouble because as the cold weather sets in for good, there's a chance that the pipes behind the bib will crack or burst under the pressure of the ice inside. Replacing plumbing inside your exterior walls gets expensive in a hurry, not to mention the risk of water damage to the walls themselves, so if you haven't drained your line before the first freeze, thawing it is your first step to recovery.
Things Needed
How to Thaw Your Hose Bib With Hot Water
How to Thaw Your Hose Bib With Hot Water
The most universal method for thawing a frozen bib requires no special equipment, just a handful of old rags or towels and copious quantities of boiling water.
1. Disconnect the Hose
If you can, disconnect the hose from the bib before you begin to thaw the plumbing. You may need to use a large pair of pliers in order to get enough leverage. If you can't remove the hose, don't worry about it. You can try again after you've started the thawing process. You should also open the spigot if you can. Again, don't worry if you can't budge it. You can try again in a few minutes.
2. Wrap the Hose Bib
Wrap the hose bib in several layers of rags or old and well-used towels. Towels are better at retaining water unless they're really threadbare.
3. Boil and Apply Water
Boil water and pour it over your hose bib in a fine, gentle stream. Your goal is to first moisten the rags or towels and then keep them hot. Don't just splash it on in quantity, which wastes water and creates an unnecessary mess.
4. Watch for Water
After a few minutes, start watching the spigot for any sign of water flowing from inside. If you weren't able to remove the hose or turn the tap previously, now is a good time to try again.
5. Repeat as Needed
Continue heating and pouring water until you begin to see water flowing from the hose bib. At this point, the running water inside the pipe will melt the rest of the ice from within. Leave the tap open until full flow has been restored and then shut it off.
6. Winterize Your Hose Bib
Finish the task by going into your basement or crawl space and shutting off the valve that feeds your hose bib. Go back outside and turn the tap on again to let any remaining water drain. Then, leave it open and return to the shutoff valve. At the bottom of the valve, you should see a small bleeder cap. Slide a pan, bucket, or other container under that and then loosen it to allow any remaining water to drain from the line. Your hose bib is now ready for the winter.
Alternative Thawing Methods
Alternative Thawing Methods
The hot water method is easy, but it's not necessarily your best option. It means you'll need to run in and out either to get water (because your hose bib is frozen) or to boil it, so you'll be letting out heat and tracking in wetness and mud. You'll make a muddy mess if the temperature is hovering right around the freezing mark or — even worse — create a sheet of ice if it's really cold.
If you can run an extension cord to the location of your hose bib, you may find that thawing it with a hair dryer or heat gun is a neater solution than using water (and a heat gun will do the job much quicker). If you're the impatient type, a propane or butane torch will certainly melt the ice, but it's a high-risk option. They are hot enough to damage the valve in the hose bib, and there's always the potential to set something on fire.
Prevention is the best method of all. A couple of weeks before the likely date of your first freeze, put away your hose and drain the line as part of your winterizing routine. Better yet, install a recessed or "frost-free" hose bib that's designed specifically for use in cold climates. Instead of the valve being located directly under the tap, it's set back about 16 inches into the interior of the house, where it won't freeze. When properly installed, these slope toward the outdoors so they'll self-drain and leave no water in the line after the valve closes.