In circumstances where a traditional fence is not practical for containing your dog or other pet in the yard, a viable option might be a so-called invisible or buried fence. For example, neighborhood covenants may prohibit the building of fences, making an invisible fencing a good option.
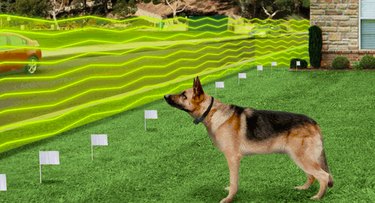
These electronic systems operate by means of a low-voltage transmitter connected to a series of underground wires that emit a faint radio signal. Your pet wears a special receiver collar, and when the pet moves too close to the hidden wires, the collar picks up the radio signal and emits a "correction" to your pet. In most systems, the collar has a range of warning/correction levels, ranging from an audio alarm when the pet begins to approach the wire to a mild static shock when he crosses the wire boundary.
Video of the Day
Video of the Day
The system consists of two lengths of wire that form the actual barrier, a transmitter that plugs into a wall outlet and a special collar for your pet. You have to bury the wires, but digging is minimal since the wires are only 1 to 2 inches below the ground.
Pros and Cons of Invisible Fencing
A considerable amount of training is necessary before your pet learns to recognize and respect the boundaries, but such systems can be very effective when used correctly. Once trained, the pet rarely even approaches the buried wires at all. Some satisfied pet owners report that invisible fences are safer for animals that are prone to attempting to climb chain link or other physical fences.
Invisible fences are not without critics, however. Although the shock your pet receives is quite faint—roughly the same as getting a static shock from carpeting—it is still an electrical shock, and some animal-rights advocates are deeply critical of such systems.
A dog with a strong instinct to roam outside its yard—to play with other dogs, for example—may develop a condition called barrier frustration when it is confined by a wireless fence. It may come to view its collar as a form of punishment, and some dogs turn from friendly to aggressive in such situations. Other dogs learn to ignore the shocks entirely when they are strongly tempted to play outside the yard.
In addition to these benefits and drawbacks of invisible fences, there are others:
Pros
- The cost is reasonable. The average nationwide price to have a fence installed is about $1,300, and if you do the work yourself, the cost is about half that. Compare that to the cost of installing a comparable wood fence, which is several times more.
- You won't lose your view. There is no physical barrier to block the scenery.
- You can make the fence as large or small as you want. If you live on a large property, you can extend the fence as far as your property lines allow to give your dog room to roam, and the cost of installation won't be much more.
- An electric fence can be more reliable than a conventional one because a dog can't jump over it, climb it or tunnel under it.
- There is no gate, so you can't forget to close it.
Cons
- The fence becomes ineffective if the wires break or the transmitter malfunctions. Systems are also disabled by power outages unless they include a battery backup feature, an optional add-on with many systems.
- An invisible fence doesn't prevent other animals from coming into your yard.
- No matter how mild, a shock collar inflicts some amount of discomfort and pain.
How to Install an Invisible Fence
Although pro installation is available, installing an invisible fence is a fairly easy DIY project that will save you quite a bit of money. The procedure is simple and requires just a few digging tools, but things can get complicated if you have to cross a concrete barrier, such as a driveway. You should follow the instructions that come with the model you purchase; most installations follow the basic procedure outlined here.
Before you start, it's a good idea to make a drawing of the fence layout that includes all important landscape features. The nature of your yard may affect how you route your underground boundaries. For example, you may want to reroute the wires rather than crossing a concrete driveway or thicket of bushes. The diagram will also help you locate the wires when the time comes to remove the fence. The invisible fence wires should not overlap utility wires, so installation preparations should include a call to the utility company to locate any buried cables that may be on your property.
Things You'll Need
Pen and paper
Wireless fence kit with wire
Tape measure
Drill
Spade
Circular saw with masonry blade (if needed)
Step 1: Call 811
Every state has a service that provides you with details about buried utility and telecommunications lines that may be buried on your property. You access this service by calling 811. Don't make any final plans until you have these details.
Step 2: Sketch Your Yard and Invisible Fence Layout
Outline your yard on a piece of paper, including all the landscape and hardscape features that you'll encounter when laying the fence wire. Don't forget to include the locations of buried utility cables. Design the layout of the fence to avoid obstacles—especially the underground cables. When fence wires run parallel to utility lines, they should be no closer than 10 feet to avoid electrical interference. When crossing an underground cable with fence wire, do so at a 90-degree angle. Choose a location for the transmitter that is in a dry indoor location, such as a garage or utility area.
Step 3: Make Measurements and Buy Cable
Measure the amount of wire you need to lay your fence, either by using a tape measure in your yard or extrapolating the distances from your diagram. Purchase about 20 percent more wire than you need.
Step 4: Lay Out the Wire and Connect It to the Transmitter
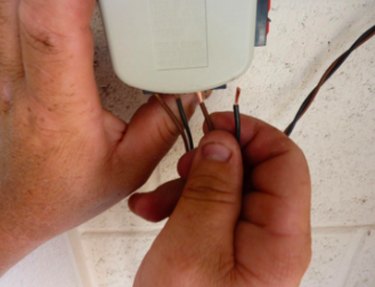
Most systems require that you lay two strands of wire, side by side. Lay them over the entire perimeter of the area you wish to fence, but don't bury them yet. Set them on the ground, running the ends of the wires indoors to the transmitter location. You may need to drill holes in the siding or foundation in order to run the wires indoors. Connect the wires by stripping about 3/4 inch of insulation from the ends of the wires and inserting the wire ends into the transmitter terminals.
Tip
If you want to create an "opening" for your pet to pass without being shocked, wind the wires together tightly for the length of the opening. Wind the wires by hand or use a drill to get about 6 to 12 twists per foot of wire.
Step 5: Plug in the Transmitter and Test the Fence
Plug in the transmitter to a GFCI wall outlet. Walk the perimeter of the fence with the dog collar, making sure you get an auditory or visual signal whenever you're close enough to trigger one. Go in the house and make sure you don't get a signal anywhere indoors. If you do, move the wire farther from the house.
Step 6: Bury the Wire
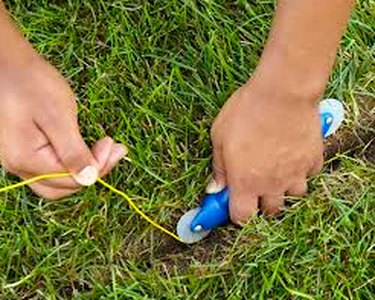
Once you are satisfied with the wire layout, use a spade or similar digging tool to make a 2-inch-deep trench in the ground along the route of the fence wire. Push the wire into the trench using a spline tool, backfill, and step on the trench to compact the soil.
If the wire has to cross a concrete surface, and you can't get it underneath, you may have to cut a groove with a circular saw and a masonry blade, then patch with concrete patching material after setting the wire inside.
Step 7: Train Your Pet
Once you've installed the fence wire, you still have to train your pet to respect the fence boundary. The fence installation kit usually comes with small flags for this purpose. Following the instructions on the container, set the flags in a line far enough from the fence to trigger the auditory alarm in the collar. After getting shocked often enough, your pet will learn to associate the audio beeping with the shock and stop venturing past the flags. Eventually, you'll be able to remove the flags.