

Don't Waste Leftover Tile: Turn It Into An Adorable Bedside Tray

We may receive a commission on purchases made from links.
A messy bedside table is more than just a visual nightmare. According to research published in Sleep, clutter may also get in the way of a good night's rest. Using an attractive tray is a nice way to corral the things you need to keep nearby. The limited size and decorative potential of this type of organizer can make you more intentional about what gets to stay on top of your table and what needs to be tucked inside a drawer or stored somewhere else entirely. Instead of spending a small fortune on one, DIYer Christina Dennis figured out a creative way to make her own bedside tray by using E6000 adhesive to attach two metallic drawer pulls to a large hexagonal tile.
Making a DIY bedside tray is one of the most affordable space-saving storage ideas for small bedrooms, whether you have a few leftover tiles from a recent bathroom upgrade or you need to purchase a single one to use with some old cabinet pulls. Although this project offers some flexibility in terms of the tile shape you use, it's very important to pick one that's large enough to hold your phone, eye mask, or any other items that are always in a jumble on your nightstand. Large hexagonal floor tiles work especially well because they provide a modern look without taking up the entire surface of your table. You can easily find substantial porcelain or marble versions for under $4 each at your local home improvement store or tile warehouse.
Tips for DIYing a small tray using a hexagon floor tile and drawer pulls
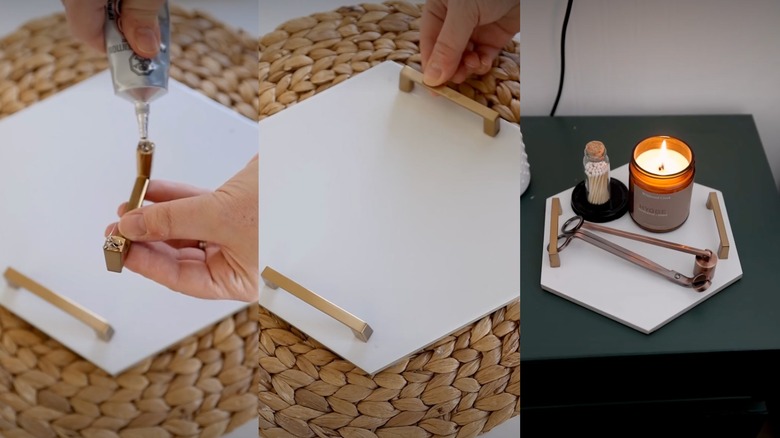
The remaining supplies will bring the total cost of this project to around $20. Head to Home Depot for the best price on a small tube of E6000 Clear Adhesive, which costs $4.48. You'll also find a wide variety of bar-style cabinet pulls there, which start at around $5 each. E6000 is one of the best adhesives for simple craft projects like this one because it creates a long-lasting bond between metal and glass, ceramic, or porcelain tiles.
The assembly process is extremely simple. Start by applying a generous bead of adhesive to each side of your cabinet pull before pressing it into place on your tile. Christina Dennis opted to use two pulls on either side of her tray to serve as handles, but you could certainly use one on every side to create a border around your entire tray. Because this will increase your overall cost, if you go this route, look for discounted cabinet pull packs instead of purchasing them by the piece. It's also important that your pulls are slightly shorter than each side of tile, so measure both carefully before purchasing.
If the edges or underside of your tile are extremely rough, there are a few optional steps worth considering to ensure your new bedside tray doesn't scratch your nightstand. You can sand rough edges on ceramic tiles using 60 or 80 grit sandpaper to dull serrated spots before working your way up to a 200 or 400 grit sandpaper for an ultra-smooth finish. As a final step, consider adding small, inexpensive self-adhesive felt pads to each corner of your tray.