

Woman Turns IKEA Deck Tiles Into Patio Decor That Adds Privacy

Nothing ruins a moment in an outdoor space faster than catching the eyes of a nosy neighbor or having to stare at an unsightly neighborhood eyesore. But a lack of privacy and visual boundaries shouldn't be why you head indoors. Instead, an easy, affordable DIY could save the day, giving you privacy and a visually appealing backdrop to reclaim your outdoor balcony, patio, or porch once again.
YouTube user ACornerInEurope shared her simple, effective, and attractive idea for creating a budget-friendly outdoor privacy screen using IKEA's perforated ALTAPPEN outdoor decking tiles as a decorative lattice panel. By attaching the decking squares to form the panel, securing it inside a custom-built wood frame, and attaching it to her railing using heavy-duty zip ties, she created an affordable, renter-friendly privacy solution for her balcony. Because the decking tile is naturally waterproof and built to withstand the elements, it's a great fit for an outdoor privacy wall instead of its usual floor application.
These inexpensive IKEA decking tiles are only $17.99 (or about $2.06 per square foot) for a pack of 9 square 11.75" tiles. Each tile is just a hair under a square foot, so you can determine how many packs you'll need based on how wide and tall you want the screen.
Build an outer privacy screen frame out of pressure-treated or composite boards
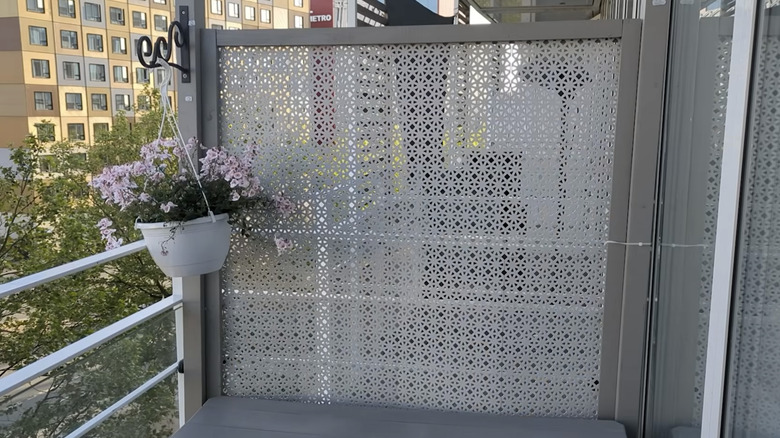
This privacy hack is very simple; it consists of a basic wood frame with the IKEA ALTAPPEN decking attached. Start by determining the best size for the privacy screen. Keep in mind that the larger you go, the more wind will affect it, so you'll want to secure it to a sturdy surface. The YouTuber used an existing privacy screen frame, so she skipped this step by simply removing the material in the middle, leaving it ready to use. However, building one from scratch is a straightforward project.
The simplest approach is to use IKEA ALTAPPEN decking to determine the frame size, so you don't have to cut the pieces to fit. If you do need to customize the size of the privacy screen to your particular patio or balcony, begin by measuring how tall and wide you'd like the screen. Use pressure-treated lumber or composite boards meant for outdoor use to create the outer frame. Install a smaller board (or one cut down lengthwise) on top of the larger frame boards, lining up the outermost edges so the frame contains an inner notch for the decking to sit inside — exactly the way a piece of glass sits in a picture frame from the back side. You can leave your outdoor-rated wood frame as-is, but sealing it and/or painting it with exterior products will extend its lifespan by protecting it from moisture (composite is already factory sealed). If you are painting or sealing the frame, do it before you install the IKEA decking.
Secure IKEA ALTAPPEN tiles inside the frame as a privacy lattice panel
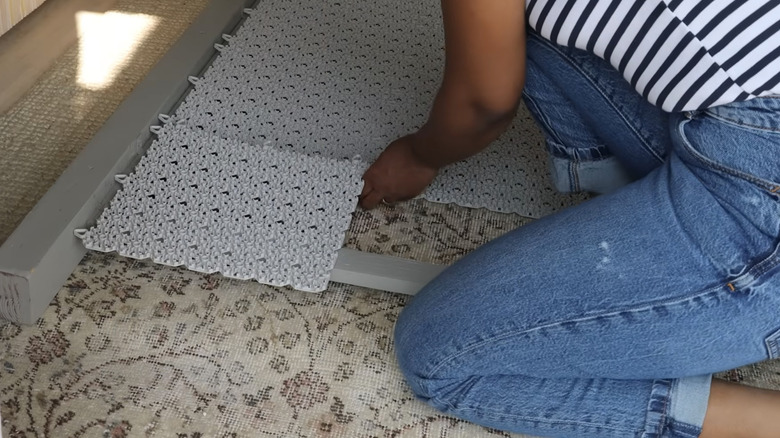
Do a test layout of the IKEA ALTAPPEN to see if cuts are necessary to fit properly within the notched box frame, using a hand saw, circular saw, or wire cutters to trim pieces as needed. If light gray isn't your preference or doesn't match with your patio/balcony aesthetic, refinish them with outdoor spray paint before installing, coating the perforations for full coverage on each piece. Once dry, click the pieces together to form one continuous lattice privacy panel, and do any paint touch-ups as needed.
Place the IKEA ALTAPPEN panel face down into your frame so that it fully nests within the inner frame notch. Secure it in place with screws, staples, or construction adhesive. For a one-sided frame, you can stop here. But if you want your frame to look nice from both sides, pre-finish and install a matching outer frame on the second side to sandwich/hide the ALTAPPEN panel and inner frame between.
To properly secure your privacy screen and prevent it from tipping or taking flight in the wind, you have a few options. To brace your screen against a balcony or deck railing like the YouTube creator, use brackets and screws or several heavy-duty zip ties to affix the screen to the railing. Alternatively, if you're installing near full-height walls or posts, secure the entire height of the screens to both sides with brackets. For a stable free-standing option, add pre-finished substantial side posts and feet, weighted with sandbags or similar, to the frame. Blend installation methods as needed for your outdoor setup, such as securing the screen to a wall on one side and using a weighted foot on the other. The result: a stylish, low-cost privacy screen.