

DIYers Turn An Old Window Into A Coffee Table With Rustic Charm

There's no better feeling than having a guest over and hearing them compliment something you made yourself. And that's just how you'll feel after making a DIY rustic coffee table. If your space could use a little more charm, the perfect material to create this table may already be collecting dust in a shed or waiting at a salvage shop. With some reclaimed wood and a little imagination, an old multipane window can become a one-of-a-kind coffee table. Better yet, it looks like a store-bought find, making it even more satisfying to tell guests you built yours in the garage.
DIYers Vintage Revivals Home & Garden Decor and Diva of DIY on YouTube turned a six-pane vintage window into a rustic coffee table with some reclaimed wood as the legs. A light whitewash and sanding give the finished piece a timeworn appearance — without hiding all the imperfections that make the salvaged materials interesting to look at. If you're looking for rustic living room ideas, this table could fit right into a farmhouse-style space, cottagecore sitting area, or a room filled with vintage and secondhand finds. Depending on where you source the materials, it could also cost less than purchasing a new coffee table.
Before building around just any window, inspect the sash for rot or cracked panes. Not all vintage glass is strong enough for everyday tabletop use either, so it might be worth having a glazier assess it or adding a fitted tempered-glass panel over the top for protection. Painted windows also need another check before you start chipping away at them, as sanding painted materials dating from before 1978 can release hazardous lead dust.
How to build a vintage-window coffee table
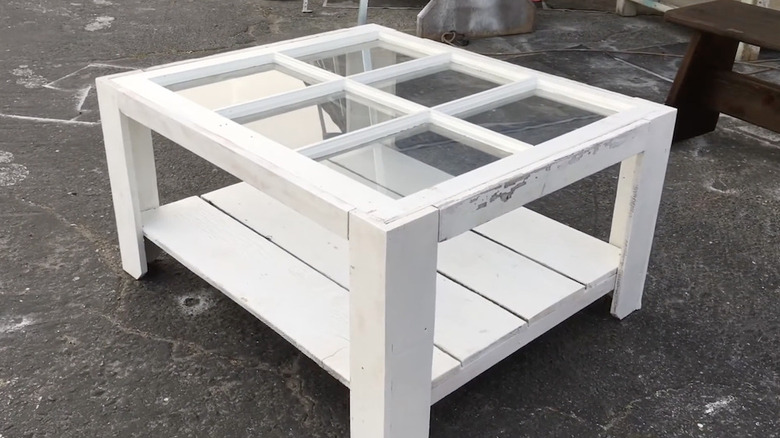
For the basic version, you'll need a wooden window sash, reclaimed wood boards, wood glue, screws, wood filler, and your preferred paint or stain. To assemble the table, grab a measuring tape, a saw, drill, clamps, and sandpaper. Cut matching pieces for the four legs, joining two narrow boards at a right angle to create each L-shaped support. Fit them around the window's corners, then glue, predrill, and screw them in place. You can add support strips between the legs and secure boards across them for an added lower shelf for even more storage. Fill visible screw holes and finish the wood with stain or paint once everything is dry.
If you're a fan of knick-knacks and want to show them off, a hinged version turns the table into a display case. In her tutorial, Diva of DIY builds a shallow wooden box beneath the window, allowing the top to open. To build that, measure the window and build the box to match its outside dimensions, accounting for board thickness when cutting the sides and plywood bottom. She uses 1-by-6 boards and ¾-inch plywood, but the box's depth can change depending on what you want to display. Attach four furniture legs (or reclaimed wood) using mounting plates and screws.
To add the top, all you have to do is place the window squarely on the box and mark and predrill the hinge locations along the back. Secure hinges to the wooden sash and box with the appropriate hardware. As with other DIY rustic decor ideas, the finish is where you can make it your own — choose paint or stain that complements your space. When arranging your keepsakes inside, you could even color-coordinate them with the table. For instance, pair a brown stain with a vintage book collection, or a shabby-chic white with quaint trinkets.