

There's No Need For A Fruit Basket: The Stylish Countertop Storage You Can DIY
We may receive a commission on purchases made from links.
Baskets are the go-to choice for storing fruit, and for obvious reasons. They free up cabinet space, allow air to circulate so produce lasts longer, and make fruit easy to grab on the go. Still, there are other kitchen storage ideas that allow you to stay on top of your fruit organization while also offering a fun and creative DIY project to tackle. Instead of opting for a store-bought basket that feels unoriginal, why not try your hand at crafting your own DIY wood produce bin to give your countertops a personalized decorative touch? This project takes about an hour to complete and, if you have a few tools on hand already, could cost less than a brand-new fruit basket.
The DIY was shared by YouTube creator Anika's DIY Life, who used thick plywood pieces to create wooden storage with a divider running through the middle. In addition to the lumber, you'll need a miter saw and a jigsaw to cut your wood, clamps to hold the pieces in place during assembly, wood glue, finish nails, and screws. The result is a practical bin that creates extra kitchen storage to free up space and a stylish spot to display fresh produce.
If you have large countertops and a big family who loves fruit, consider extending the length and adding multiple partitions to organize even more unique fruits (as well as potatoes, onions, and other unrefrigerated veggies) into individual sections. You could even make multiple bins to stack vertically. With your plan in place, you can then turn your focus to all the fun finishing and styling opportunities to make this DIY kitchen addition the perfect countertop storage upgrade.
Create rustic countertop fruit storage using plywood
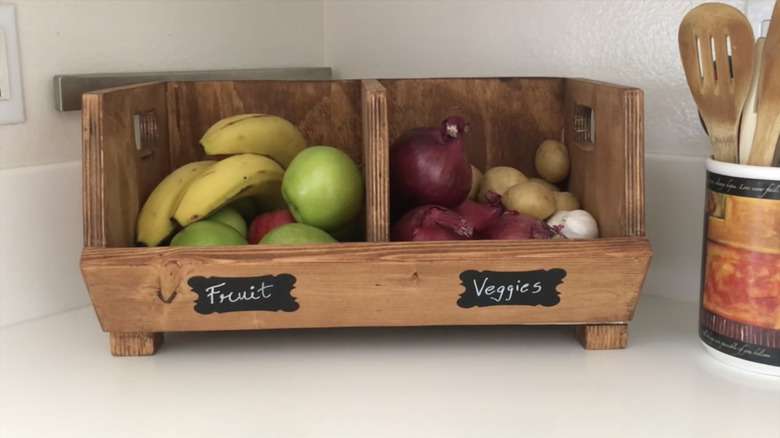
To create this rustic kitchen idea, cut your plywood into a back panel (equaling the container's final height and width) and three dividers — two edges and one central partition. If desired, cut angles into the front edges of the dividing walls for a more open design. For the two sides, draw a template for the handles. Trace this onto the side panels, and cut out the handles with a jigsaw. Then, screw the sides and the straight edge of the center divider to the back panel with pocket screws. If you don't have a pocket screw jig, you can use wood glue and brad nails instead.
Once the foundations of the frame are built, secure a front rail with wood glue and finish nails. Slats form the base to allow for all-important airflow for your fruit. Position these horizontally along the bottom, spacing them about ¾ inch apart. To finish, screw four wooden feet to the bottom (e.g., 2-inch blocks) to raise the bin off your counter surface. If you're making a stackable set, only add feet to the bottom section. Then, stack the feet-free builds on top.
There are lots of other ways to upgrade your DIY fruit storage bins, too. You could add stainable edge banding, such as EDGEMATE Birch Edge Tape, to cover the laminated plywood edges and clean up the look. If using a stain or finish, ensure you choose a food-safe option, like mineral oil or tung oil. You can also add a film finish like polyurethane, as many are considered food safe if you let them cure fully and don't damage them. Then, finish up with other personal touches, like chalk labels to stay on top of your evolving produce storage setup.