

Give Basic IKEA Furniture An Oak Cabinet-Inspired Faux Finish With A Clever DIY
The best characteristic of IKEA furniture is its basic design. This popular brand's collections are often stylish enough to befit modern and minimalistic interiors, but also simple enough to be upgraded into something more chic. The TikToker everly_andme shared a brilliant and quick way to upgrade plain white IKEA cabinets into more charming pieces.
This clever DIY creates the look of expensive, warm-toned oak with budget-friendly supplies. Wood-style furniture brings nature inside of your home and has a lot of versatility. It befits interior designs of all kinds, from rustic decor to classic styles, ensuring it'll be a long-lasting look for your space.
This hack only requires a few materials, including Frenchic's Lazy Range Creme de la Creme Paint, or any chalk paint. A layer of Frenchic Furniture Wax, or another browning wax, creates the warm oak-like effect. The original DIYer additionally recommends using a round brush to make the subtle pattern with the wax.
How to upgrade basic IKEA furniture with an oak wood look
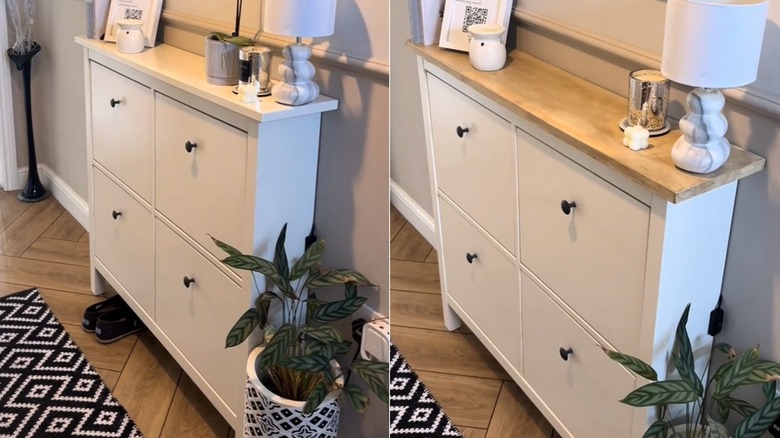
This DIY will work on other IKEA cabinet options, as the original DIYer insists it'll work on darker wood too. Start by cleaning off the cabinet top with a microfiber cloth. There's also no tedious sanding required. But to make this IKEA hack look professional, carefully wrap the bottom edges of the surface with painter's tape. This creates a neat finish and prevents paint or wax from being dripped onto the surface below. Paint over the top surface, using a regular paintbrush and the all-in-one chalk paint. If using the recommended Frenchic brand, play it safe by waiting between one to four hours for it to dry. Otherwise, adhere to your paint manufacturer's recommended dry time before starting on the next step.
@everly_andme HOW TO oak effect in 40 seconds. I always have so many questions about this so here is a summary – 1. No you don't need to sand it first 2. Crème de la crème Frenchic paint and browning wax 3. I prefer round brush for the wax but otherwise no special brushes needed 4. No I haven't used a laquer on top at the moment but I probably will for the bannisters! Let me know what you think! #diyproject #diy #rustic #oakeffect #ikeahack #budgetfriendly #upcycle #cottagevibes #newhome #newbuild #howtodo #frenchic #helping #girlssupportinggirls #homelifestyle #homedecor #hallwaydecor
Then, use a round brush to dab the browning wax over the painted surface. The DIYer alternates between dabbing and using back-and-forth strokes, but they keep their brush in the same horizontal direction. It's important that you perform the brush strokes in one direction to emulate a natural wood grain. The dabs of paint also add natural-looking imperfections and variation to the design. Let the browning wax dry for 30 to 45 minutes, and apply another coat or two for the best results. Give it a few days to fully cure before decorating the upgraded cabinet with your tabletop decor.