

Skip The Paint: Upgrade A Dated Front Door With A Wood Plank DIY
We may receive a commission on purchases made from links.
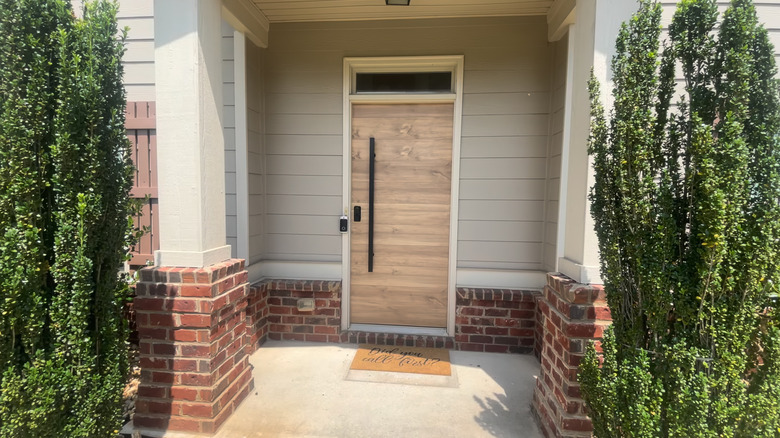
When you're stuck with a boring or builder-grade front door, it can drastically impact your home's curb appeal. Although there are some creative ways to style a front door to help it look a little more modern, you often can't do much to improve a dingy or dented panel. While updating it with a new color can be a quick and inexpensive option, YouTuber @diyelie figured out a creative way to skip the paint and update a dated front door with a wood plank DIY. To make it, the content creator repurposed a box of laminate click-lock flooring, cutting each piece to size before attaching it to both sides of the existing front door.
It doesn't take much door shopping to understand why this easy and affordable idea is so appealing. There are many different types of entry doors out there, and most of them cost hundreds or even thousands of dollars. That's especially the case if you want a contemporary look, which is exactly what this budget-friendly DIY achieves for way less.
Along with a pneumatic nail gun and rotary or tablesaw, you'll also need a few boxes of click-lock flooring similar to the Trafficmaster Laminate Wood Flooring from Home Depot @diyelie used to cover the front door. It's available in several different colors for $23 to $31 per case. The exact amount of flooring required will depend on the size of your door and whether you're covering one or both sides, so measure carefully. While you're shopping, grab a package of 5/8-inch, 18-gauge brad nails, and a tube of Liquid Nails Extreme Heavy Duty Construction Adhesive. To cover a standard-size front door, your total material cost should be around $100.
Use click-lock laminate flooring planks and large pull handles for a contemporary look
For the smoothest results, it's best to start with a solid slab door instead of one that has window panels. While some recessed decorative spaces are okay, trim or other elements that create raised areas will prohibit you from laying each piece of flooring flush with the door itself. Before making the first cut, start by removing your doorknob and lock. Then, carefully measure the width of your existing door from edge-to-edge before cutting each flooring plank to the perfect length.
@diyelie Front door upgrade. Extreme makeover #frontdoormakeover #diy #moderndoor #handyman
Next, add a generous amount of construction adhesive to the back of your first flooring plank. Starting at the bottom, firmly press the plank against the door while using a level to ensure it's perfectly straight. Once you're satisfied, use a nail gun to secure the plank along both edges as well as in the middle. Continue the process all the way up the door, clicking each plank into place before nailing it. Once you're done, sand the outer edges to ensure your door opens and shuts smoothly. Optionally, you can repeat the entire process on the other side of your door.
Figuring out what hardware you need for your front door is an important part of this project. Once you're finished covering your door with planks, you can reinsert your original doorknob or upgrade to a sleek new smart lock by using a hole saw to carefully bore an opening for installation. To achieve an even more contemporary look, consider spending around $100 more to add a large matte black pull handle.