The Easiest Way To DIY Concrete Planters Using A Plastic Bin
We may receive a commission on purchases made from links.
Do you ever wander around your local garden center looking for planters and find yourself frustrated by the prices? While there are plenty of places to find unique and stylish planters, modern versions at stores like Pottery Barn can cost hundreds, and even the smallest planters at home improvement stores aren't always budget-friendly. If you're willing to get your hands dirty, there's an unbelievably affordable way to DIY concrete planters using plastic bins from Dollar Tree. YouTuber @DIYCrasher fills them with moistened sand to create molds, covers the sand with a mortar-and-stucco concrete mix, and adds a drainage hole with a piece of PVC pipe. After the concrete cures, he removes the sand and fills his new planters with colorful flowers.
You don't need to be a masonry expert who knows exactly how to mix concrete to make DIY planters when you opt for a product like Home Depot's best-selling Sakrete Gray Type S Mortar. Available in an 80-pound bag for $8.25, the pre-blended mix requires only the addition of water, according to the manufacturer's instructions (you won't need the entire bag for one planter). It provides up to 60 minutes of work time before the concrete starts to cure, which is helpful for beginners.
There's no need to buy specialty sand for this DIY, either. It simply needs to hold enough water to maintain its shape. It's just like making a sandcastle, but instead of using a beach toy, you'll use one of Dollar Tree's $1.50 Essentials Slotted Plastic Storage Baskets.
Use a bin to create a sand mold for your DIY concrete planter
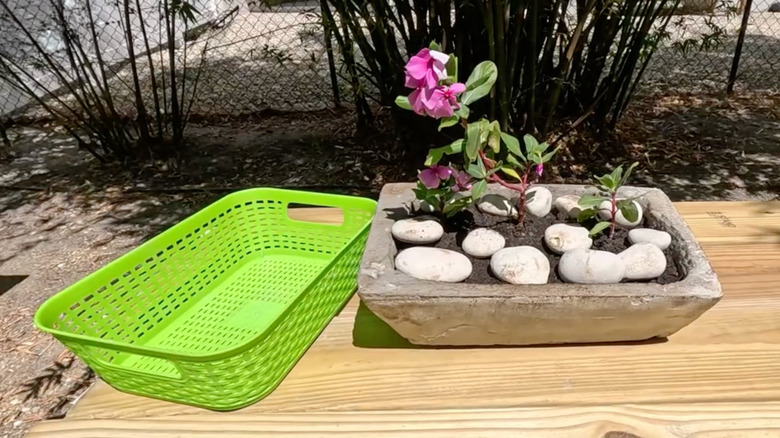
The first step is firmly packing your plastic basket full of well-moistened sand. After smoothing out the top, quickly flip it over onto a flat surface covered with a protective sheet. Then, carefully remove the basket and set it aside. You'll be left with a rectangular-shaped sand mold. Smooth out each side, and slightly round any rough edges. Don't worry about disturbing the woven pattern left behind by the basket since it will end up on the inside of your finished planter. Once you've gotten the hang of the process, your imagination is the only limit on the containers you can use as molds.
Next, mix a batch of concrete either by hand or using a paddle attachment on your power drill. While it may look and feel like glorified mud while you're working it, concrete is highly caustic and can cause serious skin and respiratory injuries, so remember to wear a mask and gloves. Use a trowel to gently apply generous scoops of concrete to the top and sides of your sand mold. Smooth out any rough edges, cracks, or gaps to make sure you end up with a professional-looking, long-lasting planter.
Once you're completely satisfied with your coating, insert a 3/-inch piece of PVC pipe completely through the center of your concrete layer to create a drainage hole. Use slow but firm pressure to ensure you reach, but don't disturb the sand mold beneath it. Allow your concrete to fully cure before turning your new planter upside down, removing the sand, and adding soil along with your favorite container gardening-friendly plants.