Reuse A Fan With This DIY That Keeps Garages And Workshops Cool Without A/C
We may receive a commission on purchases made from links.
Freestanding garages and workshops that aren't well-insulated — especially metal buildings –- can turn your work and storage space into an unusable summertime furnace. This was the situation with my workshop, a 20-by-25-foot metal building with a black roof that collects an unbelievable amount of heat from late spring to early fall. The solution, it seemed to me, was a sort of attic fan placed high in the building and venting to the outside.
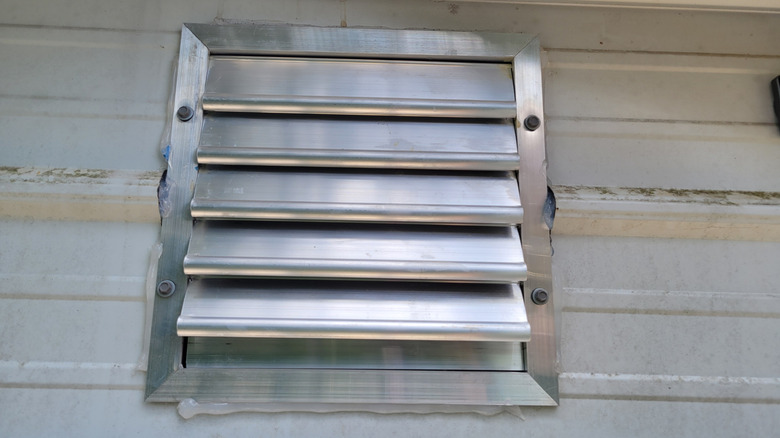
The result is sort of a cross between a whole-house and an attic fan — but without the potential downsides of attic fans — that would draw the hottest (that is, the highest) air out of the building through a 12-by-12-inch vent in the gable end of the building. Like most attic fans, my creation is controlled by a thermostat that's triggered whenever the temperature exceeds a threshold I set, and turns off when it falls below another, lower temperature.
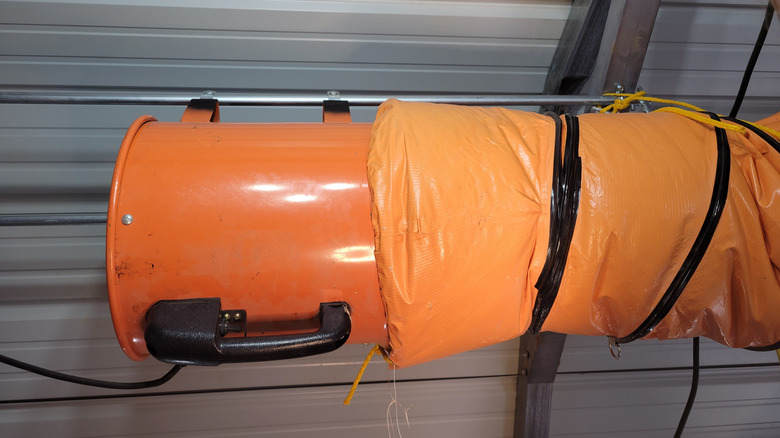
For this project, I reused a 12-inch Vevor utility blower — a portable industrial extractor fan that came with 30 feet of flexible PVC ducting. I used the fan as an attic fan while building our house, and have no other use for this loud, powerful monster of a blower. This particular fan is no longer available, but many like it are, including ones specifically designed for use as attic and whole-house fans, and maybe even for installing duct booster fans. But this one was available, and it worked a treat. Aluminum ducting is also available in the 12-inch size, and I might eventually replace the PVC duct for a neater look.
Setting up the fan and exhaust vent
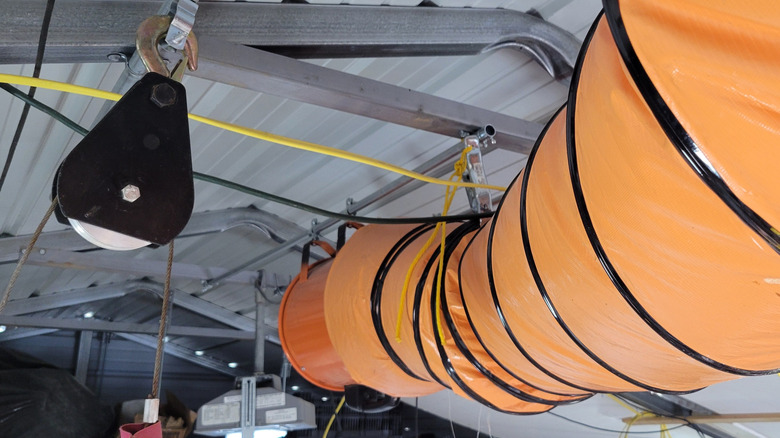
If you wanted to try an exhaust fan like this, how you accomplish it will depend entirely on the materials you use. My goals were to reuse what I already had and to avoid a roof penetration and the headaches that can come with that down the line. The fan was mounted to two rails made of ½-inch EMT conduit I had on hand. I initially mounted them to the apex bracing between the roof bracing with plastic two-hole straps that seemed strong enough, but the torque of the fan kicking on almost immediately broke one of the straps, so I replaced them with steel. The fan is mounted to these parallel rails upside-down with EMT conduit hangers attached to each of its four feet.
PVC ducting connects the fan to the gable end of the shop, where I installed the vent with gravity-actuated louvers. I didn't have any J-channel on hand, so the vent is just heavily siliconed into the hole I cut for it. Connecting the ducting was an unbelievably annoying task, since the flexible duct was far too long and I didn't want to cut it unnecessarily — the fan and ducting are designed to work together for portable, temporary ventilation.
I bunched the duct up at several points and attempted to hold it together using the built-in D-rings and spring clamps, which were attached to the roof of the building at several points, mostly using the sort of nylon rope I grew up calling "ski rope." It's an imperfect solution.
Possible future improvements
While this setup performs well for the main body of the workshop, it doesn't reach everywhere, and I'll eventually need to reduce airflow duct noise and perhaps fan noise as well. A storage loft in one end of the building still gets uncomfortably hot sometimes, probably because the fan is pulling resupply air from random places in the building, like underneath the garage door. I need to add some vents to the opposite gable end and seal other areas for strong cross-ventilation covering the whole building. But, overall, it is definitely effective and has the added benefit of doubling as ventilation for some shop activities that require it, though I'd use a separate hood for anything critical.
A note about the controller that turns the fan on and off. Thermostat controllers are available for less than $30, but I made mine from some parts I had lying around: an ESP8266 microcontroller, a DHT22 temperature and humidity sensor, and a 120-volt/15-amp relay. All of this is housed in an old plastic screw box, and someday I'll get around to making the installation look neater.
The microcontroller was programmed using code I modified from ArduinoGetStarted. It turns the fan on when the temperature at the sensor crosses a threshold I defined, and turns the fan off when the temperature crosses another, lower limit. Note that the DHT22 sensor is capable of humidity readings, so you can easily add that functionality, too.