Reuse An Old Bundt Pan For This Cute DIY Decor That Tricks The Eye
You might not find your Bundt pan useful if you aren't a big baker, find it difficult to bake professional-style cakes in them, or are trying to stay away from sweets. But that doesn't mean you should give it away. That's because you can use them to DIY gorgeous imitation Bundt cakes in a jiffy. They can serve as a decor piece in your kitchen, blend in with your lovely tea party tablescape, or double as the perfect food item for an elaborate prank on your friends and partner. And all you need is some foam insulation to craft them; whatever you have on hand is fine, and there's no need for anything fancy. But if you don't have any leftover spray foam insulation, we like Great Stuff's Gaps & Cracks Cream.
Besides this, you'll need some acrylic paint in a light brown shade to make your imitation Bundt cake look real. You can even use a slightly darker tone to employ shading to your advantage. Moreover, you'll need a sharp knife and a thin-bristled paint brush for this project. In case you want your cake to look fancy, make a little icing with a ready-made spackle, like Dap Fast 'N Final Lightweight Spackling. Use it as is or tint it a bit if you want to make your frosting look custom. Alternatively, you can go with white puffy paint, such as Duncan's Puffy 3D Paint, for that mouth-watering frosting. To go the extra mile, get some artificial berries, too, including raspberries, cherries, and strawberries, to really sell the idea of your real-looking-but-not-real Bundt cake. That being said, keep this out of reach of your young kids, or they might accidentally consume it.
How to DIY an artificial Bundt cake and make it look real
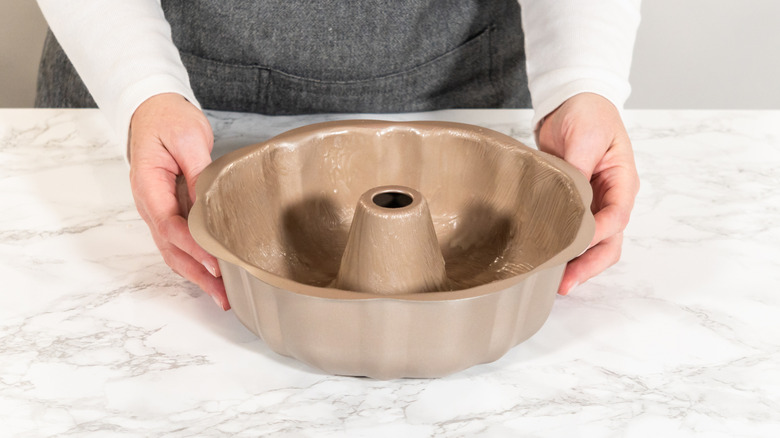
The first step is to wipe down your old Bundt pan with a damp microfiber cloth. You don't want any spider webs or debris creating problems later on. Then, stuff the hole in the middle with some old newspaper or packing paper to avoid topping it off with insulation. Now, for the fun part: spraying around foam insulation inside your pan. Try to coat the insides as evenly as possible and don't go overboard, or you'll have difficulty taking it out later on. Once you're done, set your pan aside overnight. This'll give the insulation enough time to harden and assume the shape of a Bundt cake.
In the morning, carefully take out the hardened cake from the pan — this'll be easier with a silicone pan. However, lightly tapping a cast aluminum or steel pan with the end of a knife or something similar should work, too, though it might take a bit longer. When you have the cake, you'll want to slice off a thin part from its bottom to smoothen it out. In case you aren't a pro DIYer, use a marker for a precise cut.
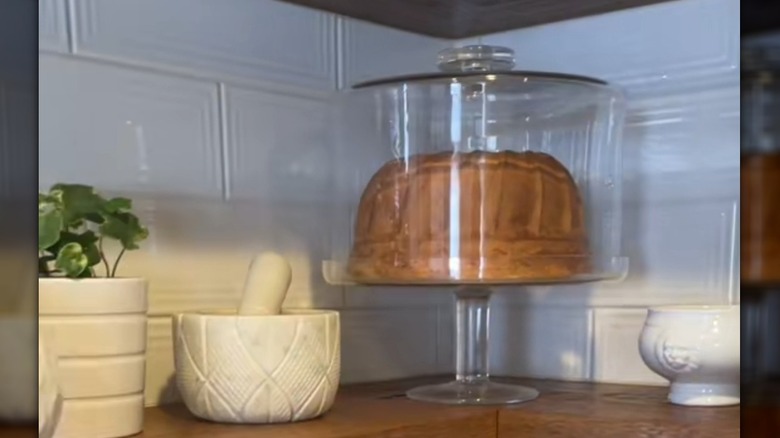
Afterward, you can start painting your decor item. Give it a coat of light brown first and let it dry before painting a second coat or adding a bit of shading with a slightly darker brown. Let it air dry, and your Bundt cake decor will be ready for display in a cake stand. If you wish to give it a refined touch, put some spackle (white or tinted) in a piping bag and fashion a little frosting on top. Finally, add some imitation berries and sprinkle in a little diamond dust for a rich sugary treat.