DIYer's Clever Bathroom Build Conceals An Everyday Eyesore: 'Sell This On Etsy Please!'
We may receive a commission on purchases made from links.
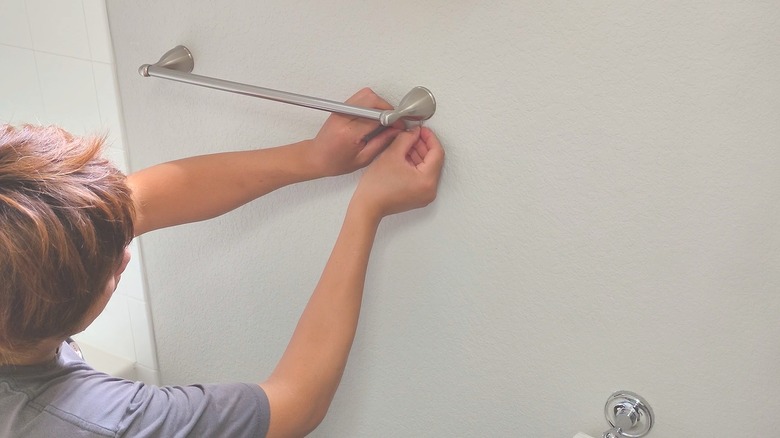
Towel racks are a bathroom necessity, but also an eyesore. If there's an inconveniently placed towel rack in your bathroom, don't let the metal rod interrupt the interior design. Pursue other stylish towel storage ideas, and transform the towel rod into a decorative shelf instead. The TikToker kelseyjld shared their wooden shelf idea that's budget-friendly and doable in a single weekend.
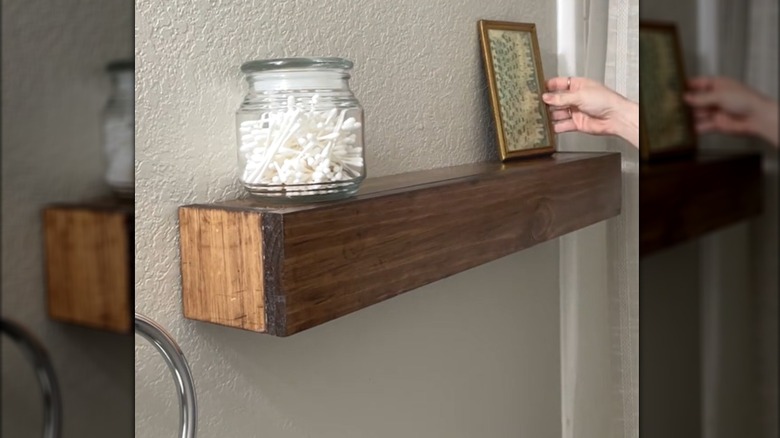
They designed a simple floating wall shelf that fits over a towel rod and hides it from view. This idea is especially clever because it's renter-friendly. The impromptu shelf is impermanent, making it safe to do, even if living under the rules of a strict landlord. It's also doable with a $50 budget, making it far more affordable than many storage ideas for bathrooms.
All you need to craft this ingenious solution is a wood plank, a saw, wood glue, wood stain, and a sealant. Measure the towel rod before purchasing the wood to ensure you buy the right quantity. The original DIYer used an 8-foot board for their standard-size rack. For the wood stain, they used Minwax Wood Finish Stain in red mahogany; however, the shade is up to your preference. Choose an oil or water-based sealer, such as the Varathane Water-Based Crystal-Clear Ultimate Polyurethane, to protect the finished project from bathroom humidity.
How to build the wood shelf for a bathroom towel rod eyesore
This is a beginner-level woodworking project, and for a more thorough tutorial, check out the long video version on Kelsey Casteel's YouTube channel. Start by measuring the furthest dimensions of the towel rod, and saw the wood into two pieces of the same length, slightly longer than the towel bar. Then, cut two more pieces as end caps so you can slide the finished "box" over the rack, and finally, add one more long piece to cover the front. Use wood glue to secure all the pieces together except the front plate. After about 30 minutes, they should be bonded in place. When assembling the wood shelf, tuck an extra piece of lumber above the center of the rod, between the metal towel bar and the DIY wood shelf, before attaching the front plate. This will keep it secure in place, so there's no need to permanently drill it into the wall.
Stain the entire design, including the still-separated front plate, with your waterproof wood stain. If your bathroom has cool-toned cabinets or a lighter aesthetic, you may choose to swap the stain for a more complementary paint color. Once the coating dries, add multiple coats of your chosen finish. You can go with any finish that best matches your bathroom. However, keep in mind that satin finishes are most practical for these spaces, since they're smooth and easy to clean.
@kelseyjld Weekend DIY and under $50!! I used one plank of wood, a saw, wood glue and stain for this super easy project #diyproject #weekenddiy #bathroomdiy #towelrackdiy
Once it's affixed to the wall, look up bathroom decor ideas for inspiration. Arrange the top with candles, artificial plants, or matching canisters for common bathroom essentials, like Q-tips and cotton balls. The key to an aesthetically pleasing setup is to include functional decor, especially since bathrooms often have limited storage options.