Woman Transforms Worn-Down Driveway Into Something Amazing For Under $200
We may receive a commission on purchases made from links.
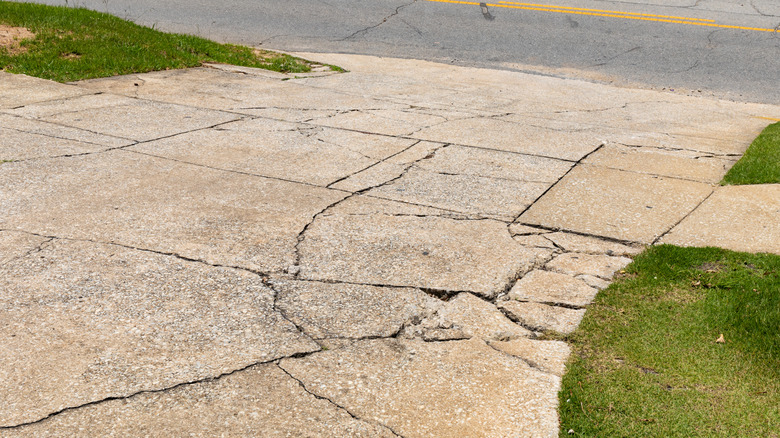
A driveway is a highly visible feature of any house, and if you have one that's well-worn and cracked, it doesn't do much for curb appeal. Cracks vary in severity, and you might need professional help to repair some of them. However, if they're fairly narrow, you can fix them yourself. Crack repairs won't necessarily make your driveway look much better, since they may still be visible, but fear not. TikTok user @karlinsummer has a budget-friendly DIY makeover that turned her driveway from tired to stylish. She caulked and filled the cracks, then camouflaged the repairs by painting the driveway to look like big slabs.
This procedure wouldn't be helpful for a driveway that is seriously damaged. Serious damage can be caused by freeze-thaw cycles, chemical spills, heavy loads, or aging. As a result, the driveway material (whether concrete or asphalt) may crumble or break away. You may also notice "live" cracks that continue to spread or sections where the material lifts on one or both sides. A purely cosmetic procedure won't fix these issues.
If, however, you've determined that your driveway is a good candidate for a cosmetic makeover, get ready to be creative. To begin, you'll need a pressure washer (you can rent one from Home Depot), a leaf blower, a trowel, a caulk gun (like the $6 Anvil Drip-Free Caulk Gun Home Depot), and several bottles of polyurethane or epoxy sealant. The $8.47 SIKA All-Purpose Construction Sealant is a highly rated choice. For the second step, you'll need high-adhesion painter's tape, a paintbrush, a roller, and driveway paint, which costs around $20 to $70.
Cleaning the driveway and filling cracks
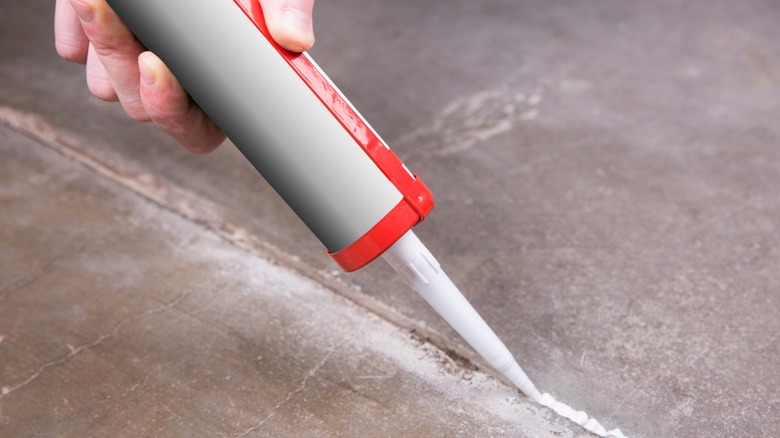
Repairing cracks in concrete and asphalt is a straightforward process, but before you get to that, you need to clean the surface. Sweep off loose debris, trim back grass and any ground cover to expose the edges, and then wash the area thoroughly with a pressure washer. To clean the surface without damaging it, you need a pressure of about 3,000 pounds per square inch (psi) — something a good electric model can deliver — and a 25-degree nozzle, which is the green one supplied with most models.
One more thing you need to do before filling a crack is to clean out any loose concrete from the edges using a leaf blower and a trowel. Then, you can fill hairline cracks — those less than ¼-inch wide – using the caulking gun and tube of crack sealant. Do note that this material will sag in wider cracks. One way to handle this is to insert a backer rod before caulking, or, for an even easier solution, use a concrete patch. It comes premixed in a bucket and can be applied with a trowel.
The goal of this part of the makeover procedure is to make the cracks as unobtrusive as possible. Color differences between the concrete and patching material won't matter after you paint the surface, but differences in level will be noticeable. Use your trowel to flatten the repairs, and if any fill material sags after it dries, fill the depression with more material and scrape it flat.
Creating a pattern and painting the driveway
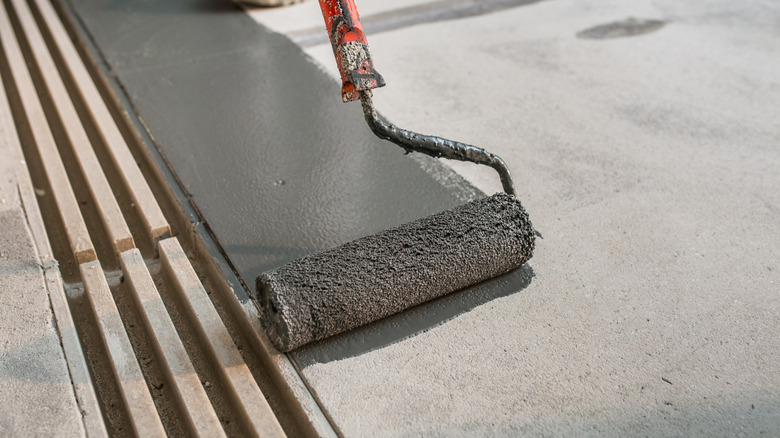
Now comes the fun part: creating a pattern and painting the driveway. Not only will you improve the appearance of the old concrete or asphalt, but you'll also give it an extra layer of protection. Of course, you have to use the right paint. A top choice is two-part epoxy, which is durable and only requires one coat, but because it hardens in the bucket (sometimes in as little as an hour after you mix the parts), applying it can be a challenge. On the other hand, one-part epoxy floor paint is easier for a DIYer to use, but it doesn't last as long and is only for concrete. Looking for types of paint to use on asphalt? Good DIY choices are water-based acrylic or latex asphalt paint.
@karlinsummer My driveway #makeover that cost less than $200! My favorite part of my home's exterior transformation, thought I'd share again 🤗✨ #diy #beforeandafter #homemakeover
While DIYer @karlinsummer opted for a grid pattern, feel free to create any geometric pattern of your choice using your paintbrush and painter's tape. You don't want the tape to lift while you're painting, so press the edges down firmly with a trowel and make sure the driveway surface is dry before you apply it.
You'll save yourself time and effort by choosing a type of paint that doesn't require primer. Epoxy covers in one coat, but for other types, you'll probably need two. Choose a warmish day with no rain in the forecast, apply the paint with a roller, and wait for the amount of time recommended on the paint container before removing the tape and walking or driving on the driveway.