Declutter And Organize Every Shoe In Your Entryway With This DIY Storage Fix
We may receive a commission on purchases made from links.
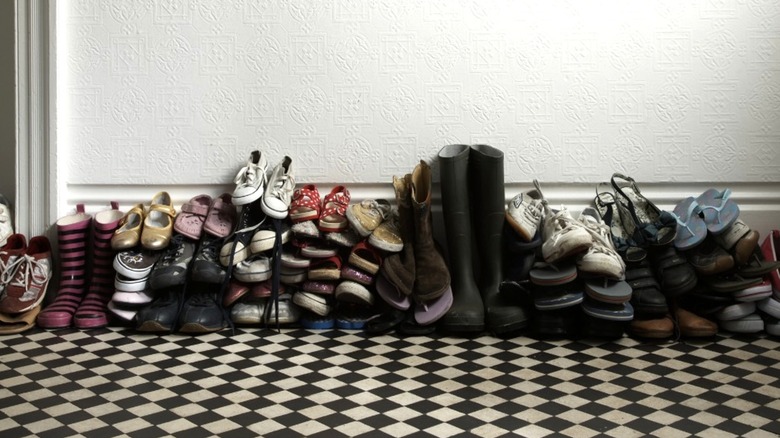
Piles of shoes by the entryway can be really bothersome, especially on snowy or rainy days when everyone has to remove their shoes before coming inside. If you've had enough of the annoyance (and you have some basic woodworking skills), solve the clutter problem with an easy project that will not only keep your shoes organized but also provide you with a place to sit while you take them on and off. Making an entryway bench with shoe storage shelves underneath, as outlined by TikTok creator @thesassybarn, doesn't have to call for expensive materials. In fact, the finished product will be more charming if you use leftover wood and spend a little extra time sanding it to a smooth finish. If you have to buy new wood, you might even consider salvaged or reclaimed wood to get an old-timey, rustic look.
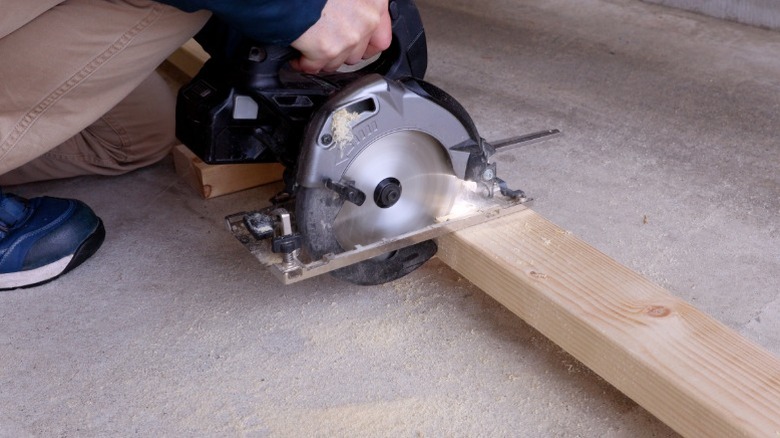
If you're into woodworking, you probably already have most of the tools you'll need for this DIY, except for one — a biscuit joiner (or plate joiner). Biscuits are football-shaped splines for connecting edge-joined boards. You'll use them to help align boards when joined lengthwise to make a bench top, and the joiner is the tool that bores the mortices for them. A low-cost option like the WEN 8.5-Amp Plate and Biscuit Joiner (retailing at $59.99) is practical for occasional builds like this, and it comes with all the biscuits you'll need for your shoe storage bench. Besides that, you'll just need a miter or circular saw to cut your boards, a sander, a drill, bar clamps, and a Kreg pocket hole jig to drive hidden screws into the legs to secure them to the bench top. Optionally, you can get wood stain or varnish to finish the entryway bench once you've completed the assembly.
Design and materials considerations for your DIY bench
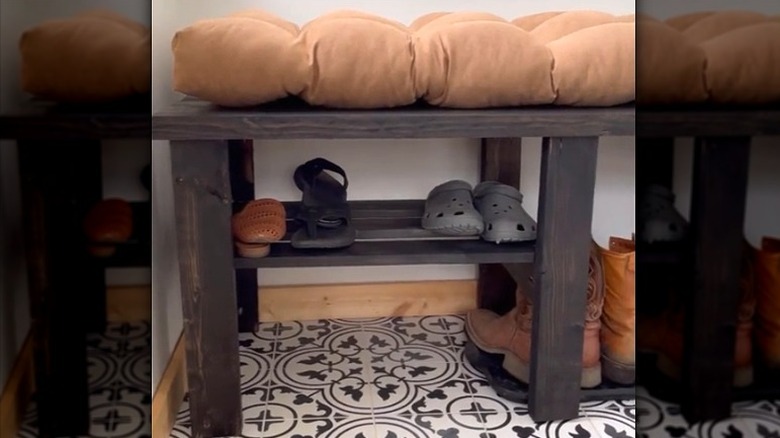
This project is a combination bench and shoe storage shelf. In the DIY from @thesassybarn, the bench top consists of two 2-by-6 planks laminated together lengthwise and is supported by four L-shaped legs made from 2-by-4 lumber. Shelves made from 1-by-4 boards sit on braces attached to the legs, but you can adjust your design around the lumber you have available.
Make the bench as long as you want, but if it's longer than about 4 to 5 feet, you may want to add two extra legs in the center (not L-shaped) for strength. This gives the opportunity to install two shelves, and they can be at different heights so you have a place to store boots as well as shoes. In terms of height, 18 to 20 inches is standard for a bench, but you can add a little extra to provide more storage space if you want.
Once you've decided on the length and height of the bench, you can cut and assemble your materials. You'll need two 2-by-6 planks cut to the same length for the bench seat and eight 2-by-4's to make four legs (10 2-by-4's for a long bench with center legs). Two 1-by-4 planks will work as leg braces and shelf supports (four for a long bench), and two more 1-by-4's will span them as shelves (four for a long bench). Measure your boards, and cut them to size using a circular saw or miter saw. Cut all the wood for the legs exactly the same length.
Putting your entryway shoe storage bench together
Join eight 2-by-4's in pairs lengthwise using wood screws to make four L-shaped legs. A clean way to connect the boards for each leg is to drill pocket holes. If you don't have a jig and are screwing a simple connection, though, a nice design touch is to countersink a hole for each screw before driving it to make the head disappear. You can then fill the hole with wood filler and sand it smooth.
@thesassybarn Shoe bench DIY in the books! And our shoes can finally not be all over the place 🤦🏼♀️ #shoeorganizer #organizing #organization #organizedhome #diy #diyproject #shoebench #home #diyprojects #easyproject
To make the bench top, laminate the 2-by-6 planks lengthwise using biscuits and wood glue. This is where you'll cut the biscuit mortices with your joiner. Space the biscuits 6 to 12 inches apart, positioning the end biscuits no less than 2 to 3 inches from the ends of the boards. After cutting the grooves, run wood glue along the joint and around the biscuits, and clamp the joined planks together tightly. When the glue has dried, fasten the legs to the bench top. Finally, screw the 1-by-4 braces to the legs to stabilize them, positioning them at the appropriate height to support the shelves and the shoes you need to store. You can add offset shelves if you attach center support legs, using extra stretchers to support shelves at different heights. Turn the bench upright, set the shelf planks on the braces, and screw them down.
You're almost done, except for sanding and finishing. After sanding the surface smooth, use a foam brush or rag to apply your stain. Wipe off the excess with another rag, and apply a brush-on clear finish with a synthetic bristle brush to seal the deal. Give the varnish 24 hours to dry before you set the bench in place and start using it to solve your entryway clutter issues.