The Property Brothers' Trick Transforms Dated Popcorn Ceilings Without Removing Them

We may receive a commission on purchases made from links.
HGTV star Jonathan Scott has faced a lot of popcorn ceilings over the years. In one 1968 home he renovated for a young couple on "Property Brothers: Forever Home," he had to budget $10,000 to remove the dated ceiling texture and all the asbestos that went along with it. During a different episode featuring a slightly newer house, he was able to cover up the bumpy texture with thin sheets of drywall. Proving that he's got plenty of ideas to cover popcorn ceilings, Scott told fans about an even more affordable (if slightly messier) technique on Facebook. Armed with some plaster and a large skimming blade, he completely covered a popcorn ceiling in a 30-year old house to give it an updated look.
Before you decide whether to try his trick or not, it helps to understand exactly what popcorn ceilings are... and why everybody hates them. Among the most common types of ceiling textures, the popcorn texture is made from a cottage cheese-like mixture of drywall compound, styrofoam, or vermiculite that's either sprayed or spackled on. Once favored by builders for being a cheap way to add sound dampening while covering up those "oops!" moments that happen during the construction process, it was commonly used between the 1960s and 1980s. Asbestos was a common ingredient until it was banned in the late 1970s, which is why Scott knew he needed to budget for abatement in that older renovation. In newer homes, it's just a nuisance. The pointy speckles catch and hold dust, and the overall look makes even nicely redecorated rooms show their age.
How to cover a popcorn ceiling with plaster
Disturbing popcorn ceilings that contain asbestos can be extremely hazardous to your health, so it makes good sense to either hire an abatement professional or cover them up. Removal can be too expensive for many of us. According to Angi, it costs $2,238 on average but as Jonathan Scott explained during the episode of "Property Brothers" with the 1968 home, the cost can also run much higher. Although it's a slightly cheaper option, having drywall installed over a popcorn ceiling can also be prohibitively expensive.
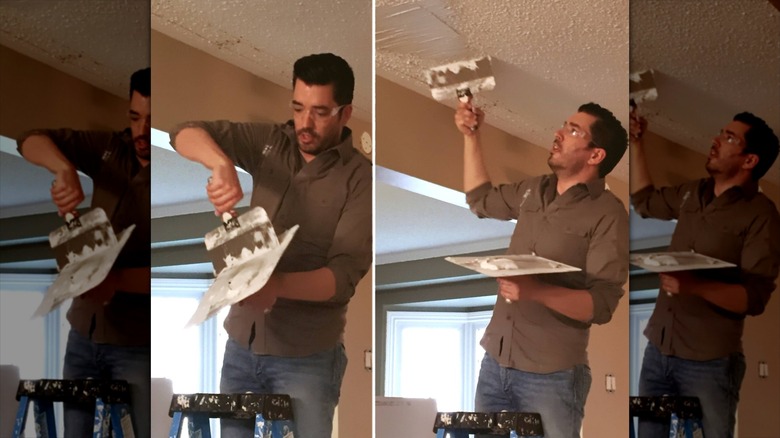
That's where Scott's simple DIY solution for covering popcorn ceilings really shines. The trickiest part is being comfortable working overhead while standing on a ladder. You'll use a technique called skim coating. Start by covering your floors and furniture with plastic, removing any light fixtures, and taping off around the edge of your ceiling. Use a large tool like the LEVEL5 12-inch Soft Grip Stainless Steel Drywall Taping Knife to smooth plaster across the ceiling. Although it isn't as hard or durable as plaster, you could also substitute a product like USG Sheetrock Brand Ready Mixed Joint Compound mixed with a little water to make it easier to apply.
The heavier your popcorn ceiling, the thicker your skim coat needs to be. To avoid ridges that will need to be sanded down once they've dried, use long continuous strokes with your taping knife to smooth out the plaster. You may need to do multiple coats to achieve a smooth finish. Work in small sections, breaking if necessary. Once your plaster has fully dried and you're satisfied with the coverage, finish with a coat of paint.