DIYer Reveals How They Gave Their Kitchen A Sleek Built-In Transformation On A Budget
When DIY influencer @morganzuhmakes (on Instagram, TikTok, and YouTube) decided to upgrade her builder-grade kitchen, it was always going to be a challenge. Kitchen renovations can be difficult, and cabinets are rarely cheap. But what @morganzuhmakes was going for was a custom, built-in look — nobody's idea of how to save money on a remodel. But she pulled it off using off-the-shelf stock cabinets, simple but solid cabinetry skills, and some smart built-in carpentry tricks.
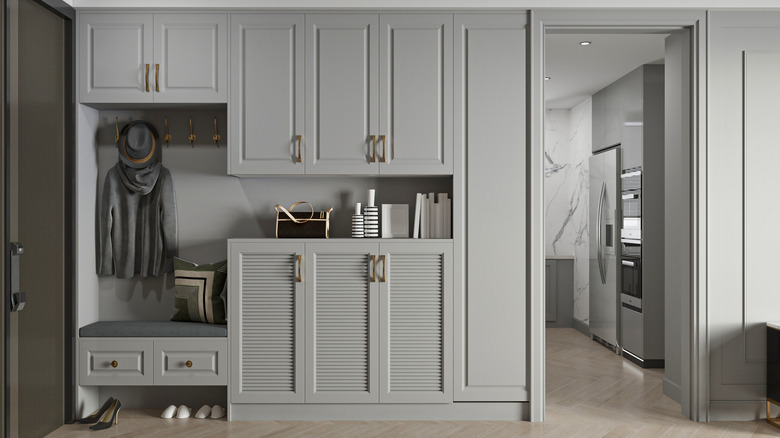
Her goal was to elevate her kitchen and add storage. The basic project corrects an awkward original arrangement of her home's kitchen cabinets by installing new cabinets around her refrigerator and on the wall behind her stove. She also built open "cubbies" on top of the stock cabinets in both areas to tie them together and take them all the way to the ceiling. Along the way, she also gave her island a facelift "from beat-up to beautiful," as she says on Instagram, added a backsplash, and painted everything. @morganzuhmakes got a quote for over $1,000 for installing a single cabinet, so she decided to have a go at DIYing the entire job, which she did for mere hundreds of dollars.
Most fitted kitchen cabinets are built-in in the sense that they're conformed to a space and "permanently" affixed to walls or other cabinets. While there's no official definition, most people use the term "built-in" to signify cabinets and shelving that are integrated with the room by being wrapped with baseboard and crown molding — combined seamlessly with room elements like windows — and typically span wall-to-wall, floor-to-ceiling, or both.
How to make custom, built-in, and store-bought all work together
You might assume that anything "built-in" was assembled in place, and that's mostly what @morganzuhmakes did with her kitchen reno. It is possible with a bit more planning to build cabinets in a workshop and then integrate them into a room. In both cases, the key is to make all of your cabinets' face frame and trim match the prefab part of cabinets as well as what's already used in the room.
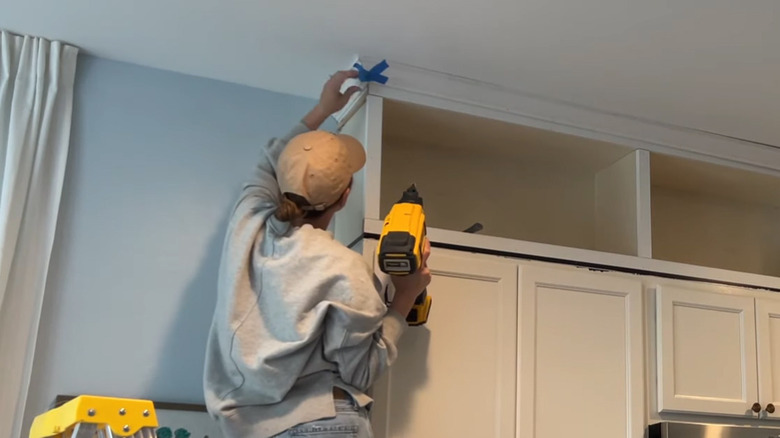
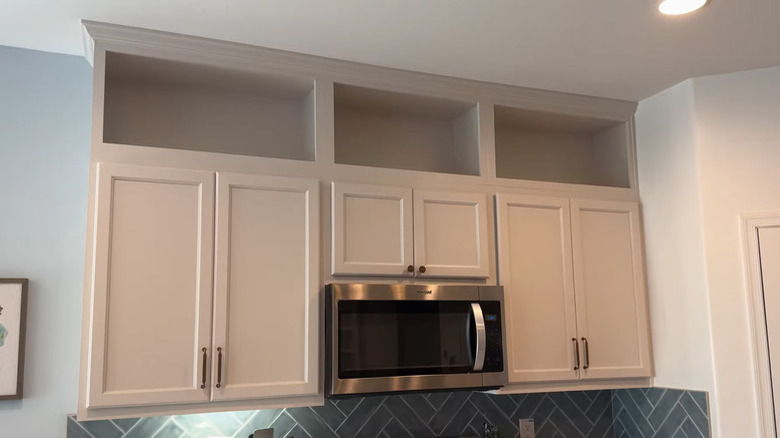
But first you need the structure. Around her stove, that was provided by the original cabinets, but surrounding the refrigerator, she replaced the existing cabinets with stock kitchen cabinets, which are reasonably easy to install. Then she built custom cabinet carcasses the same width as the cabinets beneath them in order to fill the gap between the cabinets and the ceiling ... a time-honored method for getting rid of that awful space above cabinets. The custom boxes were built with ¾-inch sanded plywood and were assembled with pocket screws to minimize the visibility of fasteners in the open cabinets.
A built-in look requires concealing gaps and joints with the face frame of the new cabinets. @morganzuhmakes used pre-primed 1x2s and crown molding to integrate the custom cabinets with the pre-fab ones and make everything look like a single unit (per YouTube). She completed the built-in look by concealing cracks at the edges with very small strips of trim. She added beadboard to the exposed side of a tall pantry cabinet and rechargeable puck lights to the open cabinets.
Tips for getting a built-in look with off-the-shelf cabinets
The craft of installing both stock and custom cabinets so that they look like built-ins comes from the ability to manipulate the face frame, trim, hidden nailers, and bits of gap-filling material so that all the edges look seamless. A few straightforward tricks of the trade will get you most of the way there, and it starts with planning and (much to @morganzuhmakes' dismay) a bit of math and an afternoon of breaking down plywood and trim to the exact dimensions you need. Note the positions of outlets, since by code they must remain accessible even if they're not used. Use an oscillating saw to remove baseboards and crown molding where your new cabinets will be flush against the wall.
Your cabinets' face frame is the next frontier in your quest to turn store-bought cabinets into built-ins. Always keep the face frame on the same plane ... that is, when viewed in cross-section, all the face frame components should line up. Stock cabinets' face frames are usually flush to the carcass, but it's often useful to overhang the face frame on sides where you need to conceal a gap. A face frame's overhang can usually be trimmed with a circular saw. For more complex situations, like extremely irregular walls, you might need to scribe the frame to the wall and cut with a jigsaw. Bevel face frame and trim cuts so just the front edge contacts the wall; this should eliminate most gaps between frame and wall by giving you a sharp edge that works regardless of any oddball angles in the cabinetry or walls.